Linux, Unix, and whatever they call that world these days

Testing Native ZFS Encryption Speed

[2020-11-02: There is a newer version of this post]

As I wrote about installing ZFS with the native encryption on the Ubuntu 20.04, it got me thinking… Should I abandon my LUKS-setup and switch? Well, I guess some performance testing was in order.

For this purpose I decided to go with the Ubuntu Server (to minimize impact desktop environment might have) inside of the 2 CPU Virtual Machine with 24 GB of RAM. Two CPUs should be enough to show any multithreading performance difference while 24 GB of RAM is there to give home to our ZFS disks. I didn’t want to depend on disk speed and variation it gives. For the testing purpose I only care about the relative speed difference and using the RAM instead of the real disks would give more repeatable results.

For OS I used Ubuntu Server with ZFS packages, carved a chunk of memory for RAM disks, and limited ZFS ARC to 1G.

sudo -i << EOF
    apt update
    apt dist-upgrade -y
    apt install -y zfsutils-linux
    grep "/ramdisk" /etc/fstab || echo "tmpfs  /ramdisk  tmpfs  rw,size=20G  0  0" \
        | sudo tee -a /etc/fstab
    grep "zfs_arc_max" /etc/modprobe.d/zfs.conf || echo "options zfs zfs_arc_max=1073741824" \
        | sudo tee /etc/modprobe.d/zfs.conf
    reboot
EOF

With the system in pristine state, I created data used for testing (random 2 GiB).

dd if=/dev/urandom of=/ramdisk/data.bin bs=1M count=2048

Data disks are just bunch of zeros (3 GB each) and the (RAID-Z2) ZFS pool has the usual stuff but with compression turned off and sync set to always in order to minimize their impact on the results.

for I in {1..6}; do dd if=/dev/zero of=/ramdisk/disk$I.bin bs=1MB count=3000; done
echo "12345678" | zpool create -o ashift=12 -O normalization=formD \
    -O acltype=posixacl -O xattr=sa -O dnodesize=auto -O atime=off \
    -O encryption=^^aes-256-gcm^^ -O keylocation=prompt -O keyformat=passphrase \
    -O compression=off -O sync=always -O mountpoint=/zfs TestPool raidz2 \
    /ramdisk/disk1.bin /ramdisk/disk2.bin /ramdisk/disk3.bin \
    /ramdisk/disk4.bin /ramdisk/disk5.bin /ramdisk/disk6.bin

To get write speed, I simply copied the data file multiple times and took the time reported by dd. To get a single figure, I removed the highest and the lowest value averaging the rest.

sudo -i << EOF
    sudo dd if=/ramdisk/data.bin of=/zfs/data1.bin bs=1M
    sudo dd if=/ramdisk/data.bin of=/zfs/data2.bin bs=1M
    sudo dd if=/ramdisk/data.bin of=/zfs/data3.bin bs=1M
    sudo dd if=/ramdisk/data.bin of=/zfs/data4.bin bs=1M
    sudo dd if=/ramdisk/data.bin of=/zfs/data5.bin bs=1M
EOF

For reads I took the file that was written and dumped it to /dev/null. Averaging procedure was the same as for writes.

sudo -i << EOF
    sudo dd if=/zfs/data1.bin of=/dev/null bs=1M
    sudo dd if=/zfs/data2.bin of=/dev/null bs=1M
    sudo dd if=/zfs/data3.bin of=/dev/null bs=1M
    sudo dd if=/zfs/data4.bin of=/dev/null bs=1M
    sudo dd if=/zfs/data5.bin of=/dev/null bs=1M
EOF

Illustration

With all that completed, I had my results.

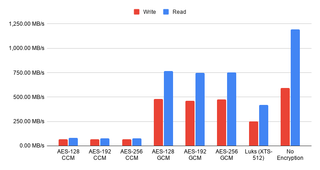
I was quite surprised how close a different bit sizes were in the performance. If your processor supports AES instruction set, there is no reason not to go with 256 bits. Only when you have an older processor without the encryption support does the 128-bit crypto make sense. There was a 15% difference when it comes to the read speeds in the favor of the GCM mode so I would probably go with that as my cipher of choice.

However, once I added measurements without the encryption and for the LUKS-based crypto I was shocked. I expected thing to go faster without the encryption but I didn’t expect such a huge difference. Also surprising was seeing the LUKS encryption to have triple the performance of the native one.

Illustration

Now, this test is not completely fair. In the real life, with a more powerful machine, and on the proper disks you won’t see such a huge difference. The sync=always setting is a performance killer and results in more encryption calls than you would normally see. However, you will still see some difference and good old LUKS seems like the winner here. It’s faster out of box, it will use less CPU, and it will encrypt all the data (not leaving metadata in the plain as ZFS does).

I will also admit that comparison leans toward apples-to-oranges kind. Reason to use ZFS’ native encryption is not due to its performance but due to the extra benefits it brings. Part of those extra cycles go into the authentication of each written block using a strong MAC. Leaving metadata unencrypted does leak a bit of (meta)data but it also enables send/receive without either side even being decrypted - just ideal for a backup box in the untrusted environment. You can backup the data without ever needing to enter password on the remote side. Lastly let’s not forget allowing ZFS direct access to the physical drives allows it to shine when it comes to the fault detection and handling of the same. You will not get anything similar if you are interfacing over the virtual device.

Personally, I will continue using the LUKS-based full disk encryption for my desktop machines. It’s just much faster. And I probably won’t touch my servers for now either. But I have a feeling that really soon I might give native ZFS encryption a spin.

[2020-11-01: Newer updates of 0.8.3 (0.8.3-1ubuntu12.4) have greatly improved GCM speed. With those optimizations GCM mode is now faster than Luks. For more details check 20.10 post.]


PS: You can take a peek at the raw data if you’re so inclined.

Installing UEFI ZFS Root on Ubuntu 20.04 (with Native Encryption)

There is a newer version of this guide for Ubuntu 21.10.


Technically, I already have a guide for encrypted ZFS setup on Ubuntu 20.04. However, that guide used Geli and, as correctly one reader noted in comments (thanks Alex!), there was no reason not to use ZFS’ native encryption. So, here is adjusted variant of my setup.

First of all, Ubuntu 20.04 has a ZFS setup option as of 19.10. You should use it instead of the manual installation procedure unless you need something special. Namely, manual installation allows for encryption, in addition to the custom pool layout and naming. You should also check the great Root on ZFS installation guide that’s part of ZFS-on-Linux project for a full picture. I find its final ZFS layout a bit too complicated for my taste but there is a lot of interesting tidbits on that page. Here is my somewhat simplified version of the same, intended for a singe disk installation.

After booting into Ubuntu desktop installation we want to get a root prompt. All further commands are going to need root credentials anyhow.

sudo -i

The very first step should be setting up a few variables - disk, pool, host name, and user name. This way we can use them going forward and avoid accidental mistakes. Just make sure to replace these values with ones appropriate for your system.

DISK=/dev/disk/by-id/^^ata_disk^^
POOL=^^ubuntu^^
HOST=^^desktop^^
USER=^^user^^

General idea of my disk setup is to maximize amount of space available for pool with the minimum of supporting partitions. If you are planning to have multiple kernels, increasing boot partition size might be a good idea.

blkdiscard $DISK

sgdisk --zap-all                        $DISK

sgdisk -n1:1M:+127M -t1:EF00 -c1:EFI    $DISK
sgdisk -n2:0:+512M  -t2:8300 -c2:Boot   $DISK
sgdisk -n3:0:0      -t3:8309 -c3:Ubuntu $DISK

sgdisk --print                          $DISK

Finally we’re ready to create system ZFS pool. Note that you need to encrypt it at the moment it’s created.

zpool create -o ashift=12 -o autotrim=on \
    -O compression=lz4 -O normalization=formD \
    -O acltype=posixacl -O xattr=sa -O dnodesize=auto -O atime=off \
    -O encryption=aes-256-gcm -O keylocation=prompt -O keyformat=passphrase \
    -O canmount=off -O mountpoint=none -R /mnt/install $POOL $DISK-part3

On top of this encrypted pool, we can create our root dataset.

zfs create -o canmount=noauto -o mountpoint=/ $POOL/root
zfs mount $POOL/root

Assuming UEFI boot, two additional partitions are needed. One for EFI and one for booting. Unlike what you get with the official guide, here I don’t have ZFS pool for boot partition but a plain old ext4. I find potential fixup works better that way and there is a better boot compatibility. If you are thinking about mirroring, making it bigger and ZFS might be a good idea. For a single disk, ext4 will do.

yes | mkfs.ext4 $DISK-part2
mkdir /mnt/install/boot
mount $DISK-part2 /mnt/install/boot/

mkfs.msdos -F 32 -n EFI $DISK-part1
mkdir /mnt/install/boot/efi
mount $DISK-part1 /mnt/install/boot/efi

To start the fun we need debootstrap package.

apt install --yes debootstrap

Bootstrapping Ubuntu on the newly created pool is next. This will take a while.

debootstrap focal /mnt/install/

zfs set devices=off $POOL

Our newly copied system is lacking a few files and we should make sure they exist before proceeding.

echo $HOST > /mnt/install/etc/hostname
sed "s/ubuntu/$HOST/" /etc/hosts > /mnt/install/etc/hosts
sed '/cdrom/d' /etc/apt/sources.list > /mnt/install/etc/apt/sources.list
cp /etc/netplan/*.yaml /mnt/install/etc/netplan/

If you are installing via WiFi, you might as well copy your wireless credentials. Don’t worry if this returns errors - that just means you are not using wireless.

mkdir -p /mnt/install/etc/NetworkManager/system-connections/
cp /etc/NetworkManager/system-connections/* /mnt/install/etc/NetworkManager/system-connections/

Finally we’re ready to “chroot” into our new system.

mount --rbind /dev  /mnt/install/dev
mount --rbind /proc /mnt/install/proc
mount --rbind /sys  /mnt/install/sys
chroot /mnt/install \
    /usr/bin/env DISK=$DISK POOL=$POOL USER=$USER \
    bash --login

Let’s not forget to setup locale and time zone.

locale-gen --purge "en_US.UTF-8"
update-locale LANG=en_US.UTF-8 LANGUAGE=en_US
dpkg-reconfigure --frontend noninteractive locales

dpkg-reconfigure tzdata

Now we’re ready to onboard the latest Linux image.

apt update
apt install --yes --no-install-recommends linux-image-generic linux-headers-generic

Followed by boot environment packages.

apt install --yes zfs-initramfs grub-efi-amd64-signed shim-signed tasksel

To mount boot and EFI partition, we need to do some fstab setup.

echo "PARTUUID=$(blkid -s PARTUUID -o value $DISK-part2) \
    /boot ext4 noatime,nofail,x-systemd.device-timeout=5s 0 1" >> /etc/fstab
echo "PARTUUID=$(blkid -s PARTUUID -o value $DISK-part1) \
    /boot/efi vfat noatime,nofail,x-systemd.device-timeout=5s 0 1" >> /etc/fstab
cat /etc/fstab

Now we get grub started and update our boot environment.

KERNEL=`ls /usr/lib/modules/ | cut -d/ -f1 | sed 's/linux-image-//'`
update-initramfs -u -k $KERNEL

Grub update is what makes EFI tick.

update-grub
grub-install --target=x86_64-efi --efi-directory=/boot/efi --bootloader-id=Ubuntu \
    --recheck --no-floppy

Finally we install out GUI environment. I personally like ubuntu-desktop-minimal but you can opt for ubuntu-desktop. In any case, it’ll take a considerable amount of time.

tasksel install ubuntu-desktop-minimal

Short package upgrade will not hurt.

apt dist-upgrade --yes

We can omit creation of the swap dataset but I personally find a small one handy.

zfs create -V 4G -b $(getconf PAGESIZE) -o compression=off -o logbias=throughput \
    -o sync=always -o primarycache=metadata -o secondarycache=none $POOL/swap
mkswap -f /dev/zvol/$POOL/swap
echo "/dev/zvol/$POOL/swap none swap defaults 0 0" >> /etc/fstab
echo RESUME=none > /etc/initramfs-tools/conf.d/resume

If one is so inclined, /home directory can get a separate dataset too.

rmdir /home
zfs create -o mountpoint=/home $POOL/home

The only remaining task before restart is to create the user, assign a few extra groups to it, and make sure its home has correct owner.

adduser --disabled-password --gecos '' $USER
usermod -a -G adm,cdrom,dip,lpadmin,plugdev,sudo $USER
passwd $USER

As install is ready, we can exit our chroot environment.

exit

And cleanup our mount points.

umount /mnt/install/boot/efi
umount /mnt/install/boot
mount | grep -v zfs | tac | awk '/\/mnt/ {print $3}' | xargs -i{} umount -lf {}
zpool export -a

After the reboot you should be able to enjoy your installation.

reboot

PS: There are versions of this guide using the native ZFS encryption for other Ubuntu versions: 22.04 and 20.04

PPS: For LUKS-based ZFS setup, check the following posts: 20.04, 19.10, 19.04, and 18.10.

[2020-06-27: Added blkdiscard and autotrim.]

Noisy Microphone on Lenovo P70 Under Linux

I use Lenovo P70 as my Ubuntu workstation and most of the time I am reasonably ok with it. However, join a call and my microphone is either too low or there is way too much background noise. And that’s whether I use internal microphone or headset.

I tried playing with the slider but that’s annoying beyond belief. Sweet spot seems to be in bottom fifth but there is a really fine line between making background noise stop and my voice inaudible. Since there is no numerical value next to slider, eyeing out the perfect level is close to impossible.

As it often happens in Linux, solution comes courtesy of command line.

amixer set Capture 80%

I found that 80% level is where background noise becomes drastically less noticeable while still allowing my voice to come through.


PS: Interestingly, 100% level from command line puts slider at 1/5th of the sale. That means that (over)amplification can get up to 500%. A bit much…

Moving Mercurial Repository from BitBucket to GitHub

I already wrote once about moving from Mercurial to Git. That was way back in 2015 when I moved most of my repositories. However, I didn’t move all. Quite a few old electronics projects remained on BitBucket, my Mercurial home of choice. With BitBucket removing Mercurial starting June 1st, it was time to move remainder.

First you will need Ubuntu Linux with a few tools.

sudo apt install --yes git mercurial wget

mkdir ~/bin
wget https://raw.github.com/felipec/git-remote-hg/master/git-remote-hg -O ~/bin/git-remote-hg
chmod +x ~/bin/git-remote-hg

Here the git-remote will do most of the heavy lifting as it will enable cloning of Mercurial repository (if it fails, try adding --config format.sparse-revlog=0 option):

git clone hg::ssh://hg@bitbucket.org/^^user^^/^^project^^

With repository now in Git format, we can treat it as any other repository and push it to our server. In the case of GitHub, that would look something like this:

git remote rm origin
git remote add origin git@github.com:^^user^^/^^project^^.git
git push --all

That’s all. Rinse and repeat until there is no Mercurial repo left.

PS: Considering how great Mercurial is for beginners, I am sad to see it’s primary online home gone. There are other places allowing hosting of Mercurial repositories but BitBucket was among first and it actually worked remarkably well.

PPS: Yes, this works for local repositories too.

Installing UEFI ZFS Root on Ubuntu 20.04

There is a newer version of this guide for Ubuntu 20.04, but with native ZFS encryption.


Ubuntu 20.04 has a ZFS setup option as of 19.10. And frankly, you should use it instead of the manual installation procedure. However, manual installation does offer it’s advantages - especially when it comes to pool layout and naming. If manual installation is needed, there is a great Root on ZFS installation guide that’s part of ZFS-on-Linux project but its final ZFS layout is a bit too complicated for my taste. Here is my somewhat simplified version of the same, intended for a singe disk installations.

After booting into Ubuntu desktop installation we want to get a root prompt. All further commands are going to need root credentials anyhow.

sudo -i

The very first step should be setting up a few variables - disk, pool, host name, and user name. This way we can use them going forward and avoid accidental mistakes. Just make sure to replace these values with ones appropriate for your system.

DISK=/dev/disk/by-id/^^ata_disk^^
POOL=^^Ubuntu^^
HOST=^^desktop^^
USER=^^user^^

General idea of my disk setup is to maximize amount of space available for pool with the minimum of supporting partitions. If you are planning to have multiple kernels, increasing boot partition size might be a good idea.

blkdiscard $DISK

sgdisk --zap-all                        $DISK

sgdisk -n1:1M:+127M -t1:EF00 -c1:EFI    $DISK
sgdisk -n2:0:+512M  -t2:8300 -c2:Boot   $DISK
sgdisk -n3:0:0      -t3:8309 -c3:Ubuntu $DISK

sgdisk --print                          $DISK

Unless there is a major reason otherwise, I like to use disk encryption.

cryptsetup luksFormat -q --cipher aes-xts-plain64 --key-size 512 \
    --pbkdf pbkdf2 --hash sha256 $DISK-part3

I like to use disk name as the name of mapped (encrypted) luks device when I open it, but really anything goes.

LUKSNAME=<code>basename $DISK</code>
cryptsetup luksOpen $DISK-part3 $LUKSNAME

Finally we’re ready to create system ZFS pool.

zpool create -o ashift=12 -o autotrim=on \
    -O compression=lz4 -O normalization=formD \
    -O acltype=posixacl -O xattr=sa -O dnodesize=auto -O atime=off \
    -O canmount=off -O mountpoint=none -R /mnt/install $POOL /dev/mapper/$LUKSNAME
zfs create -o canmount=noauto -o mountpoint=/ $POOL/root
zfs mount $POOL/root

Assuming UEFI boot, two additional partitions are needed. One for EFI and one for booting. Unlike what you get with the official guide, here I don’t have ZFS pool for boot partition but a plain old ext4. I find potential fixup works better that way and there is a better boot compatibility. If you are thinking about mirroring, making it bigger and ZFS might be a good idea. For a single disk, ext4 will do.

yes | mkfs.ext4 $DISK-part2
mkdir /mnt/install/boot
mount $DISK-part2 /mnt/install/boot/

mkfs.msdos -F 32 -n EFI $DISK-part1
mkdir /mnt/install/boot/efi
mount $DISK-part1 /mnt/install/boot/efi

To start the fun we need debootstrap package.

apt install --yes debootstrap

Bootstrapping Ubuntu on the newly created pool is next. This will take a while.

debootstrap focal /mnt/install/

zfs set devices=off $POOL

Our newly copied system is lacking a few files and we should make sure they exist before proceeding.

echo $HOST > /mnt/install/etc/hostname
sed "s/ubuntu/$HOST/" /etc/hosts > /mnt/install/etc/hosts
sed '/cdrom/d' /etc/apt/sources.list > /mnt/install/etc/apt/sources.list
cp /etc/netplan/*.yaml /mnt/install/etc/netplan/

If you are installing via WiFi, you might as well copy your wireless credentials:

mkdir -p /mnt/install/etc/NetworkManager/system-connections/
cp /etc/NetworkManager/system-connections/* /mnt/install/etc/NetworkManager/system-connections/

Finally we’re ready to “chroot” into our new system.

mount --rbind /dev  /mnt/install/dev
mount --rbind /proc /mnt/install/proc
mount --rbind /sys  /mnt/install/sys
chroot /mnt/install \
    /usr/bin/env DISK=$DISK POOL=$POOL USER=$USER LUKSNAME=$LUKSNAME \
    bash --login

Let’s not forget to setup locale and time zone.

locale-gen --purge "en_US.UTF-8"
update-locale LANG=en_US.UTF-8 LANGUAGE=en_US
dpkg-reconfigure --frontend noninteractive locales

dpkg-reconfigure tzdata

Now we’re ready to onboard the latest Linux image.

apt update
apt install --yes --no-install-recommends linux-image-generic linux-headers-generic

Followed by boot environment packages.

apt install --yes zfs-initramfs cryptsetup keyutils grub-efi-amd64-signed shim-signed tasksel

Since we’re dealing with encrypted data, we should auto mount it via crypttab. If there are multiple encrypted drives or partitions, keyscript really comes in handy to open them all with the same password. As it doesn’t have negative consequences, I just add it even for a single disk setup.

echo "$LUKSNAME UUID=$(blkid -s UUID -o value $DISK-part3) none \
    luks,discard,initramfs,keyscript=decrypt_keyctl" >> /etc/crypttab
cat /etc/crypttab

To mount boot and EFI partition, we need to do some fstab setup too:

echo "PARTUUID=$(blkid -s PARTUUID -o value $DISK-part2) \
    /boot ext4 noatime,nofail,x-systemd.device-timeout=5s 0 1" >> /etc/fstab
echo "PARTUUID=$(blkid -s PARTUUID -o value $DISK-part1) \
    /boot/efi vfat noatime,nofail,x-systemd.device-timeout=5s 0 1" >> /etc/fstab
cat /etc/fstab

Now we get grub started and update our boot environment.

KERNEL=<code>ls /usr/lib/modules/ | cut -d/ -f1 | sed &#039;s/linux-image-//&#039;</code>
update-initramfs -u -k $KERNEL

Grub update is what makes EFI tick.

update-grub
grub-install --target=x86_64-efi --efi-directory=/boot/efi --bootloader-id=Ubuntu \
    --recheck --no-floppy

Finally we install out GUI environment. I personally like ubuntu-desktop-minimal but you can opt for ubuntu-desktop. In any case, it’ll take a considerable amount of time.

tasksel install ubuntu-desktop-minimal

Short package upgrade will not hurt.

apt dist-upgrade --yes

We can omit creation of the swap dataset but I personally find a small one handy.

zfs create -V 4G -b $(getconf PAGESIZE) -o compression=off -o logbias=throughput \
    -o sync=always -o primarycache=metadata -o secondarycache=none $POOL/swap
mkswap -f /dev/zvol/$POOL/swap
echo "/dev/zvol/$POOL/swap none swap defaults 0 0" >> /etc/fstab
echo RESUME=none > /etc/initramfs-tools/conf.d/resume

If one is so inclined, /home directory can get a separate dataset too.

rmdir /home
zfs create -o mountpoint=/home $POOL/home

The only remaining task before restart is to create the user, assign a few extra groups to it, and make sure its home has correct owner.

sudo adduser --disabled-password --gecos '' $USER
usermod -a -G adm,cdrom,dip,lpadmin,plugdev,sudo $USER
passwd $USER

As install is ready, we can exit our chroot environment.

exit

And cleanup our mount points.

umount /mnt/install/boot/efi
umount /mnt/install/boot
mount | grep -v zfs | tac | awk '/\/mnt/ {print $3}' | xargs -i{} umount -lf {}
zpool export -a

After the reboot you should be able to enjoy your installation.

reboot

PS: There are versions of this guide using the native ZFS encryption for other Ubuntu versions: 21.10 and 20.04

PPS: For LUKS-based ZFS setup, check the following posts: 22.10, 19.10, 19.04, and 18.10.

[2020-05-18: Changed boot partition size to 512M (was 384M). Reason is ever increasing size of kernel making it difficult to do future upgrades without going through cleanups if you use multiple kernels.]

[2020-06-27: Added blkdiscard and autotrim.]

Disabling USB Auto-Suspend on Ubuntu

These days Linux supports a lot of devices. However, occasionally you will find a device that works but only for a while, requiring a reboot to work again. This is often due to the device itself not behaving according to the USB standard, and that’s more often than not caused by misbehaving USB suspend.

The proper way of fixing this would be either a workaround in the driver or, God forbid, a fix in the device’s firmware. But quite often nobody does anything, so what’s left is to do the improper. And the easiest improper fix is to disable USB autosuspend.

For the command line, just add usbcore.autosuspend=-1 to GRUB_CMDLINE_LINUX_DEFAULT:

sudo sed -i 's/GRUB_CMDLINE_LINUX_DEFAULT="[a-z ]*/& usbcore.autosuspend=-1/' \
    /etc/default/grub

sudo update-grub2

reboot

Once the system is up, you can check that the value is indeed -1 (disabled).

cat /sys/module/usbcore/parameters/autosuspend

Increasing and Decreasing Surface Go Backlight on LXQt

Illustration

One annoying absence from LXQt is lack of keyboard support for backlight adjustment. Yes, you can adjust backlight from settings but doing so just via keyboard is not possible. Well actually it is, if you are willing to adjust system a bit.

The first order of business is installing Backlight Tracer. As of 0.1.1 this utility has ability of increasing/decreasing backlight via command line. Why would you need this? Well, this is so you can go to Preferences, LXQt settings, Shortcut Keys. There just add two new shortcuts: XF86MnBrightnessDown executing /usr/bin/backlight-decrease command. And a similar XF86MnBrightnessUp executing /usr/bin/backlight-increase.

Now you can use your laptop keyboard to control backlight.

Determine Client WiFi Channel on Linux

If you have network with the same name on both 2.4 and 5 GHz it might not be obvious which network you are connected too. Well, on Linux, it’s easy enough - use iwlist utility.

If you run it with frequency as an argument you’ll get list of all supported channels followed by currently used channel.

iwlist frequency
 wlp4s0    32 channels in total; available frequencies :
           Channel 01 : 2.412 GHz
           Channel 02 : 2.417 GHz
           Channel 03 : 2.422 GHz
           Channel 04 : 2.427 GHz
           Channel 05 : 2.432 GHz
           Channel 06 : 2.437 GHz
           Channel 07 : 2.442 GHz
           Channel 08 : 2.447 GHz
           Channel 09 : 2.452 GHz
           Channel 10 : 2.457 GHz
           Channel 11 : 2.462 GHz
           Channel 12 : 2.467 GHz
           Channel 13 : 2.472 GHz
           Channel 36 : 5.18 GHz
           Channel 40 : 5.2 GHz
           Channel 44 : 5.22 GHz
           Channel 48 : 5.24 GHz
           Channel 52 : 5.26 GHz
           Channel 56 : 5.28 GHz
           Channel 60 : 5.3 GHz
           Channel 64 : 5.32 GHz
           Channel 100 : 5.5 GHz
           Channel 104 : 5.52 GHz
           Channel 108 : 5.54 GHz
           Channel 112 : 5.56 GHz
           Channel 116 : 5.58 GHz
           Channel 120 : 5.6 GHz
           Channel 124 : 5.62 GHz
           Channel 128 : 5.64 GHz
           Channel 132 : 5.66 GHz
           Channel 136 : 5.68 GHz
           Channel 140 : 5.7 GHz
         ^^Current Frequency=2.462 GHz (Channel 11)^^

LXQt High DPI Settings For Surface Go

Ubuntu Unity on the Surface Go is not the lightest environment out there. And on device with low memory (mine has only 4 GB) there is a definite need for something lighter. Based on my research, there are three comfortable alternatives: Xfce, LXDE, and LXQt. After a bit of testing, I decided to go with LXQt.

Installing LXQt into existing ubuntu is as easy as installing its package and selecting it on next login:

sudo apt install lxqt

What greets you are really small window elements and almost impossible to read interface. LXQt does not detect high-DPI environment and thus 1800x1200 Surface Go has to offer is used as if screen was 24" and not mere 10" in size.

Fortunately, there is a forum with high DPI advice. Unfortunately, a lot of those advices are not really applicable when it comes to Ubuntu 19.10. To spare you a lot of research, here is what worked for me.

Illustration

The first argument you will want to adjust is QT_AUTO_SCREEN_SCALE_FACTOR=2. Forum advice is to adjust QT_SCALE_FACTOR=2 but I found this to be counter productive as properly written Qt applications will have their size quadrupled. Yes, you can use QT_SCALE_FACTOR=2 combined with QT_AUTO_SCREEN_SCALE_FACTOR=0 but that still leaves you with increased toolbar icons in high-DPI aware applications. So, for my use case, just setting QT_AUTO_SCREEN_SCALE_FACTOR=2 worked the best.

Small cursor is also a problem but there is an easy way to correct this. Most often I found setting XCURSOR_SIZE=32 mentioned but I personally like to go with XCURSOR_SIZE=48.

That said, where do you set them? Just go to Preferences, LXQt settings, Session Settings, Environment (Advanced) and add those two environment variables.

Those two changes will make your Qt applications look bigger but non-Qt applications like Chrome will still look way too tiny. For those you need to set Xft.dpi in ~/.Xresources.

echo "Xft.dpi: 192" > ~/.Xresources

With these three changes I find windows once again reasonably sized on my Surface Go.

Surface Go Touch Screen Not Working in Ubuntu 19.10

Those using Ubuntu 19.10 might have noticed this suddenly stopped working. And this can be directly correlated with the latest kernel update.

If you dwelve into details, you can see the following with kernel 5.3.0-40 (previous, working version):

uname -a
 Linux 5.3.0-40-generic #32-Ubuntu SMP Fri Jan 31 20:24:34 UTC 2020 x86_64 x86_64 x86_64 GNU/Linux``

sudo journalctl -b | grep multitouch
 hid-multitouch 0018:04F3:261A.0001: input,hidraw0: I2C HID v1.00 Device [ELAN9038:00 04F3:261A] on i2c-ELAN9038:00
 hid-multitouch 0003:045E:096F.0005: input,hiddev2,hidraw4: USB HID v1.11 Mouse [Microsoft Surface Type Cover] on usb-0000:00:14.0-7/input3

If you check it under latest kernel 5.3.0-42, you’ll see a bit of an issue:

uname -a
 Linux 5.3.0-42-generic #34-Ubuntu SMP Fri Feb 28 05:49:40 UTC 2020 x86_64 x86_64 x86_64 GNU/Linux

sudo journalctl -b | grep multitouch
 hid-multitouch 0018:04F3:261A.0001: report is too long
 hid-multitouch 0018:04F3:261A.0001: item 0 1 0 8 parsing failed
 hid-multitouch: probe of 0018:04F3:261A.0001 ^^failed with error -22^^
 hid-multitouch 0003:045E:096F.0005: input,hiddev2,hidraw3: USB HID v1.11 Mouse [Microsoft Surface Type Cover] on usb-0000:00:14.0-7/input3

If you browse kernel team Bugzilla, you’ll find there is already a bug report for this issue and issue has already been merged to kernels 5.5 and 5.6. Unfortunately, Ubuntu 19.10 uses a 5.3 kernel so we’ll need to wait a bit.

The next best thing is to temporarily downgrade our kernel. For this the easiest method is to just update /etc/default/grub to use third entry of the second menu (Advanced, old kernel) as the default:

sudo sed -i 's!GRUB_DEFAULT=.*!GRUB_DEFAULT="1>2"!' /etc/default/grub
sudo update-grub2
reboot

Once patch propagates to the current version of kernel, simply restore the default:

sudo sed -i 's!GRUB_DEFAULT=.*!GRUB_DEFAULT=0!' /etc/default/grub
sudo update-grub2
reboot

PS: To discover which menu entries you have available, you can use the following generalized command:

grep -Ei 'submenu|menuentry ' /boot/grub/grub.cfg | sed -re "s/(.? )'([^']+)'.*/\1 \2/; s/(submenu|menuentry) +//"

[2020-04-27: Works again with the Ubuntu 20.04 on top of the 5.4 kernel]