Microsoft Windows and all that goes with it

Full Windows on USB Drive

While I am primarily a Linux user these days, I do need Windows occasionally. And on my Framework laptop, I find using Storage Expansion Card (essentially an USB drive) a perfect medium for it. I already wrote about Windows To-Go installation. But what if I wanted something more substantial? A full installation maybe?

Well, we can do that with the help of a few manual commands.

To start, we boot Windows 11 (or 10) off the USB as we normally would. However, instead of proceeding with the normal install, we press Shift+F10 to get into the command prompt.

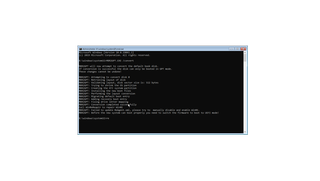
First, we start with partitioning using the diskpart utility. I opted for a bit simpler partition setup than what Windows would generate normally. Most notably, there is no recovery partition. If you want one, you can just follow Microsoft’s instructions once system is up and running.

Within diskpart, the first task is to select the disk. Make sure it is the USB disk on which you want to install Windows. Failure to do so will surely damage something. Once the disk is cleaned, we follow with the creation of a few basic partitions before exiting the tool back to the command prompt.

LIST DISK
SELECT DISK 

CLEAN
CONVERT GPT

CREATE PARTITION EFI SIZE=100
FORMAT QUICK FS=fat32
ASSIGN LETTER S

CREATE PARTITION MSR SIZE=128

CREATE PARTITION PRIMARY
FORMAT QUICK FS=ntfs
ASSIGN LETTER W

LIST VOLUME
EXIT

Now we can install Windows using a combo of dism (to copy the Windows image) and bcdboot (to sort out EFI boot). Please note that if you already have Windows installed, the source files will most probably be on drive D: instead of C:. Depending on how the bootable USB was created, you might also need to change install.wim to install.esd. If the installation contains multiple editions, you can select which one you want using the /Index:N parameter.

DISM /Get-WimInfo /WimFile:C:\Sources\install.wim
DISM /Apply-Image /ImageFile:C:\sources\install.wim /Index:1 /ApplyDir:W:\
BCDBOOT W:\Windows /s S: /f UEFI

Once both commands are done, exit the installation process and reboot into our new installation. If it’s not a default boot location, make sure to press F12 to select it.

And that’s it - now you have Windows on a completely separate drive without any intermingling with the Linux installation.

Installing Windows Onto Framework Expansion Card

Illustration

While I use Linux as the primary OS of choice on my Framework Laptop, I still need Windows from time to time. And yes, a virtual machine is usually sufficient, but there is one scenario where Windows is much better - gaming.

First of all, this setup is not limited to the Framework Expansion Card. You can get it working on pretty much any USB these days. However, there is a difference between “can” and “should”. Most notably, most USB drives out there will not actually give you enough raw speed to comfortably use Windows. You need something with a bit more umph, and both Framework expansion SSD cards fit this nicely.

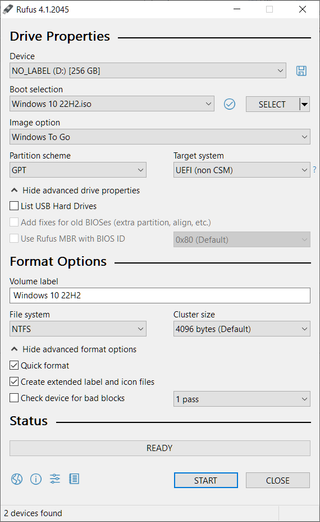
The trick in getting it all done is using Rufus and installing Windows in To Go mode. This retains much of the normal Windows behavior, but it also improves handling of what is essentially just a USB drive (e.g., you can unplug it during running). Default Rufus settings are actually good here, just make sure to select “Windows To Go” and everything else will be as normal.

Illustration

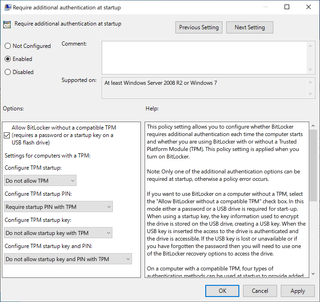
Lastly, while I do love encryption, TPIM is a slight annoyance in many scenarios where you might end up moving your installation around. Thus, while TPIM is available on the Framework laptop, I wanted my BitLocker not to make any use of it. I found editing Group Policy settings using these steps works for me.

  1. Open gpedit.msc.
  2. Navigate to Computer Configuration → Administrative Templates → Windows Components → BitLocker Drive Encryption → Operating System Drives.
  3. Require additional authentication at startup:
    • Enabled.
    • Allow BitLocker without a compatible TPM: Checked (was already)
    • Configure TPM startup: Do not allow TPM
    • Configure TPM startup PIN: Require startup PIN with TPM
    • Configure TPM startup key: Do not allow startup key with TPM
    • Configure TPM startup key and PIN: Do not allow startup key and PIN with TPM
  4. Allow enhanced PINs for startup:
    • Enabled
  5. Configure use of passwords for operating system drives:
    • Enabled
    • Configure password complexity for operating system drives: Allow password complexity (already)

Now onto to play some games. :)

Quickly Patching a Failing Ansible Setup

In my network, I use Ansible to configure both servers and clients. And yes, that includes Windows clients too. And it all worked flawlessly for a while. Out of nowhere, one Wednesday, my wife’s Surface Pro started failing its Ansible setup steps with Error when collecting bios facts.

For example:

[WARNING]: Error when collecting bios facts: New-Object : Exception calling ".ctor" with "0" argument(s): "String was not recognized as a valid DateTime."  At line:2 char:21  + ...         $bios = New-Object -TypeName
Ansible.Windows.Setup.SMBIOSInfo  +                     ~~~~~~~~~~~~~~~~~~~~~~~~~~~~~~~~~~~~~~~~~~~~~~~~~~~~~      + CategoryInfo          : InvalidOperation: (:) [New-Object], MethodInvocationException      +
FullyQualifiedErrorId : ConstructorInvokedThrowException,Microsoft.PowerShell.Commands.NewObjectCommand      at <ScriptBlock>, <No file>: line 2

And yes, the full list of exceptions was a bit longer, but they all had one thing in common. They were pointing toward SMBIOSInfo.

The first order of business was to find what the heck was being executed on my wife’s Windows machine. It took some process snooping to figure out that setup.ps1 was the culprit. Interestingly, this was despite ansible_shell_type being set to cmd. :)

On my file system, I found that file at two places. However, you’ll notice that if you delete one in the .ansible directory, it will be recreated from the one in /usr/lib.

  • /usr/lib/python3/dist-packages/ansible_collections/ansible/windows/plugins/modules/setup.ps1
  • /root/.ansible/collections/ansible_collections/ansible/windows/plugins/modules/setup.ps1

Finally, I was ready to check the script for errors, and it didn’t take me long to find the one causing all the kerfuffle I was experiencing.

The issue was with the following code:

string dateFormat = date.Length == 10 ? "MM/dd/yyyy" : "MM/dd/yy";
DateTime rawDateTime = DateTime.ParseExact(date, dateFormat, null);
return DateTime.SpecifyKind(rawDateTime, DateTimeKind.Utc);

That code boldly assumed the BIOS date uses a slash / as a separator. And that is true most of the time, but my wife’s laptop reported its date as 05.07.2014. Yep, those are dots you’re seeing. Even worse, the date was probably in DD.MM.YYYY format, albeit that’s a bit tricky to prove conclusively. In any case, ParseExact was throwing the exception.

My first reaction was to simply return null from that function and not even bother parsing the BIOS date as I didn’t use it. But then I opted to just prevent the exception as maybe that information would come in handy one day. So I added a TryParse wrapper around it.

DateTime rawDateTime;
if (DateTime.TryParseExact(date, dateFormat, null,
    System.Globalization.DateTimeStyles.None, out rawDateTime)) {
    return DateTime.SpecifyKind(rawDateTime, DateTimeKind.Utc);
} else {
    return null;
}

This code retains status quo. If it finds the date in either MM/dd/yyyy or MM/dd/yy format, it will parse it correctly. Any other format will simply return null, which is handled elsewhere in the code.

With this change, my wife’s laptop came back into the fold, and we lived happily ever after. The end.


PS: Yes, I have opened a pull request for the issue.

Windows as Ansible Client

I control quite a few of computers in my network using Ansible. However, one set of clients were traditionally unreachable - Windows computers. And yes, there were ways around it but early Ansible really had trouble connecting to vanilla Windows installations without any agents involved. Well, those days are over.

Since Windows has OpenSSH built-in for a while now (as an optional component), it’s almost as easy to prepare a Windows client as it is to prepare a Linux one.

The first step is to install OpenSSH and one can do it either by manual clickety-clicking or by executing the following in administrative PowerShell prompt.

Add-WindowsCapability -Online -Name OpenSSH.Client~~~~0.0.1.0

Start-Service sshd

Set-Service -Name sshd -StartupType 'Automatic'

New-NetFirewallRule -Name "SSH-192_168_0_0" -DisplayName "SSH (192.168.0.0/16)" -Enabled True -Profile Any -Direction inbound -Protocol TCP -LocalPort 22 -RemoteAddress 192.168.0.0/16 -Action Allow  -ErrorAction SilentlyContinue

Next comes the need to create an administrative user since Windows equivalent of root user is actually disabled on most systems. And yes, you can skip this step if you’re ok with using client user for administrative tasks. I personally like to keep it separate and naming such user root helps with setup on Ansible “server” side.

Add-Type -AssemblyName System.Web

NET user /add /y root "$([System.Web.Security.Membership]::GeneratePassword(20, 2))"

NET localgroup /add Administrators root

REG add "HKEY_LOCAL_MACHINE\Software\Microsoft\Windows NT\CurrentVersion\Winlogon\SpecialAccounts\Userlist" /v root /t REG_DWORD /d 0 /f

Lastly, we need to add a public SSH key for passwordless authentication. This is as easy as writing a file.

New-Item -Path "$Env:ALLUSERSPROFILE\ssh" -Force -Name "administrators_authorized_keys" -ItemType "file" -Value "ssh-ed25519 `n"

ICACLS "$Env:ALLUSERSPROFILE\ssh\administrators_authorized_keys" /inheritance:d

ICACLS "$Env:ALLUSERSPROFILE\ssh\administrators_authorized_keys" /remove "NT AUTHORITY\Authenticated Users"

And that’s all. On Ansible side we just add cmd as ansible_shell_type and we’re good. Something like this:

ansible_connection: ssh
ansible_shell_type: cmd

Indeed, one could also use powershell instead of cmd but I found cmd working for all my scenarios while PowerShell is sometimes wonky for older Windows clients.

Regardless, you can now use Ansible to change your Winodws client configuration too.

External Type-C Display Corruption on Windows 11

Illustration

I’ve resisted Windows 11 for a while now but eventually I had to succumb and install it on one of my laptops. I figured Framework laptop would do fine. And indeed, all was well. Until I connected the external monitor.

At first corruption was so bad that I though the monitor surely was broken somehow but connecting it to other computers proved it working. I though maybe USB cable was malfunctioning but all other cables gave similar result.

Interestingly, every time I plugged the cable in I got a slightly different result. It ranged from just a few green pixels to almost correctly looking screen.

Illustration

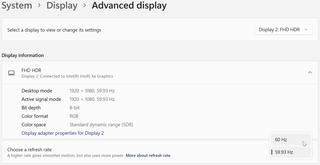
As a last resort, I decided to try messing with monitor’s refresh rate and it took me a while to find it in menus, all the way behind System > Display > Advanced Display. There I had two settings, asinine 59.93 Hz, and a nice round 60 Hz. Wouldn’t you know it, switching refresh rate to 60 Hz solved the issue!

However, I found that strange. Why? Because darn monitor worked at 59.94 Hz in Windows 10. Hm… Yes, it’s not a typo. Windows 10 thought 59.94 Hz is appropriate frequency while Windows 11 decided to go with 59.93 Hz. Why the difference between releases - who knows.

In any case, using 60 Hz solved that issue and now I can be annoyed by Windows 11 on both monitors.


PS: Yes, Ubuntu 22.04 on the same computer with the same external monitor works just fine.

PPS: Yes, 59.94 Hz is more correct frequency as it’s double the NTSC rate. Not sure from where Windows 11 got 59.93 Hz from.

Encrypting SD Card Using BitLocker

As I wanted to use SD card to move files from my laptop to Surface Go, it made sense to encryt the data. Easy, just right-click on the drive and turn on BitLocker, I thought. However, my SD card didn’t give me such option. For some reason Microsoft decided to not show this option in context menu.

However, one can still encrypt it using command line. Syntax it a bit annyoying but workable. In my example, I had my SD card mounted as drive S:.

manage-bde.exe -on S: -password -s

To check how the process goes, you can use -status parameter.

manage-bde.exe -status

To make things even better, once encrypted, these disks are usable on Ubuntu 22.04 too. You might just want to install exFAT support.

sudo add-apt-repository universe
sudo apt update
sudo apt install exfat-fuse exfatprogs

Add Application to Auto-Start from PowerShell

Since PowerShell comes installed with every Windows, I find it ideal tool for initial system setup when nothing else is installed. And one of the tasks I need it for is setting up auto-start.

My standard approach for setting application auto-start used to be to just use regedit.exe and load prepared registry file. But, as I was rewriting my setup scripts, I figured it’s time to update this too.

And it’s easy enough:

New-ItemProperty -Path "HKCU:\Software\Microsoft\Windows\CurrentVersion\Run" `
    -Name "^^Application^^" `
    -Value "^^C:\Path\To\MyApplication.exe^^"

Naughty FortiClient

As somebody often connecting to networks not belonging to me (legally!), I have a variety of VPN clients. It seems that everybody uses something else. That’s why I had to install FortiClient a few months back. If you never heard of it, it’s a VPN client that thinks it’s more than that and has no support for VPN portion under Linux.

While FortiClient wasn’t the worst VPN client I ever used, I must say there were no tears when I didn’t need it anymore. As any normal person would, I went to uninstall it only to be faced with a grayed out Uninstall button. Never mind - Windows 10 Settings app might be buggy - so I went to the Control Panel. There situation was even worse as I only had Repair available. No uninstall again.

I searched Internet for a solution and found knowledge base article by Forti itself. And it describes the exact procedure I tried to no avail. So I searched a bit and found solution on Reddit of all places (might be the first time I ever used Reddit for anything other than wasting time).

Solution was to use wmic in order to trigger uninstall. For this one should write the following into the Command Prompt with administrator rights:

wmic product where "name like 'Forti%%'" call uninstall /nointeractive

This will uninstall FortiClient and reboot computer automatically afterward. And finally it’s gone.

Authorized Keys in Windows 10 OpenSSH

With Windows now supporting OpenSSH, I figured I could setup password-less login from my Linux server and pull my home backups automatically. Currently I push backups to my server using Windows Scheduler and it’s far from ideal as any adjustment to process requires my login to each machine separately.

First attempt to get it working relied on Microsoft’s documentation and, while it did allow for password login, got me nowhere when it comes to authentication keys. There are many comments at GitHub repository dealing with the same issue but it was impossible to tell what is working and what not - especially since quite a few advises were contradictory. Mind you, recommended commands might have been working at one time or another but my Windows 10 November update was resistant to everything I found there.

So I decided to go harder route and actually check logs as I try commands. I wanted procedure that will bring the least amount of changes (ideally none) to files already installed so I can deal with upgrades and I wanted to have all those steps scriptable so I can setup everything by simply running the file.

The issue with authorized keys lied in “Authenticated Users” being allowed access to administators_authorized_keys. Once that was removed from ACL, my passwordless login started working beautifully.

My final script looked something like this:

# Start as admin
If (-NOT ([Security.Principal.WindowsPrincipal][Security.Principal.WindowsIdentity]::GetCurrent()).IsInRole([Security.Principal.WindowsBuiltInRole] "Administrator")) {   
    $arguments = "& '" + $myinvocation.mycommand.definition + "'"
    Start-Process powershell -Verb runAs -ArgumentList $arguments
    Break
}

# Preferences
Set-ExecutionPolicy RemoteSigned
$ConfirmPreference = 'None'

# OpenSSH: Install
Add-WindowsCapability -Online -Name OpenSSH.Server~~~~0.0.1.0
Set-Service -Name sshd -Computer localhost -StartupType Automatic
Start-Service sshd

# OpenSSH: Setup
New-Item -Path $Env:ALLUSERSPROFILE\ssh -Name "administrators_authorized_keys" -ItemType "file" `
  -Value "^^key^^"
icacls "$Env:ALLUSERSPROFILE\ssh\administrators_authorized_keys" /inheritance:d
icacls "$Env:ALLUSERSPROFILE\ssh\administrators_authorized_keys" /remove `
    "NT AUTHORITY\Authenticated Users"
Restart-Service -Name sshd

Speeding up BITS

If you deal with Microsoft Software Center you know the annoyance it can cause with extremely low download speeds. BITS protocol it uses was designed to be gentle toward your connection and avoid taking up bandwidth from anything else you might also be running.

However, sometime it can get overly cautious and slow down to a ridiculously low level even if you are not doing anything else with your computer. And good luck pulling those patches down if it gets into that mood.

Fortunately, you can tweak registry to give it a bit of a boost. Just go into regedit and navigate to HKEY_LOCAL_MACHINE\SOFTWARE\Policies\Microsoft\Windows\BITS. There add a DWORD named UseSystemMaximum and set it’s value to 1.

Alternatively you can get pre-prepared registry file import here (but do be very cautious when downloading registry meddling bits of the Internet).

You should see BITS drop their good guy mask and gobble all the bandwidth they can get. That will make your Software Center run much faster and maybe you get to install that darn patch within a year.