Linux, Unix, and whatever they call that world these days

LXQt High DPI Settings For Surface Go

Ubuntu Unity on the Surface Go is not the lightest environment out there. And on device with low memory (mine has only 4 GB) there is a definite need for something lighter. Based on my research, there are three comfortable alternatives: Xfce, LXDE, and LXQt. After a bit of testing, I decided to go with LXQt.

Installing LXQt into existing ubuntu is as easy as installing its package and selecting it on next login:

sudo apt install lxqt

What greets you are really small window elements and almost impossible to read interface. LXQt does not detect high-DPI environment and thus 1800x1200 Surface Go has to offer is used as if screen was 24" and not mere 10" in size.

Fortunately, there is a forum with high DPI advice. Unfortunately, a lot of those advices are not really applicable when it comes to Ubuntu 19.10. To spare you a lot of research, here is what worked for me.

Illustration

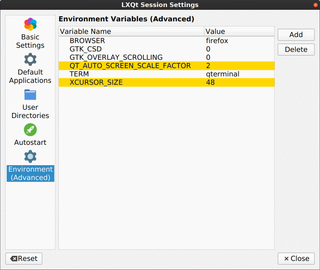
The first argument you will want to adjust is QT_AUTO_SCREEN_SCALE_FACTOR=2. Forum advice is to adjust QT_SCALE_FACTOR=2 but I found this to be counter productive as properly written Qt applications will have their size quadrupled. Yes, you can use QT_SCALE_FACTOR=2 combined with QT_AUTO_SCREEN_SCALE_FACTOR=0 but that still leaves you with increased toolbar icons in high-DPI aware applications. So, for my use case, just setting QT_AUTO_SCREEN_SCALE_FACTOR=2 worked the best.

Small cursor is also a problem but there is an easy way to correct this. Most often I found setting XCURSOR_SIZE=32 mentioned but I personally like to go with XCURSOR_SIZE=48.

That said, where do you set them? Just go to Preferences, LXQt settings, Session Settings, Environment (Advanced) and add those two environment variables.

Those two changes will make your Qt applications look bigger but non-Qt applications like Chrome will still look way too tiny. For those you need to set Xft.dpi in ~/.Xresources.

echo "Xft.dpi: 192" > ~/.Xresources

With these three changes I find windows once again reasonably sized on my Surface Go.

Surface Go Touch Screen Not Working in Ubuntu 19.10

Those using Ubuntu 19.10 might have noticed this suddenly stopped working. And this can be directly correlated with the latest kernel update.

If you dwelve into details, you can see the following with kernel 5.3.0-40 (previous, working version):

uname -a
 Linux 5.3.0-40-generic #32-Ubuntu SMP Fri Jan 31 20:24:34 UTC 2020 x86_64 x86_64 x86_64 GNU/Linux``

sudo journalctl -b | grep multitouch
 hid-multitouch 0018:04F3:261A.0001: input,hidraw0: I2C HID v1.00 Device [ELAN9038:00 04F3:261A] on i2c-ELAN9038:00
 hid-multitouch 0003:045E:096F.0005: input,hiddev2,hidraw4: USB HID v1.11 Mouse [Microsoft Surface Type Cover] on usb-0000:00:14.0-7/input3

If you check it under latest kernel 5.3.0-42, you’ll see a bit of an issue:

uname -a
 Linux 5.3.0-42-generic #34-Ubuntu SMP Fri Feb 28 05:49:40 UTC 2020 x86_64 x86_64 x86_64 GNU/Linux

sudo journalctl -b | grep multitouch
 hid-multitouch 0018:04F3:261A.0001: report is too long
 hid-multitouch 0018:04F3:261A.0001: item 0 1 0 8 parsing failed
 hid-multitouch: probe of 0018:04F3:261A.0001 ^^failed with error -22^^
 hid-multitouch 0003:045E:096F.0005: input,hiddev2,hidraw3: USB HID v1.11 Mouse [Microsoft Surface Type Cover] on usb-0000:00:14.0-7/input3

If you browse kernel team Bugzilla, you’ll find there is already a bug report for this issue and issue has already been merged to kernels 5.5 and 5.6. Unfortunately, Ubuntu 19.10 uses a 5.3 kernel so we’ll need to wait a bit.

The next best thing is to temporarily downgrade our kernel. For this the easiest method is to just update /etc/default/grub to use third entry of the second menu (Advanced, old kernel) as the default:

sudo sed -i 's!GRUB_DEFAULT=.*!GRUB_DEFAULT="1>2"!' /etc/default/grub
sudo update-grub2
reboot

Once patch propagates to the current version of kernel, simply restore the default:

sudo sed -i 's!GRUB_DEFAULT=.*!GRUB_DEFAULT=0!' /etc/default/grub
sudo update-grub2
reboot

PS: To discover which menu entries you have available, you can use the following generalized command:

grep -Ei 'submenu|menuentry ' /boot/grub/grub.cfg | sed -re "s/(.? )'([^']+)'.*/\1 \2/; s/(submenu|menuentry) +//"

[2020-04-27: Works again with the Ubuntu 20.04 on top of the 5.4 kernel]

Ubuntu 19.10 on Surface Go

Illustration

As I started traveling a bit more recently, I went into search for a small laptop I can carry with me. As an alternative to my 17" work and 15" personal laptop, I wanted to go much smaller. Here comes Surface Go.

It’s not a powerful device by a long shot and any heavy load is out of question. That is doubly so for the one I selected - with 4 GB RAM and only a 64 GB disk. What worked in its favor was a really cheap price (Craigslist) and reasonably mainline components ensuring Linux compatibility. Yep, I wanted to use this as my portable Linux machine.

The first step was to create a bootable media. I personally use Rufus if doing it from Windows. For those doing it from Linux, there is an excellent page with other options available. What you want is MBR-based FAT32 format. If you use GPT, all you’ll get is GRUB command line.

Illustration

The easiest way to install Ubuntu is if you start from Windows. Go to Recovery Options and select Restart now. From the boot menu then select Use a device and finally use Linpus lite. If Linpus lite doesn’t appear, select EFI USB device and repeat the process. For some reason Linpus option appears every second boot for me. If you are using Ubuntu, there is no need to disable secure boot or meddle with USB boot order as 19.10 fully supports secure boot (actually Microsoft signs their boot apps).

From there on, you can proceed with Ubuntu installation as you normally would do. For me that meant going with Minimal and no other changes. If you select third party drivers, you will have to setup UEFI password but I’ve found that Surface doesn’t need such special treatment.

sudo apt install ./surface-go-wifi_0.0.3_amd64.deb
reboot

That’s it. Your Surface Go will boot Ubuntu now.


PS: If you do want to mess with boot order, start with the Surface Go powered off. While holding Volume Up button, press Power button, and then release Volume Up. This will give you UEFI menu. There you can change boot order and/or disable Secure Boot. To reset BIOS settings to the default values, use F9 key.

PPS: Between the time I wrote this post and its publishing time, any further travel became unlikely due to COVID-19. There goes my reason for getting this laptop. :)

Restoring Surface Go Windows from Within Ubuntu

Booting from the USB is easy enough if you have Windows installed. Just go to Recovery Options and restart from there. But what if you installed Linux on your Surface Go an you want to get Windows back?

Yes, you can meddle with BIOS an change boot order there. But there is an easier way - just use GRUB.

To enter GRUB on Surface Go, just press Escape multiple times while booting. Once there, press c to enter command mode. All magic will happen here.

First “magic” part will be finding USB drive. For that just write ls and you will be presented with a list. Depending how you had your drive setup, you might be able to recognize it. If you used MBR it will be something like (hd0,msdos1) and if you used GPT it will be slightly different (hd0,gpt1). Frankly, that’s the probably single biggest reason I use MBR for my recovery drives - since all else uses GPT, it makes it painfully obvious which drive is correct one.

With drive selected, we just need to “chainload” it:

set root=(hd0,msdos1)
chainloader /EFI/Boot/bootx64.efi
boot

And that’s it. You now booted of the Windows recovery USB without messing with boot order or secure boot settings at all.

Surface Go WiFi Driver Package

I find Surface Go quite nicely working with Ubuntu. If you are searching for a small capable Linux machine, it’s hard to beat it. However, one issue is really annoying. Its WiFi driver.

Fortunately, there is a nice guide on Reddit on how to fix this. Unfortunately, you will need to fix it again and again as system will overwrite your changes upon many (e.g. kernel) upgrades.

Well, not anymore. I created a package that automates this task. Each time WiFi driver gets its board.bin replaced, this package will change it back. One thing less to think about.

You can download package here or check build it yourself.

To install it, use the command line (GUI route doesn’t work without Internet access).

sudo apt install ./surface-go-wifi_0.0.3_amd64.deb

ZFS GUID Galore

I am a big fan of ZFS and I have it installed on every Linux/Unix machine I own. Including the machine I use for playing with Docker containers. And it was that machine where I saw a bunch of ZFS snapshots with weird random hexadecimal names. And it wasn’t one snapshot, nor two - it was hundreds of them. So I deleted them.

Guess what, Docker build started complaining:

error creating zfs mount: mount system/root/a4f339f95f920b918bb23290a3e831dc22477bc76ef0d3496224fc424e65ec67:/var/lib/docker/zfs/graph/a4f339f95f920b918bb23290a3e831dc22477bc76ef0d3496224fc424e65ec67: no such file or directory

Well, I guess that sorted who was to blame for all those long snapshots. You see, Docker gets smart if it detect ZFS and does a lot of smart things. Unfortunately those smart things result in a lot of snapshots. And I don’t like people (or software) messing with my ZFS. And obviously Docker didn’t like me messing with it either. :)

Fortunately, the solution is easy enough. One should reconfigure Docker to use overlay2 storage driver instead of ZFS one and short daemon restart later one can continue playing with Docker without having to deal with ZFS snapshot hell.

Now only if I could remember this when I reinstall the OS…

Change the Interface's MAC Address

MAC address should be unique for each network card - whether it’s wireless or wired. It’s this uniqueness why some networks will use it to distinguish an authorized user from the unauthorized one. If you ever had a time-limited access to the network, chances are that your MAC address was used to block you once time is up.

I will leave it up to you to think of scenarios but I find randomizing my MAC address a useful option in Linux. Therefore, I created a script to automatically generate a new one. This script will randomize the last three octets of the MAC address while leaving the first three octets as they originally were. In effect this makes your computer present itself to the network as the new adapter from the same manufacturer.

#!/bin/bash

INTERFACE="^^eth0^^"

CURRENT_MAC=`/usr/sbin/ifconfig $INTERFACE | grep ether | awk '{print $2}'`
ORIGINAL_MAC=`/usr/sbin/ethtool -P $INTERFACE | rev | cut -d' ' -f1 | rev`
ORIGINAL_MAC_PREFIX=`echo $ORIGINAL_MAC | cut -d: -f1-3`
NEW_MAC="$ORIGINAL_MAC_PREFIX`/usr/bin/hexdump -n3 -e'3/1 ":%02x"' /dev/urandom`"

echo "Current MAC : $CURRENT_MAC"
echo "Original MAC: $ORIGINAL_MAC"
echo "New MAC ....: $NEW_MAC"

sudo /usr/sbin/ifconfig $INTERFACE down
sudo /usr/sbin/ifconfig $INTERFACE hw ether $NEW_MAC
sudo /usr/sbin/ifconfig $INTERFACE up

Using Let's Encrypt with Certificate Based Authentication

For one of my sites I wanted to use TLS client authentication. It’s easy enough to setup in Apache:

<VirtualHost *:80>
  …
  RewriteEngine On
  RewriteRule (.*) https://%{SERVER_NAME}$1 [R=301,L]
</VirtualHost>

<VirtualHost *:443>
  …
  SSLEngine on
  SSLCertificateFile /etc/letsencrypt/live/example.com/cert.pem
  SSLCertificateKeyFile /etc/letsencrypt/live/example.com/privkey.pem
  SSLCertificateChainFile /etc/letsencrypt/live/example.com/chain.pem
  SSLVerifyClient require
  SSLVerifyDepth 1
  SSLCACertificateFile /srv/apache/data/root.crt
  SSLRequire (%{SSL_CLIENT_S_DN_CN} == "Me") \
          || (%{SSL_CLIENT_S_DN_CN} == "Myself") \
          || (%{SSL_CLIENT_S_DN_CN} == "Irene")
  SSLUserName SSL_CLIENT_S_DN_CN
</VirtualHost>

Illustration

And this worked just fine for 90 days or so. More precisely, it worked until CertBot had to update my Let’s Encrypt certificate.

Guess what? Let’s Encrypt doesn’t have knowledge of my client certificate and thus handshake fails. Error message is not really helpful as “tls: unexpected message” doesn’t really point you to the correct path. Fortunately, I actually remembered my certificate shenanigans and thus was able to debug it quite quickly. Issue verification was as easy as dropping certificate requirements made my renewal work again.

However, dropping certificates every month or two would not work for me. I wanted something that would work the same as automatic renewal for other Let’s Encrypt certificates. And no, you cannot set .well-known directory to use different validation. With TLS 1.3, you cannot change client requirements once connection is established. You’ll just get “Cannot perform Post-Handshake Authentication” error.

But, you know where you can play with locations to your heart’s content? In HTTP section. Instead of just redirecting to HTTPS, you want to carve small hole for CertBot verification.

<VirtualHost *:80>
  …
  RewriteEngine On
  RewriteRule (.*) https://%{SERVER_NAME}$1 [R=301,L]
  <Location "/.well-known/">
    RewriteEngine Off
  </Location>
</VirtualHost>

Now Let’s Encrypt verifies renewal requests using HTTP which is not really a security issue as verification file is completely random and generated anew each time.

VPN-only Internet Access on Linux Mint 19.3 via Private Internet Access

Setting up Private Internet Access VPN is usually not a problem these days as Linux version is readily available among the supported clients. However, such installation requires GUI. What if we don’t want or need one?

For setup to work independently of GUI, one approach is to use OpenVPN client usually installed by default. Also needed are PIA’s IP-based OpenVPN configuration files. While this might cause issues down the road if that IP changes, it does help a lot with security as we won’t need to poke an unencrypted hole (and thus leak information) for DNS.

From the PIA configuration archive extract your choice of .ovpn file (usually going with the one physically closest to you will give you the best results). There is no need to extract .crt and .pem files as configuration has certificates embedded.

Rest of the VPN configuration needs to be done from the Bash:

sudo cp ~/Downloads/openvpn-ip/^^US\ Seattle^^.ovpn /etc/openvpn/client/pia.conf

echo "auth-user-pass /etc/openvpn/client/pia.login" | sudo tee -a /etc/openvpn/client/pia.conf
echo "mssfix 1400" | sudo tee -a /etc/openvpn/client/pia.conf
echo "dhcp-option DNS 209.222.18.218" | sudo tee -a /etc/openvpn/client/pia.conf
echo "dhcp-option DNS 209.222.18.222" | sudo tee -a /etc/openvpn/client/pia.conf
echo "script-security 2" | sudo tee -a /etc/openvpn/client/pia.conf
echo "up /etc/openvpn/update-resolv-conf" | sudo tee -a /etc/openvpn/client/pia.conf
echo "down /etc/openvpn/update-resolv-conf" | sudo tee -a /etc/openvpn/client/pia.conf

The basic VPN setup is already completed but we still need to setup our login (replacing username and password with the actual values):

unset HISTFILE
echo '^^username^^' | sudo tee -a /etc/openvpn/client/pia.login
echo '^^password^^' | sudo tee -a /etc/openvpn/client/pia.login
sudo chmod 400 /etc/openvpn/client/pia.login

Firewall rules are to allow data flow only via VPN’s tun0 interface with only encrypted VPN traffic being allowed on port 1198.

sudo sed -i 's/IPV6=yes/IPV6=no/' /etc/default/ufw
yes | sudo ufw reset
sudo ufw default deny incoming
sudo ufw default deny outgoing
sudo ufw allow out on tun0
sudo ufw allow out on ^^eth0^^ proto udp to `cat /etc/openvpn/client/pia.conf \
    | grep "^remote " | grep -o ' [^ ]* '` port 1198
sudo ufw disable
sudo ufw enable

To test VPN connection execute:

sudo openvpn --config /etc/openvpn/client/pia.conf

Assuming test was successful (i.e. resulted in Initialization Sequence Completed message), we can further make sure data is actually traversing VPN. I’ve found whatismyipaddress.com quite helpful here. Just check if IP detected is different then IP you usually get without VPN.

Stop the test connection using Ctrl+C and proceed to configure OpenVPN’s auto-startup. Reboot is there just to test if auto-startup works.

sudo systemctl enable openvpn-client@pia
sudo reboot

This should give you quite secure setup without the need for GUI.

[2020-07-06: Works with Linux Mint 20 too.] [2020-08-07: Added step to disable IPv6.]

Colored CPU usage in TMUX

Illustration

Those spending a lot of time in Linux command line know the value of a good terminal multiplexer. Even in the age of GUI terminal windows, using tmux will speed your work while many customizations it offers will make for comfortable environment.

Knowing its flexibility, for my Minecraft server, I wanted tmux status line to include something I never tried before - CPU usage. Yes, one could use top, htop, glances, or any other of the many monitoring tools but I didn’t want the whole screen occupied by it. I wanted just a small unobtrusive note in the corner.

There are multitude of ways to retrieve CPU usage but I found vmstat works well for me and thus the first version just placed its parsed output in the bottom-right corner:

set-option -g status-interval 1
set-window-option -g status-right ' #( vmstat 1 2 | tail -1 | awk "{ printf 100-\$15; }" )% '

While this satisfied my original requirements, I started thinking about colors. Could I make it more colorful?

Search immediately found me a few tmux plugins and one of them looked really promising. While using it would be perfectly fine for my use case, I don’t like dependencies and thus I tried to find tmux-only solution for colors.

A bit of testing later and I noticed shell commands (enclosed in #()) are processed before formatting directives. So, if I manage to return the formatting from shell, tmux will do further processing and colors will be there. A bit of awk-ing later and this is what I came up with.

set-option -g status-interval 1
set-window-option -g status-right ' #( vmstat 1 2 | tail -1 | awk "{ USAGE=100-\$15; if (USAGE &lt; 20) { printf \"#[fg=green,bright]\"; } else if (USAGE &lt; 80) { printf \"#[fg=yellow,bright]\"; } else { printf \"#[bg=red,fg=white,bright]\"; }; print \" \" USAGE \"% \" }" )'

It’s still vmstat based output but now awk appends color formatting strings for different usage levels. If usage is lower than 20%, a bright green foreground is used; lower than 80% results in a bright yellow text; and anything higher results in a bright red background.

It’s a simple color-coded way of showing CPU usage at a glance.


PS: If you want extra status line text after CPU percentage, consider adding #[bg=default,fg=default] to stop color “bleeding” to remainder of the line.