Updates for my programs and websites

Goodbye, Wordpress

As you might have noted, I took a couple of weeks from posting here. Why? Well, I decided to figure out what to do with my website. Most notable its backend.

You see, for a while now, I have not been happy with Wordpress. My main issue has been their push toward the block editor. I just don’t find it working well for my style of writing. It was just too cubersome and I ended switching to Markdown editor for my processing needs. Unfortunately, that is also not an ideal experience, especially because this markdown processor is not the newest beast and it often messes up a perfectly valid syntax (e.g. manually wrapped paragraphs). Of course, Wordpress’ latest scandal definitely didn’t improve anything.

And yes, this is not the first time I’m changing how these pages are generated. Before switching to Wordpress, I was running my own ASP.NET engine. Before that, I was using Blogspot. Before that, I was doing raw HTML. And there were many intermediate steps in between. It’s safe to say that every few years I look into alternatives to what I’m currently running.

This year, for the first time, I tried 11ty and… I fell in love. Interestingly, this static site generator is not a new beast. However, I somehow missed it a year or so ago when I tried Hugo and MkDocs, neither or which really worked for me.

11ty was trivial to get up working and expanding its functionality is just smidgen more difficult. Before I started, I made a list of things I wanted to work. Yes, my site isn’t overly complicated but I was surprised how easy was to get all things going.

Automatic thumbnails - a few hours to implement from scratch. Search - working within an hour (courtesy of Pagefind) albeit followed by a few hours of figuring out look&feel. Import (courtesy of wordpress-export-to-markdown script), albeit rather basic, done in an hour too. Custom scripts for calculators present on some pages, it’s markdown and just works.

Based on length of my hiatus, you can see there were many additional steps. For example, I didn’t find a theme I liked so building my own took ages. Figuring out the structure and finding the good balance in preserving links and getting new functionality took a while too. What 11ty allowed was for neither of those steps to take too long individually. There is just something special in seeing immediate progress. And it’s not as if I worked on this 24/7 since I have a daily job and I also squeezed in visiting Croatia for a week.

Now, finally, my static 11ty site is in good enough state to share it with the world. Not all is working yet, but I am comfortable enough that I can deal with rest of issues in the background.

The first thing you’ll notice is absence of comments and this is something I’ll miss the most. I simply didn’t find a good enough solution to deal with them. To replace that, I do have a “Contact” at the bottom of every page now so you can contact me. Poor replacement, but all that’s there for now. Mind you, my site never had an overwhelming number of comments. But those precious occasional discussions are gone for now.

The second issue is that not all stuff was imported correctly. Older things posts that used Wordpress shortcodes to display code got quite mangled in the process of conversion. I am working on fixing those and eventually they will be converted to a proper markdown. However, since that impacts only posts older than 2 years, I decided to simply fix that eventually instead of postponing the move to 2025.

With this engine swap behind me, normal program will continue the next week.


PS: Well, Matt Mullenweg is keeping up his efforts to destroy WordPress community. And yes, WordPress has always tried to bend developers to their will (remember Suffusion removal). But lately things seem a bit more insane than usual. I guess timing of my move is fortunate.

Visual Studio Code Extensions

I switched to Visual Studio Code for my text editing needs a while ago. While not perfect (still no darn CR support), I find it working well for me. However, considering it has a really nice extension model, it would be shame not to improve it a bit. So I made a few extensions of my own.

Render Line Endings

One thing I missed the most was to see line endings. Call it a habit from old python days or call it the craziness, but I often work with all whitespaces shown. And VSCode has a beautiful support for showing whitespaces within the line. But somehow, it won’t show line endings which are whitespace characters too in my book.

Idea of this extension is to work in tandem with the default rendering of whitespace characters and simply add the appropriate character at the end. Now, due to some design decisions in VSCode, extension will never be perfect. For example, VSCode normalizes the file upon loading to use only a single line ending. By the time my extension gets a stab at parsing, the original line ending is already gone. Even worse, CR line ending is still not supported and ticket is going nowhere.

That said, in 95% of cases, one is only dealing with a single line ending anyhow and extension can not only show it but it can also highlight errors (e.g. non-default line ending; i.e. CRLF when LF is expected) or extra trailing whitespaces.

It wasn’t the first extension of this type and it probably won’t be the last one. But it is (currently) the most popular and I’ve gone through a lot of efforts to make it the fastest too. Yes, it might be the same speed (or maybe even a bit slower) on small files but if you load a big file, all changes. My extension is pretty much the only line ending highlighter that doesn’t load the whole darn file in one go but does its work incrementally.

Unicode Code Point

When working with international data, I sometime need to know what character I am exactly looking at. Is it Ohm or is it Omega? To get an answer to this and many other Unicode naming questions, I present you this extension.

It’s not the most popular one nor it’s the most capable one (e.g. you cannot use it to insert Unicode). However, it does what name says, it supports many character combinations other extensions ignore (skin codes, for example), and it supports the latest Unicode 15 draft.

As an interesting tidbit, it’s probably the only status bar extension that also supports double-click - something that VSCode actually is not officially exposing to extensions.

Highlight IP

This is yet another one that solves a problem for me and pretty much only me. At work I quite often end up going over configuration files with IP addresses intermingled with other text. Whether it’s YAML, JSON, or just a text file, I like those IP addresses to pop out.

This extension is going to do exactly that, it will find and highlight IP addresses or subnet definitions wherever in text file they might be. As bonus, it will also check validity of each subnet and highlight as error those that are a bit “wonky”, e.g. 192.168.1.1/24.

This extension will happily churn IPs in background and make you forget its even there.

Color Me Error

The only task of this extension is to highlight any instance of TODO, FIXME, or any other configured word as an error. Reason for this is that I like to have my eyes drawn to such text in my code but I don’t necessarily want to have it in “Problems” tab where every other similar extension likes to place it.

If you really need to track those pesky TODOs, this extension is not for you. This extension is for those who like to have them highlighted but don’t like to be reminded about them too much.

Hourly Beep

I like to be reminded about start of an hour. Be it a coocoo clock, my Casio watch, or this extension. Its only function is to beep upon start of each hour.
Disk Preclear

Illustration

Some time ago I got into a habit of shucking. And each shucked drive I first fill with a random data. Purpose of this is twofold; the primary reason being security as disk filled with random data doesn’t “leak” information when you place encrypted file system on it (except when that file system is ZFS with native encryption but that’s a long rant for some other time).

The second reason is drive verification before I add it to my pool. While disks are hearty bunch these days, they do fail. And they usually fail either really early or really late. Giving it a bit of exercise early in their lifetime can sometime provoke failure. And if that failure happens you can easily do RMA. Doing the warranty replacement is also possible once they are shucked but might involve messing with manufacturer and their idea of “intended purpose” that’s part of their terms of warranty. It’s easier this way.

Previously I used a good old dd on my server for the same purpose but that actually became slightly annoying as I filled all the bays. Just to initialize a new drive, I had to remove the old drive and hope other disks are ok while I randomize the new one (can take a few days). Furthermore, that also meant I was increasing the CPU load (remember random numbers are not cheap) and temperature without writing any useful data. A task that’s more suitable for my Windows desktop.

With .NET 6 out, I figured I could give it a ride and write a Windows Forms application.

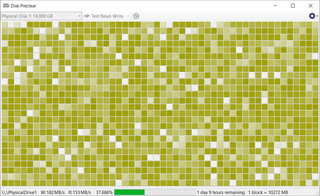
In a default state application will randomly traverse disk writing random data and verifying what’s written. While access might be random, every sector is accessed once and only once even in this mode. This is my favorite mode by far and I find it strangely calming due to how it looks graphically. But then again, I was always a fan of just looking into the defragmentation screen. :)

If you want the same effect you would get using dd with urandom you can switch to the sequential access. The same random data but written quite a bit faster since drive doesn’t need to seek all over the place. Of course, if security is not much of a concern, once could also fill disk with zeros or a “standard” 0x55AA pattern. While slightly faster, those modes are quite a bit less exciting.

I created this application to fill the need I had and no other application seemed to do exactly what I wanted. If someone else finds it useful, it’s awesome. If not, I still had fun creating it and that’s all that matters in the end.

Application download and link to its source code is available here.

Automatic Backlight Per Power Source

I love the feature when Windows sets different backlight level depending whether I am plugged in or on battery. I really fits how I use my laptop. But then one day that feature seemingly disappeared. Cause seemed to be a Windows Update and to fix it I would essentially need to restore my old driver.

Well, either that or this small utility. Once installed, it will run a service in the background tracking your power source and backlight level. Whatever level you last set on battery will be used whenever you unplug and whatever you set while plugged in will be used when your AC adapter is connected. Essentially, the same behavior as what once came by default.

While this will never be a full application as I doubt there will ever be enough interested people, download is available at GitHub.


PS: For Linux version check Backlight Tracer.

Editing Scanner Profile

Changing default scanner under Windows is possible but requires manually editing XML files.

Well, this utility at least removes that step. While knowledge of scanner profiles is necessary, one can now do it using application and without messing with XML files directly.

While this will never be a full application as I doubt there will ever be enough interested people, download is available at GitHub.

BareCam

Illustration

I had an interesting problem. I wanted another monitor. But I didn’t want to buy it. For one, I just needed it just temporarily. Secondly, I needed it to be mobile so any properly sized monitor was out of question.

With that in mind, I took inventory of things I had and came upon an idea. I already have HDMI capture USB and I already have Surface Go which surely looks like a mini monitor. If I connect my laptop via HDMI to the capture card and use webcam to show capture output, I essentially have an HDMI-to-monitor connection.

I tried it and it worked wonderfully. Almost.

As my Surface Go runs Ubuntu, I have tried multiple Linux webcam applications and neither of them worked as I wanted. I simply could not find any that would work in full screen. In addition to losing screen real estate, I also noted other issue - darn cursor was visible. None of the webcams would turn off cursor while running.

After going over every webcam application I could find and finding a fault for each, I finally decided to build my own.

This is as simple as webcam software gets. When started, it will display the first webcam while keeping cursor hidden. If you press Space, it will switch to the next webcam. Essentially everything I needed.

And yes, I did complicate it a bit more later. I added a support for windowed mode, going as far to allow alignment to any screen corner (try keys 0-9) so you can have “head-in-the-corner” effect. I also added a few configurable settings and will probably add a few more with time. However, the idea is to keep it as simple as possible.

Application supports both Linux and Windows. If you’re in need for something like that, give it a try.

IniEd

You can do wonders with sed and awk when it comes to editing config files. However, if format is not line but section based, editing it becomes exercise in writing full blown programs and even a simple reading has potential to turn into a mess of regex nobody will understand in a year. It was on a day such as that I decided to make myself a command line INI file editor.

First, the most common action, reading value is as simple as giving section and key name:

inied --section mysqld --key key_buffer --print  examples/my.cnf

Modifying a value is as easy:

inied --section mysqld --key key_buffer --edit 200M  examples/my.cnf

From there on you can go crazy with pretty-printing, filtering, or even just piping it into any other tool.

You can install utility from Debian package or grab the source code on GitHub and compile it using make yourself.

Bimil 2.30

Illustration

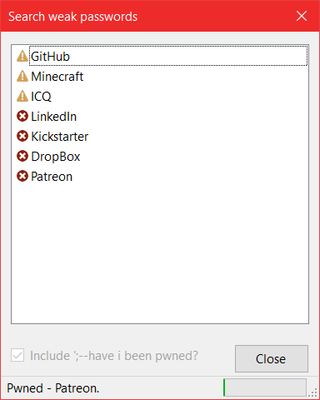
This version is all about enabling you to quickly see which passwords suck. For this purpose a centralized weak password search has been implemented. Yes, you could see which password is weak even before but it required opening every single account - and that can take a while. This way you get the same information but after a single click.

Additionally, there is an option to check all accounts for breaches at Have I been pwned? site. While password for these accounts might not be compromised themselves, risk is quite increased and changing them is not necessarily the worst idea - let’s not even think about the sites using trivial hashes (like MD5) or no hashing at all. Search is smart enough to verify when exactly you changed your password last time to avoid false positives.

Moreover, if you go into Options, you can enable more thorough search. If selected, you can verify all your passwords (hashed and sent over TLS 1.2) against all exposed passwords. This is not enabled by default (even hidden a bit) because it requires quite a big leap of faith toward Troy and his website. I personally do trust him, but your mileage might vary.

As always, new version is available from Bimil’s page or you can update it through application.

Bimil 2.20

Illustration

This minor update essentially brings only two significant changes.

First is inclusion of NTP check before time-based two-factor authentication code is generated for the first time. If you are getting code on freshly installed computer with wrong date or your clock simply drifted more than required 30 seconds, Bimil is now going to check time and issue correct code regardless of your system clock.

Second important change is Debian package. While you could run Bimil on Linux before, you had to deal with installation and requirements yourself. Now it is enough just to download package and use your favorite (Debian-based) installer. And yes, it does install in /opt.

To check these changes together with a few minor improvements and bug-fixes, you can download Bimil from these pages or update it through application.

Bimil 2.10

Illustration

For this version the main focus was on improving auto-type - both interface and discoverability. Hopefully, this will get more people to use and abuse this feature for login automation.

One surely controversial change is that entries are now editable by default. The most common complaint by new users was about the extra step needed to actually change anything. For those who prefer it that way (e.g. me), option to have entries in read-only mode until Edit button is pressed is still there in Options dialog.

Additionally, some minor bug fixes and interface adjustments were made but nothing to write home about. :)

You can download the new version either from application itself, from web page, or, for the first time ever, from Windows Store.

PS: Windows Store version doesn’t allow for credit-card information storage due to Microsoft’s policies.