Some of my settings for various stuff

My Dashcam Video Encoding Settings

Illustration

I love dashcam footage from vacation. Not only I get photos of various places I’ve visited but also route I used to get to them. And there are some beautiful drives out there.

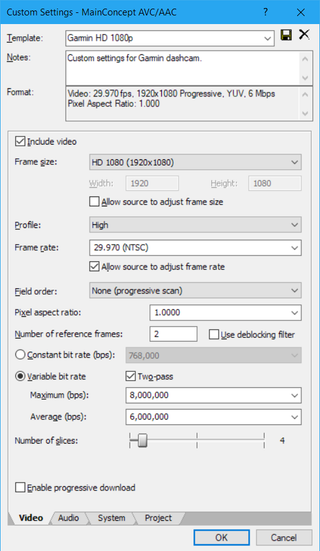
My Garmin DriveAssist 50 outputs full HD baseline MP4 videos with constant bitrate that is slightly higher than 8 Mbps. As with all dashcam videos, the quality is not something to get excited about but it isn’t too bad either. My standard process is simply to re-cut these videos to throw out idle time (e.g. while parked). Since I don’t really use them for further editing, compression settings are a bit on aggressive side.

I start by customizing Internet HD 1080p profile as it has most of configuration as I want it. What I do change is Profile level by simply increasing it to High. I consume there videos on my PC and there is simply no reason I could think of to go lower. And yes, High profile works on mobile phone too.

Dashcam videos lend themselves quite well to MP4 compression so I went with average variable rate of 6 Mbps. For moments when a bit more action is happening, a maximum of 8 Mbps should suffice. Note that I use two-pass encoding here in order to squeeze a bit more quality despite lower bitrate. This does double the encoding time but I find it reasonable compromise.

I also uncheck progressive download support as I don’t intend to stream these and this does give a few more bits to encoder.

Lastly, as my camera doesn’t record sound, I turn the audio off.

Easier Certificate Access in Chrome

Illustration

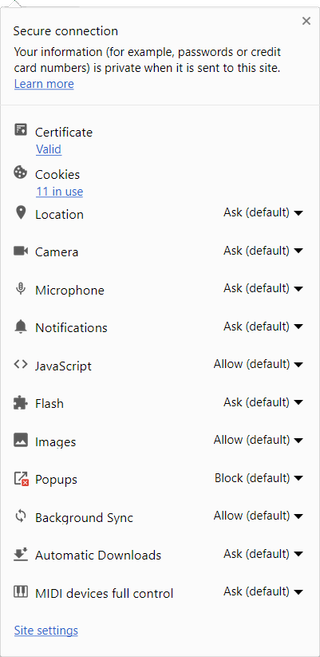
One of the rare reasons I have for occasionally using Internet Explorer is actually to view HTTPS certificate. In Internet Explorer accessing certificate is as easy as clicking on the lock icon. It used to be like that in Chrome too. And then some smartass decided to move setting in Developer Tools behind zillion mouse clicks.

However, since Chrome 60, Google has silently returned option to view certificate under its lock icon. To enable it, one has to navigate to chrome://flags/#show-cert-link and enable Show certificate link option. Quick restart later and option to view certificate is present at its natural place once again.

Why the heck is this not default, I have no idea.

My Settings for Panasonic LX100

On these pages I cover a wide array of topics. There is no order to it - just things that interest me and problems I faced trying to make them work. More often than not, posts are just a way for me to remember solutions thinly veiled into a more generic topic.

However, some posts are so specific I cannot even pretend I am actually helping somebody else than me. This is one of those posts - my general settings for Panasonic LX100 camera. Probably of no interest to anyone, oddly specific to my way of shooting photos, and for a camera that is a bit on the old side.

PS: Panasonic also makes available online full basic and advanced manual where much more detail can be found.

Rec
Photo StyleStandard: NR-2Standard profile with a touch of lower noise reduction.
Picture SizeL 12MNot sure why you would go any lower.
QualityFineOccasionally I might add Raw to it too, but not in general. I found myself too lazy to do a lot of post-processing.
AFS/AFF/AFCAFFThis setting is actually one I change the most and value varies between AFS (single focus) and AFF (flexible focus). They are both really similar but AFF does adjust a bit for moving subjects so it fits my use better as default choice.
Metering ModeMulti-meteringFor evening/night time photography I sometime change it to center-weighted or spot settings. However, for daytime use it almost always stays at default.
Burst RateMI love mid-speed setting as it gives me 7 pictures per second bursts while keeping the live view working. Even better, at this speed, fast card, and with JPEG-only you can shoot forever. For sports it is tempting to switch to high speed but there is no benefit if you are using AFF/AFC and you lose live view. Super-high speed uses electronic shutter so approach with care.
Auto Bracket-I almost never do bracketing of any kind other that for HDR which uses other settings anyhow. So I just pretend this doesn't exist.
Self Timer10 seconds (3)I really rarely use this - frankly cannot remember the last time I had it. However, I feel as having it shoot three pictures instead of one is a nice feature.
Highlight Shadow-I generally leave this at default setting. If I have picture where adjusting it would make sense I simply record it raw and edit it on computer.
i.DynamicStandardI found enabling this feature gives me better shadows for a general use case without having to fiddle with raws.
i.ResolutionOffIt basically just increases sharpness at the cost of fine detail.
Simultaneous record without filterOnI really rarely mess with filters but when I do, I like option to have the same picture with and without filter applied. Do notice this setting can only be changes if filter is selected and you are not shooting raw (annoying restriction!).
iHandheld Night ShotOnI love this setting on my FZ-300 as it helps tremendously during night recording. Unfortunately available only in automatic mode (iA).
iHDROffThis is automated HDR and not necessarily too bad if you are on a lazy side. However, I leave it off by default.
HDROffThis is manually enabled HDR and I set it to On only if I really want it. While some settings can be adjusted (e.g. EV) I like to use it on full auto.
Multi Exposure-This setting is more of a guide for taking pictures with multiple exposures. I could never been bothered to play much with it.
Time Lapse Shot-If you are fan of leaving your camera somewhere and recording a time-lapse, this camera has really nice helper. Just set the starting time and interval, and away you go.
Stop Motion Animation-If you like to make stop-animation movies this helper saves you a bit of time and even creates end video for you.
Panorama DirectionRightDefault is good.
Shutter TypeMechanicalWhile you can use higher shutter speeds with electronic shutter, that comes at the cost of various artifacts for the fast-moving subjects as it takes as much as 100 ms to read the whole sensor. That's an eternity. I prefer to use mechanical shutter unless silence is needed. In silent mode you have electronic shutter whether you like it or not.
Flash-Haven't used it in eternity - don't even know where flash that came with camera is.
Red-Eye RemovalOffThere used to be time when subjects in every picture seemingly had red vampire eyes. Not sure if people evolved in last few years or cameras got better but I don't see it happening as often anymore. And it is trivial to adjust in any photo editor so I leave it off.
ISO Limit Set6400While this camera can go all the way up to 25600, I find that anything above 6400 is really noisy. If I really need ISO that high I prefer to set it manually instead.
ISO Increments1EVI find that thirds are simply too finicky for me to bother.
Extended ISOOffUnlike with most other cameras, extended ISO doesn't increase your maximum setting but it lowers your minimum ISO to 100 instead of native 200. As this is done in software, I cannot see why you would bother.
Long Shutter Noise ReductionOnIt turns on only at low shutter speeds (1/15th and below) and it does make a difference if you need to go that low.
i.ZoomOffRealistically, it is a small digital zoom and it will impact your picture quality. Yes, 3x lens can be a bit limiting but suck it up.
Digital ZoomOffWhy would you do this to yourself?
Color SpacesRGBWhile Adobe RGB is better, sRGB is what literally every consumer device supports for viewing. Use Adobe RGB only if you know what you are doing.
StabilizerVertical-onlyFull stabilizer is a nice thing but quite annoying when panning - i.e. catching your kids running next to you.
Face RecognitionOffSomehow I never bothered to register the faces needed for this.
Profile SetupOffJust more stuff for kids and dogs.
 
Motion Picture
4K PhotoOffIt is nice idea but requires you to record everything in 4K and it changes compression method a bit.
Rec FormatMP4I find MP4 a bit better supported with amateur software.
Rec QualityFHD 20M 30pI rarely record videos and, when I do, I stick to HD most of the time. Only if I know I will be editing video further or upload it to YouTube I switch to 4K 100M 30p.
Picture ModeMotion-priorityAllows you to take 2M picture while video is recorded. I don't generally use it but I prefer it to Still-priority which essentially stops the movie in order to take picture. Annoying if done by accident.
Continuous AFOnFor most of time I want camera to refocus to action. If I am recording something where I can control field of action, I might switch it Off to keep focus steady.
Mic Level DisplayOnWhile it does add additional clutter, I find it useful to see if camera is picking up some noise it shouldn't.
Mic Level Adjust3It is default and I wen't with it.
Wind CutAutoI might change this if I record in windy situations but I generally just leave camera to decide.
Custom
Utilize Custom Set FeatureOffAs I am the only one using this camera, I never found myself needed different customization styles.
Silent ModeOffI usually keep it off as it enforces dreadful electronic shutter. However, I do keep it on quick menu for occasions when I need it.
AF/AE LockAF/AE LockI prefer to lock both focus and exposure when using that button. As I use it only if I am recording something,
AF/AE Lock HoldOnSetting this to on allows locking of AF/AE with the long press to the button and then using shutter without having to hold the button at the same time. I find default setting requires way too much fidgeting on a small space for my taste.
Shutter AFOnIt just enables half-press focus, full-press take picture mode.
Half Press ReleaseOffIt just enables half-press focus, full-press take picture mode.
Quick AFOffIdea of this setting is that camera focuses as you get ready to take picture. In reality it just eats up the battery and doesn't work when you need it the most (e.g. low-light).
Eye Sensor AFOffI prefer to set my focus by half-press and not to have camera refocus every time I switch between monitor and viewfinder.
Pinpoint AF TimeMIDI rarely use pinpoint AF so I simply go with default.
Pinpoint AF DisplayPIPI rarely use pinpoint AF so I simply go with default.
AF Assist LampOffSomehow I always find myself in positions behind glass or with shiny metal around me and AF assist lamp goes berserk. I might re-enable it during low-light.
Direct Focus AreaOffSince I use Fn1 to adjust focus area, I keep this off.
Focus/Release PriorityReleaseI'll rather have blurry picture than no picture at all.
AF+MFOffCall me lazy but I usually don't mess with auto-focus. If I want manual focus I simply use the side lever and go crazy.
MF AssistWheel FocusIt uses control ring for adjusting.
MF Assist DisplayPIPPicture-in-picture works for me.
MF GuideOnWhen using manual focus, a small scrollbar is shown with focus position marked.
PeakingOn / HighWhen manually focusing, blue dots are nice hint to know what is in the focus.
HistogramOnI would say histogram is mandatory. My favorite position is down-right; just far enough not to mess with picture framing.
Guide Line3x3I love guide lines. Makes framing much easier.
HighlightOnEven with histogram, it is easy to get picture overexposed by accident. With highlight you will see all those overexposed areas blinking and that is much harder to ignore. :)
Zebra PatternZEBRA2I like to see my errors early. :)
Monochrome Live ViewOffSupposedly it is easier to focus in black-and-white; I just ignore it.
Constant PreviewOnI love constant preview as it allows me to immediately see if I messed up Aperture/Shutter/ISO trinity instead of figuring that once my button is already half-pressed.
Exposure MeterOnWhen changing aperture or shutter speed, it is nice to see where you stand.
Dial GuideOnMore guides never hurts. :)
LVF Display StyleTop+BottomI like lot of details.
Monitor Display StyleTop+BottomI like lot of details.
Monitor Info DisplayOnWhy not having more info? :)
Recording AreaPictureI like my default setup to show how stills would look.
Remaining DisplayStillsAs I don't use videos much, I prefer to see number of stills remaining.
Auto Review2 secondsTwo seconds is more than enough to see picture you have taken.
Fn Button SetFn1I only remap Fn1 to Focus Area Set. Fn2 I leave on Wi-Fi and Fn3 stays LVF/Monitor switch.
Zoom LeverSmoothDefault is fine.
Control RingOffIf there is one thing I don't like on LX100 it is its control ring. It simply doesn't feel right and it is easy to move by accident. So I simply turn it off. Mind you, control ring still works for manual focus even if you turn it off.
Zoom ResumeOffI prefer to start on the widest zoom.
Quick MenuCustomDefault menu is OK but I find it a bit on a crowded side with all settings I can set more easily directly on the button. With custom menu, I can configure up to 3 screens with 5 settings each albeit I keep it on a single screen for even faster adjustments.
iA Button SwitchPress And HoldTwo things I find easy to do by accident: changing exposure compensation and entering iA mode. While I cannot do anything about oversensitive wheel, I can at least make later a bit harder to enter.
Video ButtonOnAs someone who takes stills most of the time, I like having video recording on a separate button.
Eye SensorLowI lower the sensibility of eye sensor to minimize misdetects.
Setup
Menu ResumeOnI prefer menu state to be remembered between visits.
Menu InformationOnI leave it on since even if you turn it off, you don't get an extra row.
Self Timer Auto OffOnI don't see purpose of remembering self-timer between camera restarts.
Playback
Delete ConfirmationYes firstI prefer to have Yes preselected when deleting images. I guess I like to live a dangerous life.
Custom Quick Menu
AFS/AFF/AFCI like to be able to quickly switch between AFS and AFF.
Metering ModeSwitching between 49-area and single-area focusing comes in handy.
HDRFor rare occasions I need HDR, I don't need to hunt it in menu.
StabilizerEssentially just to select between full and vertical-only stabilization.
Silent ModeNice for museums and similar places. Lousy for high-speed subjects.

My 4K Video Settings

Illustration

With a 4K camera in my family there came a need to find a sweet spot settings for those space hungry videos. In my case, the primary use for my 4K videos is a simple on-disk archiving and an occasional YouTube upload.

For video editing I personally use Sony Movie Studio Platinum 13. It is actually a quite well designed program without a steep learning curve, offering reasonably fast editing, and you get 4K support out of box. Yes, there might be better programs out there but they usually come either at a higher price point, without many options, or without 4K support of any kind. Movie Studio actually has two codecs supporting 4K.

I personally prefer using MainConcept AVC codec over Sony XAVC S. It might be argued that Sony XAVC S actually creates slightly better files than standard AVC codec, but customization options for that codec are non-existent. You get to select frame-rate and that is it. Resulting file is huge and maybe just slightly more manageable than what you get directly out of camera.

With MainConcept you not only get to chose your bitrate but it is also viewable on any MP4 supporting device. Yes, quality probably suffers a bit but you can improve it significantly by wisely selecting among many options. It might not be perfect but it is trouble-free - especially when your video has to be handled by a third-party.

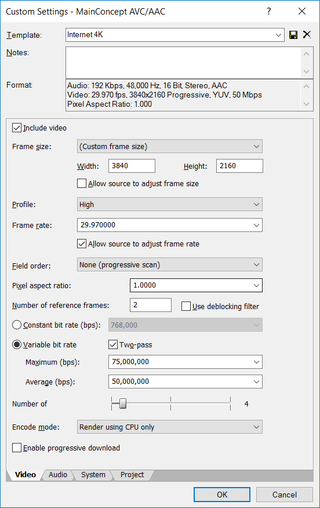
In template creation I started with Internet HD 1080p template and set frame size to 4K resolution (3840x2160). Why? Because I am lazy and that template is actually quite close to what I want.

For Profile I go with High. In theory using Baseline will offer you the most compatibility with devices and allow for playback on even older MP4 players. Main profile would allow for a bit smarter encoding, improving quality but requiring a bit more powerful playback device. High profile gives you the best quality with all the bells and whistles H.264 can offer but it will require a powerful device and a well built player. While it might be tempting to go with Main or even Baseline, this is completely unnecessary because we are not in 1080p land anymore. Pretty much any device capable of 4K playback supports High profile.

Frame rate and field order I never change. When creating project you can tell Movie Studio to match your video frame rate and just use whatever native framerate your camera gives. In my case that is 30p progressive NTSC and I use it throughout the edit process. Same goes for pixel aspect ratio I am yet to see be different than 1.

For number of reference frames I stick to the default of 2. In theory having more than that (up to 16) is allowed but I usually don’t go there. Reason is encoding time. While more reference frames can help with better motion detection, they increase time linearly without noticeable improvement in this particular quality. Where I did find them useful though is when encoding cartoons or something else that has a clean animation. For real-life footage, two is more than enough.

As my camera outputs 100 Mbps video, it makes sense to go lower to grab some file size savings. But how low is really still practical? I found my sweet spot at 50 Mbps average. This is still reasonably high that you don’t lose much of image quality even when it is shot in low light, noisy conditions. For occasional more complex scenes I usually allow for maximum of 75 Mbps (or 100 Mbps is video is really dynamic).

To help codec understand relative complexity of scenes and where to put that extra thump, I always go with two-pass encoding. Mind you, two-pass encoding will prolong your encoding time - you’ve guessed it - by (almost) double. However, the final result is worth it as you get the maximum bitrate when you need it and total file size is spot-on. Codec can try to do that dynamically within a single pass but two-pass approach leaves the guessing element out of it.

Number of threads I usually leave at default of 4 because I found it works well with my 4-core, 8-threads processor. It will keep my processor probably at around 90% usage allowing me to still use it for less intensive tasks while rendering is ongoing. And I render using CPU-only although I have a CUDA graphic card. While faster, CUDA algorithms have a noticeable quality drop (best explained in this video). Since I usually render my videos during night, I see no benefit in quality-for-speed exchange.

While I am at it, I also disable progressive download. Since I don’t stream these videos there is no benefit in using it and without it encoder can squeeze some extra bits.

Audio I leave at 192 Kbps at 48 kHz. Realistically, for audio I record 95% of the time, even less than 128 Kbps would be sufficient and probably nobody could hear the difference. However, cost of leaving it at default is minuscule enough that it is not worth thinking whether this video is one of those 5% where I have some music going on.

So, these settings work for me and I’ve tried to explain reasoning behind them. Your mileage may vary.