Linux, Unix, and whatever they call that world these days

Testing Native ZFS Encryption Speed (20.10)

[2020-11-02: There is a newer version of this post]

Illustration

Back in the days of Ubuntu 20.04, I did some ZFS native encryption testing. Results were not promising to say the least but they were done using ZFS 0.8.3 on Ubuntu 20.04. There was a hope that Ubuntu 20.10 bringing 0.8.4 would have a lot of performance improvements. So I repeated my testing.

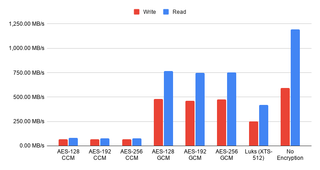
First I tested CCM and saw that results were 10-15% lower than in 20.04. However, this was probably not due to ZFS changes as both Luks and no-encryption numbers dropped too. As my testing was done on a virtual machine, it might not be anything related to Ubuntu at all. For all practical purposes, you can view those results as unchanged.

However, when I tested GCM encryption speed, I had to repeat test multiple times because I couldn’t believe the results I was seeing. ZFS native encryption using GCM was only about 25% slower than no encryption at all and handily beating Luks numbers. Compared to the last year’s times, GCM encryption got a fivefold improvement. That’s what I call optimization.

Last year I suggested going with native ZFS encryption only when you are really interested in ZFS having direct physical access to drives or if you were interested in encrypted send/receive. For performance critical scenarios, Luks was the way to go.

Now I can honestly recommend going with the native ZFS encryption (provided you use GCM). It’s as fast as Luks, allows ZFS to handle physical drives directly, and simplifies the setup. The only scenario where Luks still matters is if you want to completely hide your disk content as native encryption does leak some metadata (e.g., dataset properties). And no, you don’t need to upgrade to 20.10 for the speed as some performance improvements have been backported to 20.04 too.

I have migrated my own main file server to ZFS native encryption some time ago mostly to give ZFS direct disk access and without much care for array speed. Now there is no reason not to use it on desktop either.


PS: You can take a peek at the raw data if you’re so inclined.

PPS: Test procedure is in the previous post so I didn’t bother repeating it here.

Windows Product Key in VirtualBox BIOS

As many who use virtual machines for testing, I often need to reinstall the same. One thing that annoys me when getting Windows reinstalled is the prompt for the product key. Yes, you can bypass it temporarily but you still need to enter it when you go and activate the Windows. My laptop has product key embedded in BIOs. Why cannot I do the same with virtual machine? Well, maybe I can.

Investigation started by looking into where exactly the key is located on physical hardware. It was relatively easy to discover this was in ACPI MSDM table. Microsoft even has instructions on how to create the table. If you look a bit further, you can even find description on the MSDM fields.

OffsetLengthNameValue
04SignatureAlways MSDM.
44LengthTotal length is always 0x55.
81RevisionAlways 3.
91ChecksumChecksum over the whole table.
106OEM IDAnything goes; pad with spaces.
168OEM Table IDAnything goes albeit ASCII text is customary.
244OEM RevisionAny number will do but keep it positive (little-endian).
284Creator IDAnything goes; pad with spaces.
324Creator RevisionAny number will do but keep it positive (little-endian).
364MSDM VersionAlways 1.
404ReservedAlways 0.
444Data typeAlways 1.
484ReservedAlways 0.
524Key lengthAlways 0x1D.
5629Product keyProduct key with dashes included.

It was relatively easy to figure what goes in which field except for the checksum. I didn’t find which checksum method it uses but realistically there are only two when you have a 8-bit checksum. Either it’s CRC or a simple sum of all fields. Well, it was a sum for this one. No matter what, sum of all fields has to be 0. If all fields except for checksum would count up to 250, the checksum would need to be 6 in order to overflow to 0. Actually a trivial thing to calculate.

With the file generated, it’s easy to add it to the VirtualBox VM.

vboxmanage setextradata "^^VM^^" "VBoxInternal/Devices/acpi/0/Config/CustomTable" ^^/msdm\_table.dat^^

Now your Windows 10 installation can proceed with the product key pre-entered and only activation pending.


PS: This just automatically fills product key during install. You still need to do the activation. This will NOT work with the pirated key.

PPS: Yes, this is essentially the same thing as adding PID.txt to the installation media. The same result but without media modification.

PPPS: And yes, of course I made a generator.

Product Key:

Resizing Fixed VirtualBox Disk

I like using fixed disks for VirtualBox VMs. It just gives me a warm fuzzy feelings when it comes to stability. However, that comes at a cost of not being able to resize it easily. If you try, you’ll get VBOX_E_NOT_SUPPORTED error.

vboxmanage modifyhd Test.vdi --resize 262144
 0%...
 Progress state: VBOX_E_NOT_SUPPORTED
 VBoxManage: error: Failed to resize medium
 VBoxManage: error: Resizing to new size 274877906944 is not yet supported
 VBoxManage: error: Details: code VBOX_E_NOT_SUPPORTED (0x80bb0009)
 VBoxManage: error: Context: "RTEXITCODE handleModifyMedium(HandlerArg*)" at line 816

But that doesn’t meant it’s impossible.

First we stop VM and clone its disk to a new image. This will automatically make it dynamic. And it will take a while.

sudo vboxmanage clonemedium "Test.vdi" "Test_new1.vdi"
 0%...10%...20%...30%...40%...50%...60%...70%...80%...90%...100%
 Clone medium created in format 'VDI'. UUID: 96e20ba5-65f6-4248-b42e-ab48683a4cf9

With dynamic disk, we can now resize disk image.

sudo vboxmanage modifymedium disk "Test_new1.vdi" --resize 262144
 0%...10%...20%...30%...40%...50%...60%...70%...80%...90%...100%

But resizing leaves us with dynamic disk which is not what I wanted. So we convert it back to fixed. Will take long time but we again have fixed disk once done.

sudo vboxmanage clonemedium "Test_new1.vdi" "Test_new2.vdi" --variant Fixed
 0%...10%...20%...30%...40%...50%...60%...70%...80%...90%...100%
 Clone medium created in format 'VDI'. UUID: 2bc060b6-0637-43f9-8a55-8ac6bc69ea0d

Since we want direct replacement, we need to copy old UID to the new image.

UUID=`sudo vboxmanage showmediuminfo "Test.vdi" | egrep '^UUID' | awk '{print $2}'`
sudo vboxmanage internalcommands sethduuid "Test_new2.vdi" $UUID
 UUID changed to: 4f046c99-d76a-478f-95cf-f52b07927bd0

And now we can remove intermediate step.

rm "Test_new1.vdi"

Then we copy file system properties of old image to the new one (probably not needed but it doesn’t hurt).

sudo chmod --reference="Test.vdi" "Test_new2.vdi"
sudo chown --reference="Test.vdi" "Test_new2.vdi"

And finally we replace the old image with the new one.

mv "Test_new2.vdi" "Test.vdi"

This whole process will take ages and it will require enough space to copy disk twice. Increasing disk from 128 to 256 GB required 128+128+256 - essentially 4x the disk space. But sometime roundabout way is the only way. :)

Headless VirtualBox on Ubuntu Server 20.04

As expected, first we need to install VirtualBox.

sudo wget -q https://www.virtualbox.org/download/oracle_vbox_2016.asc -O- | sudo apt-key add -
echo "deb [arch=amd64] https://download.virtualbox.org/virtualbox/debian focal contrib" \
    | sudo tee /etc/apt/sources.list.d/virtualbox.list
sudo apt update
sudo apt-get install --yes virtualbox-6.1
sudo systemctl status vboxdrv

sudo usermod -aG vboxusers $USER

Since our server is headless, we will need a remote acces. This means installing Oracle’s extension pack with RDP support. You should be good installing this on your home system but you will need license for production deployments.

VBOXVER=`vboxmanage -v | cut -dr -f1`
wget -P /tmp \
    https://download.virtualbox.org/virtualbox/$VBOXVER/Oracle_VM_VirtualBox_Extension_Pack-$VBOXVER.vbox-extpack
vboxmanage extpack install /tmp/Oracle_VM_VirtualBox_Extension_Pack-$VBOXVER.vbox-extpack

With installation ready, we can approach creating VM. I’ll give an example of the Ubuntu Desktop but really anything goes.

mkdir -p /srv/virtualbox

vboxmanage createvm \
    --ostype Ubuntu_64 \
    --basefolder "^^/srv/virtualbox^^" \
    --register \
    --name "^^Test^^"

vboxmanage modifyvm "^^Test^^" \
    --memory 1024 \
    --nic1 nat \
    --vrde on --vrdeport ^^33890^^

vboxmanage createhd \
    --filename "^^/srv/virtualbox/Test/Test.vdi^^" \
    --format VDI --size ^^10240^^

vboxmanage storagectl "^^Test^^" \
    --name "SATA" \
    --add sata

vboxmanage storageattach "^^Test^^" \
    --storagectl SATA --port 0 --type hdd \
    --medium "/srv/virtualbox/Test/Test.vdi"

vboxmanage storageattach "^^Test^^" \
    --storagectl SATA --port 15 --type dvddrive \
    --medium ^^/tmp/ubuntu-20.04-desktop-amd64.iso^^

If you are using firewall, make sure to allow port through. For example, iptables would need the following adjustment.

iptables -A INPUT -p tcp --dport 33890 -j ACCEPT

With this, we’re finally ready to start the virtual machine.

vboxmanage startvm "^^Test^^" --type headless

To connect to it just use any Remote Desktop application.


PS: Authentication for RDP is highly recommended and you should probably check documentation to see what works best for you.

Manually Installing Ubuntu 20.04 on Surface Go

I love ZFS but it definitely doesn’t fit every situation. One situation it doesn’t fit is Surface Go. Not only device is low on RAM but it’s also low on disk space. And ZFS really hates when it doesn’t have enough disk space.

Now, one can install Ubuntu perfectly well without any shenanigans. Just follow a guide on how to boot install USB and you’re golden. But I like my installations to be a bit special. :)

After booting into Ubuntu desktop installation one needs a root prompt. All further commands are going to need root credentials anyhow.

sudo -i

The very first step should be setting up a few variables - disk, pool, host name, and user name. This way we can use them going forward and avoid accidental mistakes. Just make sure to replace these values with ones appropriate for your system.

DISK=/dev/disk/by-id/^^ata_disk^^
HOST=^^desktop^^
USER=^^user^^

Disk setup is really minimal .

blkdiscard $DISK

sgdisk --zap-all                       $DISK

sgdisk -n1:1M:+63M -t1:EF00 -c1:EFI    $DISK
sgdisk -n2:0:+448M -t2:8300 -c2:Boot   $DISK
sgdisk -n3:0:0     -t3:8309 -c3:Ubuntu $DISK

sgdisk --print                         $DISK

I usually encrypt just the root partition as having boot partition unencrypted does offer advantages and having standard kernels exposed is not much of a security issue.

cryptsetup luksFormat -q --cipher aes-xts-plain64 --key-size 512 \
    --pbkdf pbkdf2 --hash sha256 $DISK-part3

Since crypt device name is displayed on every startup, for Surface Go I like to use host name here.

cryptsetup luksOpen $DISK-part3 $HOST

Now we can prepare all needed partitions.

yes | mkfs.ext4 /dev/mapper/$HOST
mkdir /mnt/install
mount /dev/mapper/$HOST /mnt/install/

yes | mkfs.ext4 $DISK-part2
mkdir /mnt/install/boot
mount $DISK-part2 /mnt/install/boot/

mkfs.msdos -F 32 -n EFI $DISK-part1
mkdir /mnt/install/boot/efi
mount $DISK-part1 /mnt/install/boot/efi

To start the fun we need debootstrap package.

apt install --yes debootstrap

And then we can get basic OS on the disk. This will take a while.

debootstrap focal /mnt/install/

Our newly copied system is lacking a few files and we should make sure they exist before proceeding.

echo $HOST > /mnt/install/etc/hostname
sed "s/ubuntu/$HOST/" /etc/hosts > /mnt/install/etc/hosts
sed '/cdrom/d' /etc/apt/sources.list > /mnt/install/etc/apt/sources.list
cp /etc/netplan/*.yaml /mnt/install/etc/netplan/

If you are installing via WiFi, you might as well copy your wireless credentials:

mkdir -p /mnt/install/etc/NetworkManager/system-connections/
cp /etc/NetworkManager/system-connections/* /mnt/install/etc/NetworkManager/system-connections/

Finally we’re ready to “chroot” into our new system.

mount --rbind /dev  /mnt/install/dev
mount --rbind /proc /mnt/install/proc
mount --rbind /sys  /mnt/install/sys
chroot /mnt/install \
    /usr/bin/env DISK=$DISK HOST=$HOST USER=$USER \
    bash --login

Let’s not forget to setup locale and time zone.

locale-gen --purge "en_US.UTF-8"
update-locale LANG=en_US.UTF-8 LANGUAGE=en_US
dpkg-reconfigure --frontend noninteractive locales

dpkg-reconfigure tzdata

Now we’re ready to onboard the latest Linux image.

apt update
apt install --yes --no-install-recommends linux-image-generic linux-headers-generic

Followed by boot environment packages.

apt install --yes initramfs-tools cryptsetup keyutils grub-efi-amd64-signed shim-signed tasksel

Since we’re dealing with encrypted data, we should auto mount it via crypttab. If there are multiple encrypted drives or partitions, keyscript really comes in handy to open them all with the same password. As it doesn’t have negative consequences, I just add it even for a single disk setup.

echo "$HOST  UUID=$(blkid -s UUID -o value $DISK-part3)  none \
    luks,discard,initramfs,keyscript=decrypt_keyctl" >> /etc/crypttab
cat /etc/crypttab

To mount boot and EFI partition, we need to do some fstab setup too:

echo "UUID=$(blkid -s UUID -o value /dev/mapper/$HOST) \
    / ext4 noatime,nofail,x-systemd.device-timeout=5s 0 1" >> /etc/fstab
echo "PARTUUID=$(blkid -s PARTUUID -o value $DISK-part2) \
    /boot ext4 noatime,nofail,x-systemd.device-timeout=5s 0 1" >> /etc/fstab
echo "PARTUUID=$(blkid -s PARTUUID -o value $DISK-part1) \
    /boot/efi vfat noatime,nofail,x-systemd.device-timeout=5s 0 1" >> /etc/fstab
cat /etc/fstab

Now we get grub started and update our boot environment.

KERNEL=`ls /usr/lib/modules/ | cut -d/ -f1 | sed 's/linux-image-//'`
update-initramfs -u -k $KERNEL

Grub update is what makes EFI tick.

update-grub
grub-install --target=x86_64-efi --efi-directory=/boot/efi --bootloader-id=Ubuntu \
    --recheck --no-floppy

Finally we install out GUI environment. I personally like ubuntu-desktop-minimal but you can opt for ubuntu-desktop. In any case, it’ll take a considerable amount of time.

tasksel install ubuntu-desktop-minimal

Short package upgrade will not hurt.

apt dist-upgrade --yes

The only remaining task before restart is to create the user, assign a few extra groups to it, and make sure its home has correct owner.

sudo adduser --disabled-password --gecos '' $USER
usermod -a -G adm,cdrom,dip,lpadmin,plugdev,sudo $USER
passwd $USER

As install is ready, we can exit our chroot environment.

exit

And unmount our disk:

umount /mnt/install/boot/efi
umount /mnt/install/boot
mount | tac | awk '/\/mnt/ {print $3}' | xargs -i{} umount -lf {}

After the reboot you should be able to enjoy your installation.

reboot

PS: If you are doing install on normal desktop, check similar ZFS-based installation guide.

Getting Rid of Aspeed Firmware Warning

Every time I would run update-initramfs, I would receive the following warning on my SuperMicro machine:

update-initramfs -u
 update-initramfs: Generating /boot/initrd.img-5.4.0-42-generic
 W: Possible missing firmware /lib/firmware/ast_dp501_fw.bin for module ast

This issue is well-known and harmless. It’s just a hardcoded value that’s checked by ASPEED driver and, if file is not present, results in this warning.

If you are tired of it and you just want to make driver happy, create an empty file at that spot:

touch /lib/firmware/ast_dp501_fw.bin

And now the warning is gone. :)

IPv6 Prefix Delegation with NetPlan

No. That’s the short of it.

Longer version starts with me setting up my new Ubuntu server and deciding to use netplan to setup network interfaces. Nothing too big. Just a few bonds here and there. And all seemed fine until I tried to setup email and noticed the following message in syslog:

postfix/smtp[49721]: connect to alt1.aspmx.l.google.com[209.85.146.27]:25: Connection timed out
postfix/smtp[49721]: connect to aspmx5.googlemail.com[2607:f8b0:4002:c08::1b]:25: Network is unreachable

Once I double-checked, I noticed syslog was right - I only had link-local address assigned to interface. Ok, so DHCPv6 only turns on DHCP and not prefix delegation I use for my network. Easy-peasy, that’s surely matter of just turning on the correct setting…

Or finding a matching bug. Yep, prefix delegation that’s perfectly valid and well supported IPv6 address allocation method is not supported.

But ticket did solve my problem. As advised, I simply reverted to use networkd (don’t forget to use systemctl enable systemd-networkd).


PS: Here are my networkd files that work with IPv6 PD.

[NetDev]
Name=bond0
MACAddress=00:25:90:ba:31:40
Kind=bond

[Bond]
Mode=802.3ad
LACPTransmitRate=fast
MIIMonitorSec=100ms
TransmitHashPolicy=layer2+3
[Match]
Name=bond0

[DHCP]
RouteMetric=100
UseMTU=true

[Network]
DHCP=yes
IPv6PrefixDelegation=yes
IPv6PrivacyExtensions=true
LinkLocalAddressing=ipv6
ConfigureWithoutCarrier=yes
[Match]
PermanentMACAddress=00:25:90:ba:31:40

[Network]
Bond=lan
[Match]
PermanentMACAddress=00:25:90:ba:31:41

[Network]
Bond=lan

Encrypted ZFS Root on Ubuntu Server 20.04 (with USB Unlock)

It’s all nice and dandy to setup unencrypted ZFS on server or setting it up with boot encryption. However, what if we want to use USB to unlock the encrypted drive? And no, it’s not as crazy as it seems. Scenarios are actually plentiful.

One scenario is when you have your servers encrypted (as realistically everybody should) but you don’t necessarily want (or can) enter the password. If you can plug in USB with a key and make ZFS use that key, you suddenly have password-less boot without connecting to the server. After boot is done, you can unplug the USB and store it somewhere safe. And this can be done by literally anybody you trust - it doesn’t have to be you.

My favorite scenario is using it with self-erasing USB drive. You place the encryption key on the small drive and it will be there for every boot. You can use your server as you normally would. However, if power is lost, your key will disappear and content of server will not be accessible anymore. When would such crazy scenario happen you ask? Well, if anybody is stealing your server they have to unplug it first. And yes, your server is gone but at least your data is not.

I admit I never had that scenario happen to me - fortunately all my servers are still accounted for. But I did RMA disk drives. And worrying about erasing the data when you cannot access it anymore is a bit too late.

Whatever might be your case, let me guide you through setting up natively-encrypted ZFS with a key on the USB drive.

Once you enter the shell of the installation media, the very first step is setting up a few variables - location of disk and USB drive, followed by pool and host name. This way we can use them going forward and avoid accidental mistakes. Make sure to replace these values with the ones appropriate for your system.

DISK=/dev/disk/by-id/^^ata-xxx^^
USB=/dev/disk/by-id/^^usb-xxx^^
POOL=^^Ubuntu^^
HOST=^^server^^

Next let’s sort out question of the encryption key. Assumption is that the key will be on the first partition of the FAT formatted USB drive and we’ll mount it at /tmpusb. While you could create the key material directly, I personally prefer the passphrase as it makes life easier in the case of recovery. If you already have the passphrase on the drive just skip the last command as it will overwrite it.

mkdir /tmpusb
mount -t vfat -o rw "$USB-part1" /tmpusb
echo -n "^^password^^" > /tmpusb/boot.pwd

General idea of my disk setup is to maximize amount of space available for pool with the minimum of supporting partitions. If you are installing on SSD blkdiscard will trim all the data. You can safely ignore any errors on disks that don’t support it.

blkdiscard $DISK 2>/dev/null

sgdisk --zap-all                        $DISK

sgdisk -n1:1M:+127M -t1:EF00 -c1:EFI    $DISK
sgdisk -n2:0:+512M  -t2:8300 -c2:Boot   $DISK
sgdisk -n3:0:0      -t3:8309 -c3:Ubuntu $DISK

sgdisk --print                          $DISK

To kick off the fun of the installation we need debootstrap and zfsutils-linux package.

apt update
apt install --yes debootstrap zfsutils-linux

Now we’re ready to create system ZFS pool.

zpool create -o ashift=12 -o autotrim=on \
    -O compression=lz4 -O normalization=formD \
    -O acltype=posixacl -O xattr=sa -O dnodesize=auto -O atime=off \
    -O encryption=aes-256-gcm -O keyformat=passphrase -O keylocation=file:///tmpusb/boot.pwd \
    -O canmount=off -O mountpoint=none -R /mnt/install $POOL $DISK-part3
zfs create -o canmount=noauto -o mountpoint=/ $POOL/System
zfs mount $POOL/System

Assuming UEFI boot, two additional partitions are needed - one for EFI and one for booting. I don’t have ZFS pool for boot partition but a plain old ext4 as I find potential fixup works better that way.

yes | mkfs.ext4 $DISK-part2
mkdir /mnt/install/boot
mount $DISK-part2 /mnt/install/boot/

mkfs.msdos -F 32 -n EFI $DISK-part1
mkdir /mnt/install/boot/efi
mount $DISK-part1 /mnt/install/boot/efi

Bootstrapping Ubuntu on the newly created pool is next. This will take a while.

debootstrap focal /mnt/install/

zfs set devices=off $POOL

Our newly copied system is lacking a few files and we should make sure they exist before proceeding.

echo $HOST > /mnt/install/etc/hostname
sed '/cdrom/d' /etc/apt/sources.list > /mnt/install/etc/apt/sources.list
cp /etc/netplan/*.yaml /mnt/install/etc/netplan/

Finally we’re ready to “chroot” into our new system.

mount --rbind /dev  /mnt/install/dev
mount --rbind /proc /mnt/install/proc
mount --rbind /sys  /mnt/install/sys
chroot /mnt/install /usr/bin/env DISK=$DISK USB=$USB POOL=$POOL bash --login

Let’s not forget to setup locale and time zone.

locale-gen --purge "en_US.UTF-8"
update-locale LANG=en_US.UTF-8 LANGUAGE=en_US
dpkg-reconfigure --frontend noninteractive locales

dpkg-reconfigure tzdata

To mount EFI and boot partitions, we need to do some fstab setup too:

echo "PARTUUID=$(blkid -s PARTUUID -o value $DISK-part2) \
    /boot ext4 noatime,nofail,x-systemd.device-timeout=5s 0 1" >> /etc/fstab
echo "PARTUUID=$(blkid -s PARTUUID -o value $DISK-part1) \
    /boot/efi vfat noatime,nofail,x-systemd.device-timeout=5s 0 1" >> /etc/fstab
cat /etc/fstab

Now we’re ready to onboard the latest Linux image.

apt update
apt install --yes --no-install-recommends linux-image-generic linux-headers-generic

Followed by the boot environment packages.

apt install --yes zfs-initramfs plymouth grub-efi-amd64-signed shim-signed

Now it’s time to setup boot scripts to ensure USB drive is mounted before ZFS needs it. I found that initramfs’ init-premount directory is the ideal spot.

cat << EOF > /usr/share/initramfs-tools/scripts/init-premount/tmpusb
#!/bin/sh -e

PREREQ="udev"
prereqs() {
    echo "\$PREREQ"
}

case \$1 in
    prereqs)
        prereqs
        exit 0
    ;;
esac

USB="$USB"
POOL="$POOL"

echo "Waiting for \$USB"
for I in \`seq 1 20\`; do
    if [ -e "\$USB" ]; then break; fi
    echo -n .
    sleep 1
done
echo

sleep 2

if [ -e "\$USB" ]; then
    mkdir /tmpusb
    mount -t vfat -o ro "\$USB-part1" /tmpusb
    if [ \$? -eq 0 ]; then
        exit 0
    else
        echo "Error mounting \$USB-part1" >&2
    fi
else
    echo "Cannot find \$USB" >&2
fi
exit 1
EOF
# chmod 755 /usr/share/initramfs-tools/scripts/init-premount/tmpusb

# cat << EOF > /usr/share/initramfs-tools/scripts/init-bottom/tmpusb
#!/bin/sh -e

PREREQ="udev"
prereqs() {
    echo "\$PREREQ"
}

case \$1 in
    prereqs)
        prereqs
        exit 0
    ;;
esac

if [ -e "/tmpusb" ]; then
    umount /tmpusb
    rmdir /tmpusb
fi
EOF

chmod 755 /usr/share/initramfs-tools/scripts/init-bottom/tmpusb

The first script will wait for USB drive if needed and mount it at /tmpusb for ZFS to find. Second script is there just for a bit of cleanup.

If USB drive is not mounted, this will cause boot to fail. If we want ZFS to ask for the passphrase instead (despite having file as the keylocation) a further customization is needed. But note these commands might need adjustment and they definitely need to be repeated each time ZFS package is updated. I might go into the details in some future post but suffice to say this is really not future-proof solution but it’s the minimum set of changes that I could make sed work with.

sed -i 's/load-key/load-key -L prompt/' /usr/share/initramfs-tools/scripts/zfs
sed -i '0,/load-key/ {s/-L prompt//}' /usr/share/initramfs-tools/scripts/zfs
sed -i '/KEYSTATUS=/i \\t\t\t$ZFS load-key "${ENCRYPTIONROOT}"' /usr/share/initramfs-tools/scripts/zfs
sed -i '/KEYSTATUS=/i \\t\t\tKEYLOCATION=prompt' /usr/share/initramfs-tools/scripts/zfs

In lieu of warning, suffice it to say these changes to zfs script are suitable only for this scenario and don’t really work for anything else.

Now we get grub started and update our boot environment. Due to Ubuntu 19.10 having some kernel version kerfuffle, we need to manually create initramfs image. This is also a good moment to check if our script is in.

KERNEL=`ls /usr/lib/modules/ | cut -d/ -f1 | sed 's/linux-image-//'`
update-initramfs -u -k $KERNEL

lsinitramfs /boot/initrd.img-$KERNEL | grep tmpusb

Grub update is what makes EFI tick.

update-grub 2>/dev/null
grub-install --target=x86_64-efi --efi-directory=/boot/efi --bootloader-id=Ubuntu \
    --recheck --no-floppy

Short package upgrade will not hurt.

apt dist-upgrade --yes

We can omit creation of the swap dataset but I personally find its good to have it just in case.

zfs create -V 4G -b $(getconf PAGESIZE) -o compression=off -o logbias=throughput \
    -o sync=always -o primarycache=metadata -o secondarycache=none $POOL/Swap
mkswap -f /dev/zvol/$POOL/Swap
echo "/dev/zvol/$POOL/Swap none swap defaults 0 0" >> /etc/fstab
echo RESUME=none > /etc/initramfs-tools/conf.d/resume

This is a good time to install other packages (e.g.,openssh-server) and do any setup you might need (e.g.,firewall). If nothing else, then setup root password so you have a way to log in (I personally prefer to create another user and leave root passwordless).

passwd

As installation is finally done, we can exit our chroot environment.

exit

And cleanup mount points.

umount /mnt/install/boot/efi
umount /mnt/install/boot
mount | grep -v zfs | tac | awk '/\/mnt/ {print $3}' | xargs -i{} umount -lf {}
zpool export -a

After the reboot you should be able to enjoy your installation.

reboot

Ubuntu Server 20.04 on UEFI ZFS Without Encryption

Illustration

With Ubuntu 20.04 Desktop there is a (still experimental) ZFS setup option in the addition to long time manual ZFS installation option. For Ubuntu Server we’re still dependent on the manual steps.

Steps here follow my 19.10 server guide but without the encryption steps. While I normally love having encryption enabled, there are situations where it gets in the way. Most notable example is a machine which you cannot access remotely to enter encryption key.

To start with installation we need to get to the root prompt. Just find Enter Shell behind Help menu item (Shift+Tab comes in handy) and you’re there.

The very first step is setting up a few variables - disk, pool, host name, and user name. This way we can use them going forward and avoid accidental mistakes. Make sure to replace these values with the ones appropriate for your system. It’s a good idea to use something unique for the pool name (e.g., host name). I personally also like having pool name start with uppercase but there is no real rule here.

DISK=/dev/disk/by-id/^^ata_disk^^
POOL=^^Ubuntu^^
HOST=^^server^^
USER=^^user^^

To start the fun we need debootstrap and zfsutils-linux package. Unlike desktop installation, ZFS package is not installed by default.

apt install --yes debootstrap zfsutils-linux

General idea of my disk setup is to maximize amount of space available for pool with the minimum of supporting partitions. If you are planning to have multiple kernels, increasing boot partition size might be a good idea. Major change as compared to my previous guide is partition numbering. While having partition layout different than partition order had its advantages, a lot of partition editing tools would simply “correct” the partition order to match layout and thus cause issues down the road.

blkdiscard $DISK

sgdisk --zap-all                        $DISK

sgdisk -n1:1M:+127M -t1:EF00 -c1:EFI    $DISK
sgdisk -n2:0:+512M  -t2:8300 -c2:Boot   $DISK
sgdisk -n3:0:0      -t3:8309 -c3:Ubuntu $DISK

sgdisk --print                          $DISK

Now we’re ready to create system ZFS pool.

zpool create -o ashift=12 -O compression=lz4 -O normalization=formD \
    -O acltype=posixacl -O xattr=sa -O dnodesize=auto -O atime=off \
    -O canmount=off -O mountpoint=none -R /mnt/install $POOL $DISK-part3
zfs create -o canmount=noauto -o mountpoint=/ $POOL/root
zfs mount $POOL/root

Assuming UEFI boot, two additional partitions are needed. One for EFI and one for booting. Unlike what you get with the official guide, here I don’t have ZFS pool for boot partition but a plain old ext4. I find potential fixup works better that way and there is a better boot compatibility. If you are thinking about mirroring, making it bigger and ZFS might be a good idea. For a single disk, ext4 will do.

yes | mkfs.ext4 $DISK-part2
mkdir /mnt/install/boot
mount $DISK-part2 /mnt/install/boot/

mkfs.msdos -F 32 -n EFI $DISK-part1
mkdir /mnt/install/boot/efi
mount $DISK-part1 /mnt/install/boot/efi

Bootstrapping Ubuntu on the newly created pool is next. As we’re dealing with server you can consider using --variant=minbase rather than the full Debian system. I personally don’t see much value in that as other packages get installed as dependencies anyhow. In any case, this will take a while.

debootstrap focal /mnt/install/

zfs set devices=off $POOL

Our newly copied system is lacking a few files and we should make sure they exist before proceeding.

echo $HOST > /mnt/install/etc/hostname
sed '/cdrom/d' /etc/apt/sources.list > /mnt/install/etc/apt/sources.list
cp /etc/netplan/*.yaml /mnt/install/etc/netplan/

Finally we’re ready to “chroot” into our new system.

mount --rbind /dev  /mnt/install/dev
mount --rbind /proc /mnt/install/proc
mount --rbind /sys  /mnt/install/sys
chroot /mnt/install /usr/bin/env DISK=$DISK POOL=$POOL USER=$USER bash --login

Let’s not forget to setup locale and time zone. If you opted for minbase you can either skip this step or manually install locales and tzdata packages.

locale-gen --purge "en_US.UTF-8"
update-locale LANG=en_US.UTF-8 LANGUAGE=en_US
dpkg-reconfigure --frontend noninteractive locales

dpkg-reconfigure tzdata

Now we’re ready to onboard the latest Linux image.

apt update
apt install --yes --no-install-recommends linux-image-generic linux-headers-generic

Followed by boot environment packages.

apt install --yes zfs-initramfs grub-efi-amd64-signed shim-signed

To mount EFI and boot partitions, we need to do some fstab setup too:

echo "PARTUUID=$(blkid -s PARTUUID -o value $DISK-part2) \
    /boot ext4 noatime,nofail,x-systemd.device-timeout=1 0 1" >> /etc/fstab
echo "PARTUUID=$(blkid -s PARTUUID -o value $DISK-part1) \
    /boot/efi vfat noatime,nofail,x-systemd.device-timeout=1 0 1" >> /etc/fstab
cat /etc/fstab

Now we get grub started and update our boot environment. Due to Ubuntu 19.10 having some kernel version kerfuffle, we need to manually create initramfs image. As before, boot cryptsetup discovery errors during mkinitramfs and update-initramfs as OK.

KERNEL=`ls /usr/lib/modules/ | cut -d/ -f1 | sed 's/linux-image-//'`
update-initramfs -u -k $KERNEL

Grub update is what makes EFI tick.

update-grub
grub-install --target=x86_64-efi --efi-directory=/boot/efi --bootloader-id=Ubuntu \
    --recheck --no-floppy

Since we’re dealing with computer that will most probably be used without screen, it makes sense to install OpenSSH Server.

apt install --yes openssh-server

I also prefer to allow remote root login. Yes, you can create a sudo user and have root unreachable but that’s just swapping one security issue for another. Root user secured with key is plenty safe.

sed -i '/^#PermitRootLogin/s/^.//' /etc/ssh/sshd_config
mkdir /root/.ssh
echo "^^<mykey>^^" >> /root/.ssh/authorized_keys
chmod 644 /root/.ssh/authorized_keys

If you’re willing to deal with passwords, you can allow them too by changing both PasswordAuthentication and PermitRootLogin parameter. I personally don’t do this.

sed -i '/^#PasswordAuthentication yes/s/^.//' /etc/ssh/sshd_config
sed -i '/^#PermitRootLogin/s/^.//' /etc/ssh/sshd_config
sed -i 's/^PermitRootLogin prohibit-password/PermitRootLogin yes/' /etc/ssh/sshd_config
passwd

Short package upgrade will not hurt.

apt dist-upgrade --yes

We can omit creation of the swap dataset but I personally find its good to have it just in case.

zfs create -V 4G -b $(getconf PAGESIZE) -o compression=off -o logbias=throughput \
    -o sync=always -o primarycache=metadata -o secondarycache=none $POOL/swap
mkswap -f /dev/zvol/$POOL/swap
echo "/dev/zvol/$POOL/swap none swap defaults 0 0" >> /etc/fstab
echo RESUME=none > /etc/initramfs-tools/conf.d/resume

If one is so inclined, /home directory can get a separate dataset too.

rmdir /home
zfs create -o mountpoint=/home $POOL/home

And now we create the user and assign a few extra groups to it.

adduser --disabled-password --gecos '' $USER
asermod -a -G adm,cdrom,dip,plugdev,sudo $USER
chown -R $USER:$USER /home/$USER
passwd $USER

Consider enabling firewall. While you can go wild with firewall rules, I like to keep them simple to start with. All outgoing traffic is allowed while incoming traffic is limited to new SSH connections and responses to the already established ones.

apt install --yes man iptables iptables-persistent

iptables -F
iptables -X
iptables -Z
iptables -P INPUT DROP
iptables -P FORWARD DROP
iptables -P OUTPUT ACCEPT
iptables -A INPUT -i lo -j ACCEPT
iptables -A INPUT -m conntrack --ctstate ESTABLISHED,RELATED -j ACCEPT
iptables -A INPUT -p tcp --dport 22 -j ACCEPT
iptables -A INPUT -p icmp -j ACCEPT
iptables -A INPUT -p ipv6-icmp -j ACCEPT

netfilter-persistent save

As install is ready, we can exit our chroot environment.

exit

And cleanup our mount points.

umount /mnt/install/boot/efi
umount /mnt/install/boot
mount | grep -v zfs | tac | awk '/\/mnt/ {print $3}' | xargs -i{} umount -lf {}
zpool export -a

After the reboot you should be able to enjoy your installation.

reboot

XigmaNAS as a SysLog Server

As it is the machine with the most redundancy, there are many tasks that fall onto my XigmaNAS server. One of those tasks is serving as a syslog destination for other devices.

However, you cannot get that behavior by default as its syslog server will start in secure mode ([-ss](https://www.freebsd.org/cgi/man.cgi?query=syslogd&sektion=8)) without opening any socket. And there is no easy GUI way to make it accept syslog messages.

But here comes the power of postinit actions. Just add the following in SystemAdvancedCommand scripts as the new PostInit entry:

sed -i -e 's^ -ss^ -a 192.168.0.0/16^' /etc/rc.d/syslogd ; /etc/rc.d/syslogd restart

Your XigmaNAS server will now accept all messages coming from your local network.

PS: To troubleshoot settings, you can do the following on the command line:

$ kenv rc.debug=1
$ /etc/rc.d/syslogd restart