My adventures with Framework computer

Just the Hibernation Steps, Please

For a while now I use Ubuntu family of Linux on my Framework. While the exact flavor might change (Kubuntu rules! :)), two things remain the same. ZFS and hibernation. If you want to install system from scratch, you can find post for many different Ubuntu releases. What I don’t have is a separate post with just a hibernation steps. So, here it is.

First, let’s discuss prerequisites. You MUST have a separate swap partition if you want to hibernate to a file on ZFS. My setup is usually something like this:

PartitionTypeSize (MB)Description
EFIEF00FAT32255Small EFI partition
Boot8300EXT41,792Linux boot partition
Swap8200-65,536Swap, minimum 40% of RAM
(else)8309(whatever)one or more partitions for system and data

If you don’t have a separate partition, you can stop reading now and find somebody smarter. And no, the swap partition doesn’t need to be same size or larger than the amount of RAM you have. Minimum is actually 40% of your RAM (controlled by image_size parameter). Now, I’ve been guilty of having the swap the same size as RAM too. But that is not a requirement.

You also must have the Secure Boot disabled. If you don’t have it disabled, it will all seemingly work but system will never restore.

Steps I am giving here are for encrypted swap. I personally think that you should NEVER have unencrypted data on disk. NEVER. However, I am aware that most of people don’t care and see password entry as a chore. In one of the next posts, I will add instructions for non-encrypted swap too. So, if you are “one of those”, stay tuned.

Order of operations is quite fungible but, for the purpose of this guide, I will start with config files. There are two and whether you will modify them both depends on what you want to achieve.

In sleep.conf, I adjust suspend settings to allow for Suspend-then-Hibernate setup. My preference is to have system hibernate after 13 minutes of sleep but you can change that to your liking.

sudo sed -i 's/.*AllowSuspend=.*/AllowSuspend=yes/'                           /etc/systemd/sleep.conf
sudo sed -i 's/.*AllowHibernation=.*/AllowHibernation=yes/'                   /etc/systemd/sleep.conf
sudo sed -i 's/.*AllowSuspendThenHibernate=.*/AllowSuspendThenHibernate=yes/' /etc/systemd/sleep.conf
sudo sed -i 's/.*HibernateMode=.*/HibernateMode=platform shutdown/'           /etc/systemd/sleep.conf
sudo sed -i 's/.*HibernateDelaySec=.*/HibernateDelaySec=13min/'               /etc/systemd/sleep.conf

Second config file is to reassign power button to hibernation. This is just my preference and, if you want power button to stay as-is, you can omit this step. For this, you need to install pm-utils package, if not already present on your system. Again, these are settings I like so adjust as needed.

sudo apt install -y pm-utils
sudo sed -i 's/.*HandlePowerKey=.*/HandlePowerKey=hibernate/'                          /etc/systemd/logind.conf
sudo sed -i 's/.*HandleLidSwitch=.*/HandleLidSwitch=suspend-then-hibernate/'           /etc/systemd/logind.conf
sudo sed -i 's/.*HandleLidSwitchExternalPower=.*/HandleLidSwitchExternalPower=ignore/' /etc/systemd/logind.conf
sudo sed -i 's/.*HoldoffTimeoutSec=.*/HoldoffTimeoutSec=13s/'                          /etc/systemd/logind.conf

With this sorted out, you need to make sure computer doesn’t wake up. This step can be skipped quite often, but not so with Framework. With Framework laptops you need to manually disable wakeup for i2c_hid_acpi and xhci_hcd devices.

These commands will generate script I personally use and allow for its execution upon sleep.

cat << EOF | sudo tee /usr/lib/systemd/system-sleep/framework
#!/bin/sh
case \$1 in
  pre)
    for DRIVER_LINK in \$(find /sys/devices/ -name "driver" -print); do
      DEVICE_PATH=\$(dirname \$DRIVER_LINK)
      if [ ! -f "\$DEVICE_PATH/power/wakeup" ]; then continue; fi
      DRIVER=\$( basename \$(readlink -f \$DRIVER_LINK) )
      if [ "\$DRIVER" = "i2c_hid_acpi" ] || [ "\$DRIVER" = "xhci_hcd" ]; then
        echo disabled > \$DEVICE_PATH/power/wakeup
     fi
    done
  ;;
esac
EOF
sudo chmod +x /usr/lib/systemd/system-sleep/framework

Now, we can setup swap. For this I strongly recommend using variables as to avoid any naming issues. Replacewith your partition (e.g. /dev/disk/by-id/whatever-part3).

PART=<part>
UUID=`sudo blkid -s PARTUUID -o value $PART`

Assuming your swap is not initialized, you need to do so.

sudo cryptsetup luksFormat -q --type luks2 \
  --sector-size 4096 \
  --cipher aes-xts-plain64 --key-size 256 \
  --pbkdf argon2i /dev/disk/by-partuuid/$UUID
sudo cryptsetup luksOpen \
  --persistent --allow-discards \
  --perf-no_write_workqueue --perf-no_read_workqueue \
  /dev/disk/by-partuuid/$UUID $UUID
mkswap /dev/mapper/$UUID

Of course, adding this to both crypttab and fstab is also needed for swap to work properly.

echo "$UUID PARTUUID=$UUID none luks,discard,initramfs,keyscript=decrypt_keyctl" | sudo tee -a /etc/crypttab
echo "/dev/mapper/$UUID none swap sw,nofail 0 0" | sudo tee -a /etc/fstab

The final step is adding swap as RESUME into grub. Note that swap will be identified based on partition UUID.

sudo sed -i "s/^GRUB_CMDLINE_LINUX_DEFAULT.*/GRUB_CMDLINE_LINUX_DEFAULT=\"quiet splash \
  rtc_cmos.use_acpi_alarm=1 \
  RESUME=UUID=$(blkid -s UUID -o value /dev/mapper/$UUID)\"/" \
  /etc/default/grub

With these things in place, you should be able to use hibernate. To check, use systemctl.

sudo systemctl hibernate

And yes, you can probably use these steps with any laptop, not just Framework. However, I tested this on Framework and thus will not make other claims. :)

Sweet Dreams, My Dear Framework

Setting up sleep on my Framework 13 was a bit annoying but, once set, it worked perfectly. However, the same solution didn’t work on my Framework 16. While my installation is far from standard, the hibernation steps are quite straighforward:

  1. Setup swap partition RESUME variable in grub loader
  2. Adjust sleep.conf
  3. Disable wakeup for troublesome components so your laptop doesn’t wake immediately

And it was the step 3 that presented the problem - the darn thing kept waking up.

Since I sorted this out with Framework 13, I figured I can do the same for Framework 16. Even better, I found a forum post that actually told me which components need more of a sleep.

echo disabled > /sys/devices/pci0000:00/0000:00:08.1/0000:c1:00.3/usb1/1-4/1-4.3/power/wakeup
echo disabled > /sys/devices/platform/AMDI0010:03/i2c-1/i2c-PIXA3854:00/power/wakeup
echo disabled >/sys/devices/LNXSYSTM:00/LNXSYBUS:00/PNP0A08:00/device:4b/PNP0C09:00/PNP0C0D:00/power/wakeup

Yes, it was different than my approach of disabling them in udev rules, but the same idea overall. And it even has the same suspects as for Framework 13, most notably Touchpad (i2c_hid_acpi), lid switch (button), and USB xHCI (xhci_hcd). Full of hope, I tried that and my computer still woke up.

My next step was to check the file (yes, I blindly copy/pasted it) and problem was obvious. My devices were at a different path. So I adjusted, tried it again, finished up a blog post, and called it a day. I mean, everything was working perfectly. Or so I thought.

After a few days, I placed computer into hibernate only for the darn thing to wake up on me. What the heck? I though I solved that issue. So I checked and noticed my devices were at slightly different location. Hm, maybe in all the fuss around finishing up blog post I accidentally made an error. So I addjusted paths and, with everything working correctly, called it a day.

But, guess what, in a few days I got the same issue again. And this time I was certain I had it done correctly. However, device paths were changed again. With so many independent USB devices, plug-and-play was moving stuff around every time system was rebooted.

So, I needed to script my /usr/lib/systemd/system-sleep/framework a bit smarter. At the end I ended up with this:

#!/bin/sh
case $1 in
  pre)
    for DRIVER_LINK in $(find /sys/devices/ -name "driver" -print); do
      DEVICE_PATH=$(dirname $DRIVER_LINK)
      if [ ! -f "$DEVICE_PATH/power/wakeup" ]; then continue; fi
      DRIVER=$( basename $(readlink -f $DRIVER_LINK) )
      if [ "$DRIVER" = "i2c_hid_acpi" ] || [ "$DRIVER" = "xhci_hcd" ]; then
        echo disabled > $DEVICE_PATH/power/wakeup
     fi
    done
  ;;
esac

This will search for naughty devices every time hibernate is called upon and turn off wakeup. If PnP moves them, no worries, script will find them again.

And yes, the same script works for both Framework 13 and 16.


P.S.: While I mention button driveer in text, script actually doesn’t disable wakeup on lid switch. I kinda like computer to wake when I open it.

Ubuntu 24.04 ZFS Mirror on Framework 16 Laptop (with Hibernate)

ZFS was, and still is, the primary driver for my Linux adventures. Be it snapshots or seamless data restoration, once you go ZFS it’s really hard to go back. And to get the full benefits of ZFS setup you need at least two drives. Since my Framework 16 came with two drives, the immediate idea was to setup ZFS mirror.

While Framework 16 does have two NVMe drives, they are not the same. One of them is full-size M.2 2280 slot and that’s the one I love. The other one is rather puny 2230 in size. Since M.2 2230 SSDs are limited to 2 TB in size, that also puts an upper limit on our mirror size. However, I still decided to combine it with a 4 TB drive.

My idea for setup is as follows: I match the smaller drive partitioning exactly so I can have myself as much mirrored disk space as possible. Leftover space I get to use for files that are more forgiving when it comes to a data loss.

I also wanted was a full disk encryption using LUKS (albeit most of the steps work if you have native ZFS encryption too). Since this is a laptop, I definitely wanted hibernation support too as it makes life much easier.

Now, easy and smart approach might be to use Ubuntu’s ZFS installer directly and let it sort everything out. And let nobody tell you anything is wrong with that. However, I personally like a bit more controlled approach that requires a lot of manual steps. And no, I don’t remember them by heart - I just do a lot of copy/paste.

With that out of the way, let’s go over the necessary steps.

The first step is to boot into the “Try Ubuntu” option of the USB installation. Once we have a desktop, we want to open a terminal. And, since all further commands are going to need root access, we can start with that.

sudo -i

Next step should be setting up a few variables - disk, pool name, hostname, and username. This way we can use them going forward and avoid accidental mistakes. Just make sure to replace these values with ones appropriate for your system.

DISK1=/dev/disk/by-id/<disk1>
DISK2=/dev/disk/by-id/<disk2>
HOST=<hostname>
USERNAME=<username>

On a smaller drive I wanted 3 partitions. The first two partitions are unencrypted and in charge of booting. While I love encryption, I almost never encrypt the boot partition in order to make my life easier as you cannot seamlessly integrate the boot partition password prompt with the later password prompt thus requiring you to type the password twice (or thrice if you decide to use native ZFS encryption on top of that). Third partition would be encrypted and take the rest of the drive.

On bigger drive I decided to have 5 partitions. First three would match the smaller drive. Fourth partition is 96 GB swap in order to accommodate full the worst case scenario. Realistically, even though my laptop has 96 GB of RAM, I could have gone with a smaller swap partition but I decided to reserve this space for potential future adventures. The last partition will be for extra non-mirrored data.

All these requirements come in the following few partitioning commands:

DISK1_LASTSECTOR=$(( `blockdev --getsz $DISK1` / 2048 * 2048 - 2048 - 1 ))
DISK2_LASTSECTOR=$(( `blockdev --getsz $DISK2` / 2048 * 2048 - 2048 - 1 ))

blkdiscard -f $DISK1 2>/dev/null
sgdisk --zap-all                                 $DISK1
sgdisk -n1:1M:+127M            -t1:EF00 -c1:EFI  $DISK1
sgdisk -n2:0:+1920M            -t2:8300 -c2:Boot $DISK1
sgdisk -n3:0:$DISK1_LASTSECTOR -t3:8309 -c3:LUKS $DISK1
sgdisk --print                                   $DISK1

PART1UUID=`blkid -s PARTUUID -o value $DISK1-part1`
PART2UUID=`blkid -s PARTUUID -o value $DISK1-part2`

blkdiscard -f $DISK2 2>/dev/null
sgdisk --zap-all                                                $DISK2
sgdisk -n1:1M:+127M            -t1:EF00 -c1:EFI  -u1:$PART1UUID $DISK2
sgdisk -n2:0:+1920M            -t2:8300 -c2:Boot -u2:$PART2UUID $DISK2
sgdisk -n3:0:$DISK1_LASTSECTOR -t3:8309 -c3:LUKS -u3:R          $DISK2
sgdisk -n4:0:+96G              -t4:8200 -c4:Swap -u4:R          $DISK2
sgdisk -n5:0:$DISK2_LASTSECTOR -t5:8309 -c5:LUKS                $DISK2
sgdisk --print                                                  $DISK2

And yes, using the same partition UUIDs for boot drives is important and we’ll use it later to have a mirror of our boot data too.

The next step is to setup all LUKS partitions. If you paid attention, that means we need to repeat formatting a total of 4 times. Unless you want to deal with multiple password prompts, make sure to use the same password for each:

cryptsetup luksFormat -q --type luks2 \
    --sector-size 4096 \
    --cipher aes-xts-plain64 --key-size 256 \
    --pbkdf argon2i $DISK1-part3

cryptsetup luksFormat -q --type luks2 \
    --sector-size 4096 \
    --cipher aes-xts-plain64 --key-size 256 \
    --pbkdf argon2i $DISK2-part3

cryptsetup luksFormat -q --type luks2 \
    --sector-size 4096 \
    --cipher aes-xts-plain64 --key-size 256 \
    --pbkdf argon2i $DISK2-part4

cryptsetup luksFormat -q --type luks2 \
    --sector-size 4096 \
    --cipher aes-xts-plain64 --key-size 256 \
    --pbkdf argon2i $DISK2-part5

Since creating encrypted partitions doesn’t mount them, we do need this as a separate step. I like to name my LUKS devices based on partition names so we can recognize them more easily:

cryptsetup luksOpen \
    --persistent --allow-discards \
    --perf-no_write_workqueue --perf-no_read_workqueue \
    $DISK1-part3 ${DISK1##*/}-part3
cryptsetup luksOpen \
    --persistent --allow-discards \
    --perf-no_write_workqueue --perf-no_read_workqueue \
    $DISK2-part3 ${DISK2##*/}-part3
cryptsetup luksOpen \
    --persistent --allow-discards \
    --perf-no_write_workqueue --perf-no_read_workqueue \
    $DISK2-part4 ${DISK2##*/}-part4
cryptsetup luksOpen \
    --persistent --allow-discards \
    --perf-no_write_workqueue --perf-no_read_workqueue \
    $DISK2-part5 ${DISK2##*/}-part5

Finally, we can set up our mirrored ZFS pool with an optional step of setting quota to roughly 85% of disk capacity. Since we’re using LUKS, there’s no need to setup any ZFS keys. Name of the mirrored pool will match name of the host and it will contain several datasets to start with. It’s a good starting point, adjust as needed:

zpool create -o ashift=12 -o autotrim=on \
    -O compression=lz4 -O normalization=formD \
    -O acltype=posixacl -O xattr=sa -O dnodesize=auto -O atime=off \
    -O quota=1600G \
    -O canmount=off -O mountpoint=none -R /mnt/install \
    ${HOST^} mirror /dev/mapper/${DISK1##*/}-part3 /dev/mapper/${DISK2##*/}-part3

zfs create -o canmount=noauto -o mountpoint=/ \
    -o reservation=100G \
    ${HOST^}/System
zfs mount ${HOST^}/System

zfs create -o canmount=noauto -o mountpoint=/home \
           ${HOST^}/Home
zfs mount ${HOST^}/Home
zfs set canmount=on ${HOST^}/Home

zfs create -o canmount=noauto -o mountpoint=/Data \
           ${HOST^}/Data
zfs set canmount=on ${HOST^}/Data

zfs set devices=off ${HOST^}

Of course, we can also setup our extra non-mirrored pool:

zpool create -o ashift=12 -o autotrim=on \
    -O compression=lz4 -O normalization=formD \
    -O acltype=posixacl -O xattr=sa -O dnodesize=auto -O atime=off \
    -O quota=1600G \
    -O canmount=on -O mountpoint=/Extra \
    ${HOST^}Extra /dev/mapper/${DISK2##*/}-part5

With ZFS done, we might as well setup boot, EFI, and swap partitions too. Any yes, we don’t have mirrored boot and EFI at this time; we’ll sort that out later.

yes | mkfs.ext4 $DISK1-part2
mkdir /mnt/install/boot
mount $DISK1-part2 /mnt/install/boot/

mkfs.msdos -F 32 -n EFI -i 4d65646f $DISK1-part1
mkdir /mnt/install/boot/efi
mount $DISK1-part1 /mnt/install/boot/efi

mkswap /dev/mapper/${DISK2##*/}-part4

At this time, I also sometimes disable IPv6 as I’ve noticed that on some misconfigured IPv6 networks it takes ages to download packages. This step is both temporary (i.e., IPv6 is disabled only during installation) and fully optional.

sysctl -w net.ipv6.conf.all.disable_ipv6=1
sysctl -w net.ipv6.conf.default.disable_ipv6=1
sysctl -w net.ipv6.conf.lo.disable_ipv6=1

To start the fun we need to debootstrap our OS. As of this step, you must be connected to the Internet.

apt update
apt dist-upgrade --yes
apt install --yes debootstrap
debootstrap noble /mnt/install/

We can use our live system to update a few files on our new installation:

echo $HOST > /mnt/install/etc/hostname
sed "s/ubuntu/$HOST/" /etc/hosts > /mnt/install/etc/hosts
rm /mnt/install/etc/apt/sources.list
cp /etc/apt/sources.list.d/ubuntu.sources /mnt/install/etc/apt/sources.list.d/ubuntu.sources
cp /etc/netplan/*.yaml /mnt/install/etc/netplan/

At last, we’re ready to chroot into our new system.

mount --rbind /dev  /mnt/install/dev
mount --rbind /proc /mnt/install/proc
mount --rbind /sys  /mnt/install/sys
chroot /mnt/install /usr/bin/env \
    DISK1=$DISK1 DISK2=$DISK2 HOST=$HOST USERNAME=$USERNAME \
    bash --login

With our newly installed system running, let’s not forget to set up locale and time zone.

locale-gen --purge "en_US.UTF-8"
update-locale LANG=en_US.UTF-8 LANGUAGE=en_US
dpkg-reconfigure --frontend noninteractive locales

ln -sf /usr/share/zoneinfo/America/Los_Angeles /etc/localtime
dpkg-reconfigure -f noninteractive tzdata

Now we’re ready to onboard the latest Linux image.

apt update
apt install --yes --no-install-recommends \
    linux-image-generic linux-headers-generic

Now we set up crypttab so our encrypted partitions are decrypted on boot.

echo "${DISK1##*/}-part3 $DISK1-part3 none \
      luks,discard,initramfs,keyscript=decrypt_keyctl" >> /etc/crypttab
echo "${DISK2##*/}-part3 $DISK2-part3 none \
      luks,discard,initramfs,keyscript=decrypt_keyctl" >> /etc/crypttab

echo "${DISK2##*/}-part4 $DISK2-part4 none \
      luks,discard,initramfs,keyscript=decrypt_keyctl" >> /etc/crypttab

echo "${DISK2##*/}-part5 $DISK2-part5 none \
      luks,discard,initramfs,keyscript=decrypt_keyctl" >> /etc/crypttab

cat /etc/crypttab

To mount all those partitions, we also need some fstab entries. ZFS entries are not strictly needed. I just like to add them in order to hide our LUKS encrypted ZFS from the file manager:

echo "PARTUUID=$(blkid -s PARTUUID -o value $DISK1-part2) \
    /boot ext4 noatime,nofail,x-systemd.device-timeout=3s 0 1" >> /etc/fstab
echo "PARTUUID=$(blkid -s PARTUUID -o value $DISK1-part1) \
    /boot/efi vfat noatime,nofail,x-systemd.device-timeout=3s 0 1" >> /etc/fstab

echo "/dev/mapper/${DISK1##*/}-part3 \
    none auto nofail,nosuid,nodev,noauto 0 0" >> /etc/fstab
echo "/dev/mapper/${DISK2##*/}-part3 \
    none auto nofail,nosuid,nodev,noauto 0 0" >> /etc/fstab

echo "/dev/mapper/${DISK2##*/}-part4 \
    swap swap nofail 0 0" >> /etc/fstab

echo "/dev/mapper/${DISK2##*/}-part5 \
    none auto nofail,nosuid,nodev,noauto 0 0" >> /etc/fstab

cat /etc/fstab

On systems with a lot of RAM, I like to adjust memory settings a bit. This is inconsequential in the grand scheme of things, but I like to do it anyway.

echo "vm.swappiness=10" >> /etc/sysctl.conf
echo "vm.min_free_kbytes=1048576" >> /etc/sysctl.conf

Now we can create the boot environment:

apt install --yes zfs-initramfs cryptsetup keyutils grub-efi-amd64-signed shim-signed
update-initramfs -c -k all

And then, we can get grub going. Do note we also set up booting from swap (needed for hibernation) here too. If you’re using secure boot, bootloaded-id HAS to be Ubuntu.

apt install --yes grub-efi-amd64-signed shim-signed
sed -i "s/^GRUB_CMDLINE_LINUX_DEFAULT.*/GRUB_CMDLINE_LINUX_DEFAULT=\"quiet splash \
    RESUME=UUID=$(blkid -s UUID -o value /dev/mapper/${DISK2##*/}-part4)\"/" \
    /etc/default/grub
update-grub
grub-install --target=x86_64-efi --efi-directory=/boot/efi \
    --bootloader-id=Ubuntu --recheck --no-floppy

I don’t like snap so I preemptively banish it from ever being installed:

apt remove --yes snapd 2>/dev/null
echo 'Package: snapd'    > /etc/apt/preferences.d/snapd
echo 'Pin: release *'   >> /etc/apt/preferences.d/snapd
echo 'Pin-Priority: -1' >> /etc/apt/preferences.d/snapd
apt update

And now, finally, we can install our desktop environment.

apt install --yes ubuntu-desktop-minimal man

Since Firefox is a snapd package (banished), we can install it manually:

add-apt-repository --yes ppa:mozillateam/ppa
cat << 'EOF' | sed 's/^    //' | tee /etc/apt/preferences.d/mozillateamppa
    Package: firefox*
    Pin: release o=LP-PPA-mozillateam
    Pin-Priority: 501
EOF
apt update && apt install --yes firefox

Chrome aficionados, can install it too:

pushd /tmp
wget --inet4-only https://dl.google.com/linux/direct/google-chrome-stable_current_amd64.deb
apt install ./google-chrome-stable_current_amd64.deb
popd

If you still remember the start of this post, we are yet to mirror our boot and EFI partition. For this, I have a small utility we might as well install now:

wget -O- http://packages.medo64.com/keys/medo64.asc | sudo tee /etc/apt/trusted.gpg.d/medo64.asc
echo "deb http://packages.medo64.com/deb stable main" | sudo tee /etc/apt/sources.list.d/medo64.list
apt update
apt install -y syncbootpart
syncbootpart

With Framework 16, there are no mandatory changes you need to do in order to have the system working. That said, I still like to do a few changes; the first of them is to allow trim operation on expansion cards:

cat << EOF | tee /etc/udev/rules.d/42-framework-storage.rules
ACTION=="add|change", SUBSYSTEM=="scsi_disk", ATTRS{idVendor}=="13fe", ATTRS{idProduct}=="6500", ATTR{provisioning_mode}:="unmap"
ACTION=="add|change", SUBSYSTEM=="scsi_disk", ATTRS{idVendor}=="32ac", ATTRS{idProduct}=="0005", ATTR{provisioning_mode}:="unmap"
ACTION=="add|change", SUBSYSTEM=="scsi_disk", ATTRS{idVendor}=="32ac", ATTRS{idProduct}=="0010", ATTR{provisioning_mode}:="unmap"
EOF

Since we’re doing hibernation, we might as well disable some wake up events that might interfere. I explain the exact process in another blog post but suffice it to say, this works for me:

cat << EOF | sudo tee /etc/udev/rules.d/42-disable-wakeup.rules
ACTION=="add", SUBSYSTEM=="i2c", DRIVER=="i2c_hid_acpi", ATTRS{name}=="PIXA3854:00", ATTR{power/wakeup}="disabled"
ACTION=="add", SUBSYSTEM=="pci", DRIVER=="xhci_hcd", ATTRS{subsystem_device}=="0x0001", ATTRS{subsystem_vendor}=="0xf111", ATTR{power/wakeup}="disabled"
ACTION=="add", SUBSYSTEM=="serio", DRIVER=="atkbd", ATTR{power/wakeup}="disabled"
ACTION=="add", SUBSYSTEM=="usb", DRIVER=="usb", ATTR{power/wakeup}="disabled"
EOF

[2025-01-11] Probably better way is creating a small pre-hibernate script that will hunt down these devices:

cat << EOF | sudo tee /usr/lib/systemd/system-sleep/framework
#!/bin/sh
case \$1 in
  pre)
    for DRIVER_LINK in \$(find /sys/devices/ -name "driver" -print); do
      DEVICE_PATH=\$(dirname \$DRIVER_LINK)
      if [ ! -f "\$DEVICE_PATH/power/wakeup" ]; then continue; fi
      DRIVER=\$( basename \$(readlink -f \$DRIVER_LINK) )
      if [ "\$DRIVER" = "button" ] || [ "\$DRIVER" = "i2c_hid_acpi" ] || [ "\$DRIVER" = "xhci_hcd" ]; then
        echo disabled > \$DEVICE_PATH/power/wakeup
     fi
    done
  ;;
esac
EOF

sudo chmod +x /usr/lib/systemd/system-sleep/framework

For hibernation I like to change sleep settings so that hibernation kicks in after 13 minutes of sleep:

sed -i 's/.*AllowSuspend=.*/AllowSuspend=yes/' \
    /etc/systemd/sleep.conf
sed -i 's/.*AllowHibernation=.*/AllowHibernation=yes/' \
    /etc/systemd/sleep.conf
sed -i 's/.*AllowSuspendThenHibernate=.*/AllowSuspendThenHibernate=yes/' \
    /etc/systemd/sleep.conf
sed -i 's/.*HibernateDelaySec=.*/HibernateDelaySec=13min/' \
    /etc/systemd/sleep.conf

For that we also need to do a minor lid switch configuration adjustment:

apt install -y pm-utils

sed -i 's/.*HandlePowerKey=.*/HandlePowerKey=hibernate/' \
    /etc/systemd/logind.conf
sed -i 's/.*HandleLidSwitch=.*/HandleLidSwitch=suspend-then-hibernate/' \
    /etc/systemd/logind.conf
sed -i 's/.*HandleLidSwitchExternalPower=.*/HandleLidSwitchExternalPower=suspend-then-hibernate/' \
    /etc/systemd/logind.conf

Lastly, we need to have a user too.

adduser --disabled-password --gecos '' $USERNAME
usermod -a -G adm,cdrom,dialout,dip,lpadmin,plugdev,sudo,tty $USERNAME
echo "$USER ALL=NOPASSWD:ALL" > /etc/sudoers.d/$USERNAME
passwd $USERNAME

It took a while, but we can finally exit our debootstrap environment:

exit

Let’s clean all mounted partitions and get ZFS ready for next boot:

sync
umount /mnt/install/boot/efi
umount /mnt/install/boot
mount | grep -v zfs | tac | awk '/\/mnt/ {print $3}' | xargs -i{} umount -lf {}
zpool export -a

After reboot, we should be done and our new system should boot with a password prompt.

reboot

Once we log into it, I like to first increase text size a bit:

gsettings set org.gnome.desktop.interface text-scaling-factor 1.25

Now we can also test hibernation:

sudo systemctl hibernate

If you get Failed to hibernate system via logind: Sleep verb "hibernate" not supported, go into BIOS and disable secure boot (Enforce Secure Boot option). Unfortunately, the secure boot and hibernation still don’t work together but there is some work in progress to make it happen in the future. At this time, you need to select one or the other.

Assuming all works nicely, we can get firmware updates going:

fwupdmgr enable-remote -y lvfs-testing
fwupdmgr refresh
fwupdmgr update

And that’s it - just half a thousand steps and you have Ubuntu 24.04 with a ZFS mirror.
Repurposing Airplane Mode

Having QMK based keyboard on Framework 16 gives quite a lot of flexibility to change keyboard mapping to whatever suits you. The only problem is that the default layout is as good as it gets considering the key count. So, what can we even improve? Well, how about using Airplane Mode key for something useful? Well, that actually isn’t as straightforward as it could be.

Due to how ISO keyboard definitions are made, airplane mode key gets processed before it hits keymap.c. So, we can go a bit deeper in quantum definitions and edit keymap_common.c. Default definition is:

case KC_AIRPLANE_MODE:
    action.code = ACTION_USAGE_RADIO;

To make it do something else (for example, start file manager), we just give it the correct code. In given example that would be KC_MY_COMPUTER:

case KC_AIRPLANE_MODE:
    action.code = ACTION_USAGE_CONSUMER(KEYCODE2CONSUMER(KC_MY_COMPUTER));

Compile and flash, and you can enjoy additional macro key instead of accidentally killing your network.

Enter QMK Bootloader By Holding a Button

As Framework 16 has QMK keyboard, of course I was tempted to mess with it. But here lies the problem - to update the keyboard, one has to get into the boot mode. And to get into the boot mode, one has to simultaneously press both Alt keys while plugging the keyboard in (or 2 and 6 key for the Numpad). That gets old really quickly. So, for my first modification, I decided to make this a bit easier.

Dedicating a key for the boot functionality was out of question. I wanted to have a full keyboard experience and not to sacrifice any keys. And that goes double for the Numpad as there isn’t too many keys there to start with. So, I needed a key to serve its normal function during the day and to turn into the bootloading villain during the night. One way to signal such intent would be a long press.

But which key is unlikely to be long pressed on my keyboard you might ask. While there are couple of candidates, there is only one villain among them - CapsLock. Rarely used intentionally, and even when used, never held for long. Oh, and look at that, we have a parallel key on the Numpad - NumLock.

With keys decided upon, it was time to modify the firmware. Fortunately, we don’t need to start from scratch as Framework already did the hard part of the job. Unfortunately, there is so many branches and the most obvious one (framework16-keyboards) is not matching the production hardware. The last tag, v0.2.9 as I’m writing this, seems to match the hardware I have so I started from that.

So, how do we change it? Well, it’s easy as adding a few lines to the process_record_user function in keymap.c. Something like this:

...
bool process_record_user(uint16_t keycode, keyrecord_t *record) {
+    static uint16_t bootloader_key_timer = 0;
+    static bool bootloader_other_key_recorded = false;  // track if any key other than CapsLock has been pressed
+    if (keycode != KC_CAPS) { bootloader_other_key_recorded = true; }
+
     switch (keycode) {
+        case KC_CAPS:  // enter bootloader if CapsLock is held for 5 seconds
+            if (record->event.pressed) {
+                bootloader_key_timer = timer_read();
+                bootloader_other_key_recorded = false;  // start tracking other keys
+            } else {
+                if (!bootloader_other_key_recorded) {  // only go to bootloader if no other key has been pressed
+                    if (timer_elapsed(bootloader_key_timer) >= 5000) {
+                        bootloader_jump();
+                    }
+                }
+                bootloader_key_timer = 0;  // reset timer counter on release so it can be used for tracking if CapsLock is pressed
+            }
+            break;
+
         case FN_LOCK:
...

This code will start timer as soon as CapsLock is pressed and then just track if any other key has been pressed while CapsLock is still down. If yes, it will just behave as it normally would (i.e., no bootload function). However, if there was no other keypresses and key has been held down for 5 seconds, upon releasing the CapsLock, you will go into the bootloader mode without having to disassemble your input modules.

Not strictly necessary modification but it makes QMK development so much easier.


PS: Or you can download code from my repo containing a few additional changes (e.g., NumLock changing background level for the Numpad).

Preventing hibernation wake-up on Ubuntu

I have Ubuntu 23.10 with hibernation enabled on my Framework 13 but I noticed that it wakes up after a few minutes every time I put it into hibernation. That sort of defeats the purpose of hibernation so I had to investigate a bit.

My first step was checking what is enabled. Fortunately, we can find that information rather easily.

cat /proc/acpi/wakeup | grep enabled

After playing with a few things, I noticed that disabling XHCI actually does the trick most of the time.

echo "XHCI" | sudo tee /proc/acpi/wakeup

While this can be one solution, I wanted to be a bit more granular. So I started with listing all /sys devices that have a wakeup enabled.

for FILE in `sudo find /sys/devices -name 'wakeup' -print 2>/dev/null`; do
    if [[ -f $FILE ]] && [[ "`cat $FILE`" == "enabled" ]]; then
        dirname "`dirname "$FILE"`"
    fi
done

For each device found, you can check a few more details.

udevadm info -q all -a /sys/devices/pci0000:00/0000:00:15.3/i2c_designware.2/i2c-2/i2c-PIXA3854:00/

Based on those details, I would create an entry in /etc/udev/rules.d/42-disable-wakeup.rules for each suspicious device. For example, if I suspected my keyboard driver, I would create an entry like this.

ACTION=="add", SUBSYSTEM=="serio", DRIVER=="atkbd", ATTR{power/wakeup}="disabled"

Once I placed all suspicious entries in, I forced a rule reload using udevadm and tried hibernation out.

sudo udevadm control --reload-rules && sudo udevadm trigger
sudo systemctl hibernate

While this did solve my issue, it was overly restrictive. So, I removed entries one by one, testing hibernation each time. Once done, I had a list of devices that caused the wakeup isolated. On my Framework 13 with i5-1135G7, the winning combination file can be created using this command:

cat << EOF | sudo tee /etc/udev/rules.d/42-disable-wakeup.rules
ACTION=="add", SUBSYSTEM=="i2c", DRIVER=="i2c_hid_acpi", ATTRS{name}=="PIXA3854:00", ATTR{power/wakeup}="disabled"
ACTION=="add", SUBSYSTEM=="pci", DRIVER=="xhci_hcd", ATTRS{subsystem_device}=="0x0001", ATTRS{subsystem_vendor}=="0xf111", ATTR{power/wakeup}="disabled"
ACTION=="add", SUBSYSTEM=="serio", DRIVER=="atkbd", ATTR{power/wakeup}="disabled"
EOF

Your laptop might have a different list of culprits but the overall procedure should work the same.

[2025-01-11 Probably better way is creating a small pre-hibernate script that will hunt down these devices.]

Installing Windows Onto Framework Expansion Card

Illustration

While I use Linux as the primary OS of choice on my Framework Laptop, I still need Windows from time to time. And yes, a virtual machine is usually sufficient, but there is one scenario where Windows is much better - gaming.

First of all, this setup is not limited to the Framework Expansion Card. You can get it working on pretty much any USB these days. However, there is a difference between “can” and “should”. Most notably, most USB drives out there will not actually give you enough raw speed to comfortably use Windows. You need something with a bit more umph, and both Framework expansion SSD cards fit this nicely.

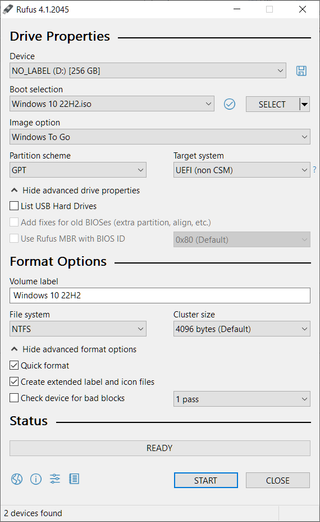
The trick in getting it all done is using Rufus and installing Windows in To Go mode. This retains much of the normal Windows behavior, but it also improves handling of what is essentially just a USB drive (e.g., you can unplug it during running). Default Rufus settings are actually good here, just make sure to select “Windows To Go” and everything else will be as normal.

Illustration

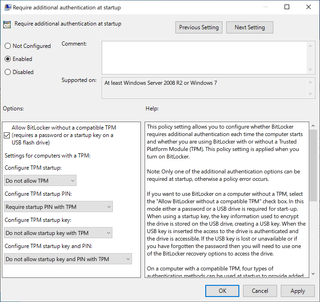
Lastly, while I do love encryption, TPIM is a slight annoyance in many scenarios where you might end up moving your installation around. Thus, while TPIM is available on the Framework laptop, I wanted my BitLocker not to make any use of it. I found editing Group Policy settings using these steps works for me.

  1. Open gpedit.msc.
  2. Navigate to Computer Configuration → Administrative Templates → Windows Components → BitLocker Drive Encryption → Operating System Drives.
  3. Require additional authentication at startup:
    • Enabled.
    • Allow BitLocker without a compatible TPM: Checked (was already)
    • Configure TPM startup: Do not allow TPM
    • Configure TPM startup PIN: Require startup PIN with TPM
    • Configure TPM startup key: Do not allow startup key with TPM
    • Configure TPM startup key and PIN: Do not allow startup key and PIN with TPM
  4. Allow enhanced PINs for startup:
    • Enabled
  5. Configure use of passwords for operating system drives:
    • Enabled
    • Configure password complexity for operating system drives: Allow password complexity (already)

Now onto to play some games. :)

Ubuntu 23.04 on Framework Laptop (with Hibernate)

I’ve been running Ubuntu on my Framework 13 for a while now without any major issues. However, my initial setup restricted me to a deep sleep suspend that will drain your battery in a day or two if you forget about it. As I anyhow needed to reinstall my system to get Ubuntu 23.04 going, I decided to mix it up a bit.

My setup is simple and has only a few requirements. First of all, a full disk encryption is a must. Secondly, ZFS is non-negotiable. And lastly, it would be nice to have hibernation this time round.

When it comes to full disk encryption with ZFS, there is an option of native ZFS encryption. And indeed, I’ve done setups with it before. However, getting hibernation running on top of ZFS was not something I managed to get running properly.

For hibernation, I really prefer to have a separate swap partition encrypted using Luks. And, if you use both Luks and native ZFS encryption, you get asked for the encryption passphrase twice. Since I’m too lazy for that, I decided to have ZFS on top of the Luks, like in the good old days. Performance-wise it’s awash anyhow. Yes, writing is a bit slower on artificial tests but in reality, the difference is negligible.

Avid readers of my previous installation guides will already know that my personal preferences are really noticeable in these guides. For example, I like my partitions set up a certain way and I will always nuke the dreadful snap system.

Honestly, if you are ok with the default Ubuntu setup, or just uncomfortable with the command line, you might want to stop reading and simply follow the official Framework 13 installation guide. It’s a great guide and the final result is something 99% of people will be happy with.

The first step is to boot into the “Try Ubuntu” option of the USB installation. Once we have a desktop, we want to open a terminal. And, since all further commands are going to need root credentials, we can start with that.

sudo -i

Next step should be setting up a few variables - disk, pool name, hostname, and username. This way we can use them going forward and avoid accidental mistakes. Just make sure to replace these values with ones appropriate for your system.

DISK=/dev/disk/by-id/<diskid>
POOL=<poolname>
HOST=<hostname>
USER=<username>

For this setup, I wanted 4 partitions. The first two partitions will be unencrypted and in charge of booting. While I love encryption, I decided not to encrypt the boot partition in order to make my life easier as you cannot integrate the boot partition password prompt with the later data password prompt thus requiring you to type the password twice (or trice if you decide to use native ZFS encryption on top of that). Both swap and ZFS partition are fully encrypted.

Also, my swap size is way too excessive since I have 64 GB of RAM and I wanted to allow for hibernation under the worst of circumstances (i.e., when RAM is full). Hibernation usually works with much smaller partitions but I wanted to be sure and my disk

Also, my swap size is way too excessive since I have 64 GB of RAM and I wanted to allow for hibernation under the worst of circumstances (i.e., when RAM is full). Hibernation usually works with much smaller partitions but I wanted to be sure and my disk was big enough to accommodate.

Lastly, while blkdiscard does nice job of removing old data from the disk, I would always recommend also using dd if=/dev/urandom of=$DISK bs=1M status=progress if your disk was not encrypted before.

blkdiscard -f $DISK
sgdisk --zap-all                     $DISK
sgdisk -n1:1M:+63M -t1:EF00 -c1:EFI  $DISK
sgdisk -n2:0:+960M -t2:8300 -c2:Boot $DISK
sgdisk -n3:0:+64G  -t3:8200 -c3:Swap $DISK
sgdisk -n4:0:0     -t4:8309 -c4:ZFS  $DISK
sgdisk --print                       $DISK

Once partitions are created, we want to setup our LUKS encryption. Here you will notice I use luks2 headers with a few arguments helping with nVME performance.

cryptsetup luksFormat -q --type luks2 \
    --perf-no_write_workqueue --perf-no_read_workqueue \
    --cipher aes-xts-plain64 --key-size 256 \
    --pbkdf argon2i $DISK-part4

cryptsetup luksFormat -q --type luks2 \
    --perf-no_write_workqueue --perf-no_read_workqueue \
    --cipher aes-xts-plain64 --key-size 256 \
    --pbkdf argon2i $DISK-part3

Since creating encrypted partition doesn’t mount them, we do need this as a separate step. Since the swap partition will be the first one to load, I will give it a name of the host in order to have a bit nicer password prompt.

cryptsetup luksOpen $DISK-part4 zfs
cryptsetup luksOpen $DISK-part3 $HOST

Finally, we can set up our ZFS pool with an optional step of setting quota to roughly 80% of disk capacity. Adjust the exact values as needed.

zpool create -o ashift=12 -o autotrim=on \
    -O compression=lz4 -O normalization=formD \
    -O acltype=posixacl -O xattr=sa -O dnodesize=auto -O atime=off \
    -O canmount=off -O mountpoint=none -R /mnt/install \
    $POOL /dev/mapper/zfs
zfs set quota=1.5T $POOL

I used to be a fan of using just a main dataset for everything, but these days I use a more conventional “separate root dataset” approach.

zfs create -o canmount=noauto -o mountpoint=/ $POOL/Root
zfs mount $POOL/Root

And a separate home partition will not be forgotten.

zfs create -o canmount=noauto -o mountpoint=/home $POOL/Home
zfs mount $POOL/Home
zfs set canmount=on $POOL/Home

With all datasets in place, we can finish setting the main dataset properties.

zfs set devices=off $POOL

Now it’s time to format the swap.

mkswap /dev/mapper/$HOST

And then the boot partition.

yes | mkfs.ext4 $DISK-part2
mkdir /mnt/install/boot
mount $DISK-part2 /mnt/install/boot

And finally, the EFI partition.

mkfs.msdos -F 32 -n EFI -i 4d65646f $DISK-part1
mkdir /mnt/install/boot/efi
mount $DISK-part1 /mnt/install/boot/efi

At this time, I also sometime disable IPv6 as I’ve noticed that on some misconfigured IPv6 networks it takes ages to download packages. This step is both temporary (i.e., IPv6 is disabled only during installation) and fully optional.

sysctl -w net.ipv6.conf.all.disable_ipv6=1
sysctl -w net.ipv6.conf.default.disable_ipv6=1
sysctl -w net.ipv6.conf.lo.disable_ipv6=1

To start the fun we need debootstrap package. Starting this step, you must be connected to the Internet.

apt update && apt install --yes debootstrap

Bootstrapping Ubuntu on the newly created pool comes next. This will take a while.

debootstrap lunar /mnt/install/

We can use our live system to update a few files on our new installation.

echo $HOST > /mnt/install/etc/hostname
sed "s/ubuntu/$HOST/" /etc/hosts > /mnt/install/etc/hosts
sed '/cdrom/d' /etc/apt/sources.list > /mnt/install/etc/apt/sources.list
cp /etc/netplan/*.yaml /mnt/install/etc/netplan/

If you are installing via WiFi, you might as well copy your wireless credentials. Don’t worry if this returns errors - that just means you are not using wireless.

mkdir -p /mnt/install/etc/NetworkManager/system-connections/
cp /etc/NetworkManager/system-connections/* /mnt/install/etc/NetworkManager/system-connections/

At last, we’re ready to “chroot” into our new system.

mount --rbind /dev  /mnt/install/dev
mount --rbind /proc /mnt/install/proc
mount --rbind /sys  /mnt/install/sys
chroot /mnt/install \
    /usr/bin/env DISK=$DISK USER=$USER \
    bash --login

With our newly installed system running, let’s not forget to set up locale and time zone.

locale-gen --purge "en_US.UTF-8"
update-locale LANG=en_US.UTF-8 LANGUAGE=en_US
dpkg-reconfigure --frontend noninteractive locales
dpkg-reconfigure tzdata

Now we’re ready to onboard the latest Linux image.

apt update
apt install --yes --no-install-recommends \
    linux-image-generic linux-headers-generic

Followed by the boot environment packages.

apt install --yes \
    zfs-initramfs cryptsetup keyutils grub-efi-amd64-signed shim-signed

Now we set up crypttab so our encrypted partitions are decrypted on boot.

echo "$HOST PARTUUID=$(blkid -s PARTUUID -o value $DISK-part3) none \
      swap,luks,discard,initramfs,keyscript=decrypt_keyctl" >> /etc/crypttab
echo "zfs PARTUUID=$(blkid -s PARTUUID -o value $DISK-part4) none \
      luks,discard,initramfs,keyscript=decrypt_keyctl" >> /etc/crypttab
cat /etc/crypttab

To mount all those partitions, we also need some fstab entries. The last entry is not strictly needed. I just like to add it in order to hide our LUKS encrypted ZFS from the file manager.

echo "UUID=$(blkid -s UUID -o value /dev/mapper/$HOST) \
      swap swap defaults 0 0" >> /etc/fstab
echo "PARTUUID=$(blkid -s PARTUUID -o value $DISK-part2) \
      /boot ext4 noatime,nofail,x-systemd.device-timeout=5s 0 1" >> /etc/fstab
echo "PARTUUID=$(blkid -s PARTUUID -o value $DISK-part1) \
      /boot/efi vfat noatime,nofail,x-systemd.device-timeout=5s 0 1" >> /etc/fstab
echo "/dev/disk/by-uuid/$(blkid -s UUID -o value /dev/mapper/zfs) \
      none auto nosuid,nodev,nofail 0 0" >> /etc/fstab
cat /etc/fstab

On systems with a lot of RAM, I like to adjust swappiness a bit. This is inconsequential in the grand scheme of things, but I like to do it anyhow.

echo "vm.swappiness=10" >> /etc/sysctl.conf

Now we create the boot environment.

KERNEL=`ls /usr/lib/modules/ | cut -d/ -f1 | sed 's/linux-image-//'`
update-initramfs -c -k $KERNEL

And then, we can get grub going. Do note we also set up booting from swap (needed for hibernation) here too. Since we’re using secure boot, bootloaded-id HAS to be Ubuntu.

sed -i "s/^GRUB_CMDLINE_LINUX_DEFAULT.*/GRUB_CMDLINE_LINUX_DEFAULT=\"quiet splash \
    nvme.noacpi=1 \
    module_blacklist=hid_sensor_hub \
    RESUME=UUID=$(blkid -s UUID -o value /dev/mapper/$HOST)\"/" \
    /etc/default/grub
update-grub
grub-install --target=x86_64-efi --efi-directory=/boot/efi --bootloader-id=Ubuntu \
    --recheck --no-floppy

And now, finally, we can install our desktop environment.

apt install --yes ubuntu-desktop-minimal

Once the installation is done, I like to remove snap and banish it from ever being installed.

apt remove --yes snapd
echo 'Package: snapd'    > /etc/apt/preferences.d/snapd
echo 'Pin: release *'   >> /etc/apt/preferences.d/snapd
echo 'Pin-Priority: -1' >> /etc/apt/preferences.d/snapd

Since Firefox is only available as snapd package, we can install it manually.

add-apt-repository --yes ppa:mozillateam/ppa
cat << 'EOF' | sed 's/^    //' | tee /etc/apt/preferences.d/mozillateamppa
    Package: firefox*
    Pin: release o=LP-PPA-mozillateam
    Pin-Priority: 501
EOF
apt update && apt install --yes firefox

For Framework Laptop I use here, we need one more adjustment due to Dell audio needing special care. In addition, you might want to mess with WiFi power save modes a bit.

echo "options snd-hda-intel model=dell-headset-multi" >> /etc/modprobe.d/alsa-base.conf
sed '/s/wifi.powersave =.*/wifi.powersave = 2/' \
    /etc/NetworkManager/conf.d/default-wifi-powersave-on.conf

Of course, we need to have a user too.

adduser --disabled-password --gecos '' $USER
usermod -a -G adm,cdrom,dialout,dip,lpadmin,plugdev,sudo,tty $USER
echo "$USER ALL=NOPASSWD:ALL" > /etc/sudoers.d/$USER
passwd $USER

I like to add some extra packages and do one final upgrade before dealing with the sleep stuff.

add-apt-repository --yes universe
apt update && apt dist-upgrade --yes

The first portion is setting up the whole suspend-then-hibernate stuff. This will make Ubuntu to do normal suspend first. If suspended for 20 minutes, it will quickly wake up and do the hibernation then.

sed -i 's/.*AllowSuspend=.*/AllowSuspend=yes/' \
    /etc/systemd/sleep.conf
sed -i 's/.*AllowHibernation=.*/AllowHibernation=yes/' \
    /etc/systemd/sleep.conf
sed -i 's/.*AllowSuspendThenHibernate=.*/AllowSuspendThenHibernate=yes/' \
    /etc/systemd/sleep.conf
sed -i 's/.*HibernateDelaySec=.*/HibernateDelaySec=20min/' \
    /etc/systemd/sleep.conf

And lastly, the whole sleep setup is nothing if we cannot activate it. Closing the lid seems like a perfect place to do it.

apt install -y pm-utils

sed -i 's/.*HandleLidSwitch=.*/HandleLidSwitch=suspend-then-hibernate/' \
    /etc/systemd/logind.conf
sed -i 's/.*HandleLidSwitchExternalPower=.*/HandleLidSwitchExternalPower=suspend-then-hibernate/' \
    /etc/systemd/logind.conf

It took a while but we can finally exit our debootstrap environment.

exit

Let’s clean all mounted partitions and get ZFS ready for next boot.

umount /mnt/install/boot/efi
umount /mnt/install/boot
mount | grep -v zfs | tac | awk '/\/mnt/ {print $3}' | xargs -i{} umount -lf {}
umount /mnt/install
zpool export -a

After reboot, we should be done and our new system should boot with a password prompt.

reboot

Once we log into it, we still need to adjust boot image and grub, followed by a hibernation test. If you see your desktop in the same state as you left it after waking the computer up, all is good.

sudo update-initramfs -u -k all
sudo update-grub
sudo systemctl hibernate

If you get Failed to hibernate system via logind: Sleep verb "hibernate" not supported, go into BIOS and disable secure boot (Enforce Secure Boot option). Unfortunately, the secure boot and hibernation still don’t work together but there is some work in progress to make it happen in the future. At this time, you need to select one or the other.


PS: Just setting HibernateDelaySec as in older Ubuntu versions doesn’t work with the current Ubuntu anymore due to systemd bug. Hibernation is only going to happen when the battery reaches 5% of capacity instead of at a predefined time. This was corrected in v253 but I doubt Ubuntu 23.04 will get that update. I’ll leave it in the guide as it’ll likely work again in Ubuntu 23.10.

PPS: If battery life is really precious to you, you can go to hibernate directly by setting HandleLidSwitch=suspend-then-hibernate. Alternatively, you can look into setting mem_sleep_default=deep in the Grub.

PPPS: There are versions of this guide (without hibernation though) using the native ZFS encryption for the other Ubuntu versions: 22.04, 21.10, and 20.04. For LUKS-based ZFS setup, check the following posts: 22.10, 20.04, 19.10, 19.04, and 18.10.