All things related to XigmaNAS (previously NAS4Free)

VirtualBox Host I/O Cache

Illustration

My XigmaNAS-based file server is usually quite a speedy beast. Between 8 disk ZFS RAID-Z2 and LACP, it can pretty much handle everything I need for my home. Except VirtualBox.

When I tried using its built-in VirtualBox, the guest virtual machine was really slow to install. Disk transfer was in kilobytes. And it wasn’t the disk speed problem as I could copy files in the background at the excess of 100 MB/s. After a bit of investigation, culprit was found in the way how VirtualBox writes to disk. Every write is essentially flushed. Combine that with ZFS on spinning rust and you have ridiculously low performance.

There are essentially two ways to solve this. The first one is to enable such pattern on ZFS. Adding logging SSD disk to my array would do wonders. However, considering this was the only load requiring them, I didn’t want to go through neither the cost or the effort of setting mirrored logging devices.

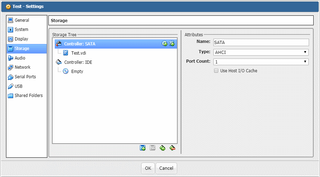
Another fix is much easier and comes without the cost. I just enabled Use Host I/O Cache for my virtual controller and speed went through the roof. Yes, this solution makes host crashes really dangerous as all cached data will be lost. And that’s a few seconds worth of important guest file system data with a potential to cause corruption. You should really think twice before turning it on.

However, for my VM it proved to be good enough. All data used by that VM lived on network shares to start with and recovering from corrupted OS didn’t bother me much as I scripted the whole setup anyhow.

Low cost solution for when you can handle a data loss potential.
Installing Git on Embedded XigmaNAS

Having Git on NAS server comes in handy and I was quite annoyed when my workaround that worked on NAS4Free 11.1 stopped working with the advent of XigmaNAS 11.2. Well, I guess it was time to make some adjustments.

I won’t get into how the whole process works as I already explained it previously. Suffice to say it stopped working on 11.2 due to even tighter disk space restrictions it brought. While originally I just didn’t have space to install software, this time there wasn’t enough space to even get needed packages.

So I adjusted my unionfs creation process to include two extra directories (/var/db/pkg/ and /var/cache/pkg/):

rm -rf /mnt/.unionfs/* |& sed '/^$/d' |& sed -e 's/^/  /'
for LOCATION in "usr/local" "var/db/pkg" "var/cache/pkg"
do
  if mount -t unionfs | grep "/mnt/.unionfs/$LOCATION" >/dev/null
  then
    echo -en "${ESCAPE_OUTPUT}"
    mount -t unionfs |& grep "/mnt/.unionfs/$LOCATION" | sed -e 's/^/  /'
    echo -en "${ESCAPE_RESET}"
  else
    echo -en "${ESCAPE_ISSUE}"
    mkdir -p "/mnt/.unionfs/$LOCATION/" |& sed '/^$/d' |& sed -e 's/^/  /'
    mkdir -p "/$LOCATION/"
    mount_unionfs "/mnt/.unionfs/$LOCATION/" "/$LOCATION/" |& sed '/^$/d' |& sed -e 's/^/  /'
    echo -en "${ESCAPE_RESET}"

    echo -en "${ESCAPE_OUTPUT}"
    mount -t unionfs |& grep "/mnt/.unionfs/$LOCATION" | sed -e 's/^/  /'
    echo -en "${ESCAPE_RESET}"
  fi
done

Adjusting initialization script with this allowed me to install Git once again.

Encrypted ZFS (A Slightly Parallel Edition)

Initial encryption of ZFS pool does require a bit of work - especially when it comes to initial disk randomization. Yes, you could skip it but then encrypted bits are going to stick out. It’s best to randomize it all before even doing anything ZFS related.

The first problem I had with the old setup was the need to start randomizing each disk separately. Since operation takes a while (days!), this usually resulted in me starting all dd commands concurrently thus starving it of resources (mostly CPU for random number generation).

As my CPU can generate enough random data to saturate two disks, it made sense to use parallelize xargs using the serial number (diskid) of each disk as an input. While using /dev/sd* would work, I tend to explicitly specify disks serial number as it’s not destructive if ran on the wrong machine. I consider it a protection against myself. :)

The final command still takes ages but it requires only one window and it will take care to keep only two disks busy at a time:

echo "^^DISK-ID-123^^ ^^DISK-ID-456^^ ^^DISK-ID-789^^ ^^DISK-ID-012^^" | \
  tr ' ' '\n' | xargs -I '{}' -P 2 \
  dd if=/dev/urandom of=/dev/diskid/{} bs=1M

After drives are “cleaned”, I do the encryption (one-by-one this time):

echo "^^DISK-ID-123^^ ^^DISK-ID-456^^ ^^DISK-ID-789^^ ^^DISK-ID-012^^" | \
  tr ' ' '\n' | xargs -I '{}' \
  geli init -e AES-XTS -l 128 -s 4096 '/dev/diskid/{}'

There used to be times when I encrypted each disk with a separate password and that’s still a bit more secure than having a single one. However, with multiple passwords comes a great annoyance. These days I only have a single password for all the disks in the same pool. It makes my life MUCH easier.

In theory, somebody cracking one disk will immediately get access to all my data but in practice it makes no big difference. If somebody decrypted one disk, they either: found a gaping hole in Geli and/or underlying encryption and thus the other disks will suffer the same fate and there’s nothing I can do; or they intercepted one of my keys. As I always use all the keys together, chances are that intercepting one is the same effort as intercepting them all. So I trade a bit of security for a major simplification.

Now we get to attach all encrypted drives:

echo "^^DISK-ID-123^^ ^^DISK-ID-456^^ ^^DISK-ID-789^^ ^^DISK-ID-012^^" | \
  tr ' ' '\n' | xargs -I '{}' \
  geli attach '/dev/diskid/{}'

And the final step is creating ZFS pool, using RAIDZ2 and allowing for loss of two disks before data is compromised:

zpool create \
  -o autoexpand=on -m none -O compression=gzip-7 -O atime=off \
  -O utf8only=on -O normalization=formD -O casesensitivity=sensitive \
  ^^Data^^ raidz2 \
  /dev/diskid/^^DISK-ID-123^^.eli  /dev/diskid/^^DISK-ID-456^^.eli /dev/diskid/^^DISK-ID-789^^.eli /dev/diskid/^^DISK-ID-012^^.eli

And that’s it - pool is ready for all the data you can throw at it.


PS: Yes, I am still using Geli - native ZFS encryption didn’t find its way to FreeBSD yet.

PPS: If machine goes down, it is enough to re-attach Geli disks followed by restart of the ZFS daemon:

echo "^^DISK-ID-123^^ ^^DISK-ID-456^^ ^^DISK-ID-789^^ ^^DISK-ID-012^^" | \
  tr ' ' '\n' | xargs -I '{}' \
  geli attach '/dev/diskid/{}'

/etc/rc.d/zfs onestart

XigmaNAS Booting Directly Into Shell

Illustration

One of my XigmaNAS machines had a curious issue. Upon boot, it wouldn’t display the console menu. After boot it would go directly to the bash prompt - no password asked. While practical, this was completely insecure as anyone capable of connecting monitor and keyboard would get a full access.

Upon checking configuration, culprit was obvious - I changed the default shell. As console menu execution is part of .cshrc configuration file and bash ignores that file, the console menu was forever lost.

I definitely didn’t like that.

Since I really wanted bash prompt but also preferred to have the console menu (that can be disabled), I decided upon a slightly different shell selection approach without system-wide consequences . Simply adding exec bash command at the end of .cshrc works nicely without the nasty side-effects The following PostInit script will do the trick:

printf '\\nif ($?prompt) then\\n\\texec bash\\nendif\\n' >> /root/.cshrc

And yes, check if we’re working with interactive shell ($?prompt part) is necessary because commands executed without terminal (e.g. directly over SSH or cron jobs) will fail otherwise.

ZFS Record Size For Backup Machine

Illustration

When it came to setup my remote backup machine, only three things were important: use of 4K disks, two disk redundancy (raidz2), and a reasonably efficient storage of variously sized files. Reading around internet lead me to believe volblocksize tweaking was what I needed.

However, unless you create zvol, that knob is actually not available. The only available property impacting file storage capacity is recordsize. Therefore I decided to try out a couple record sizes and see how storage capacity compares.

For the purpose of test I decided to create virtual machine with six extra 20 GB disks. Yes, using virtual machine was not ideal but I was interested in relative results and not the absolute numbers so this would do. And mind you, I wasn’t interested in speed but just in data usage so again virtual machine seemed like a perfect environment.

Instead of properly testing with real files, I created 100000 files that were about 0.5K, 33000 files about 5K, 11000 files about 50K, 3700 files about 500K, 1200 files about 5M, and finally about 400 files around 50M. Essentially, there were six file sizes with each set being one decade bigger but happening only a third as often. The exact size for each file was actually randomly chosen to ensure some variety.

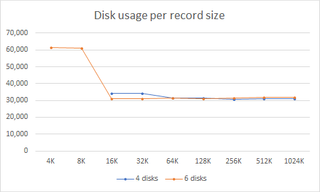
After repeating test three times with each size and for both 4 and 6 disk setup, I get the following result:

4 disks6 disks
Record sizeUsedAvailableUsedAvailable
4K-061,55717,064
8K-061,17117,450
16K34,0084,19131,22347,398
32K34,0254,17331,21347,408
64K31,3006,89931,26847,353
128K31,2766,92331,18047,441
256K30,7197,48131,43247,189
512K31,0697,13031,81446,807
1024K30,9207,27931,71446,907

Two things of interest to note here. The first one is that small record size doesn’t really help at all. Quantity of metadata needed goes well over available disk space in the 4-disk case and causes extremely inefficient storage for 6 disks. Although test data set has 30.2 GB, with overhead occupancy goes into the 60+ GB territory. Quite inefficient.

The default 128K value is actually quite well selected. While my (artificial) data set has shown a bit better result with the larger record sizes, essentially everything at 64K and over doesn’t fare too badly.

PS: Excel with raw data and script example is available for download.

PPS: Yes, the script generates the same random numbers every time - this was done intentionally so that the same amount of logical space is used with every test. Do note that doesn’t translate to the same physical space usage as (mostly due to transaction group timing) a slightly different amount of metadata will be written.

Enabling Disk ID (/dev/diskid/*) on XigmaNAS

Illustration

While the standard FreeBSD disk device enumeration found under /dev/sd* works just fine, I always found the serial number irreplaceable.

Not only it doesn’t depend on the ordering of SATA cables but it also ensures you don’t delete drive on the wrong machine. If you dd if=/dev/zero of=/dev/sda, you better be sure you’re on the correct machine. On the other hand, if you run dd if=/dev/zero of=/dev/diskid/DISK-SERIAL-123 on the wrong machine, you will just see an error telling you the device was not found. Much better.

But I don’t have /dev/diskid/, I hear you complain. XigmaNAS, as pretty much any FreeBSD system by default needs a slight modification to track disks this way.

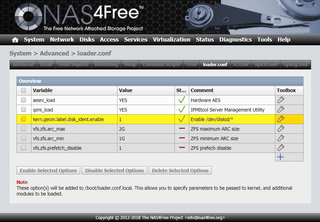
To turn it on, go to System, Advanced, and loader.conf tab. There add kern.geom.label.disk_ident.enable=1 and reboot. Once system has started again, all your disks will have their entry in /dev/diskid/*.

Git Client on NAS4Free

Using NAS4Free as my centralized storage also means I use it for Git repositories. As such it would be awesome if I could do some basic stuff with Git directly from my server’s bash command line.

It’s possible to install packages on NAS4Free - just like on any FreeBSD - you can write pkg install -y git. However, due to file system size of embedded installation that simple solution doesn’t work - it’s strange how fast those memory disks fill. Yes, one could go with the full NAS4Free install instead but there’s another way.

When it comes to file systems any BSD offers a lot of possibilities - one of which is unionfs. That one allows you to expand file system with the additional space while actually preserving stuff already present in directory.

To preserve the fleeting nature of embedded installation and due to sometime finicky nature of the united file system, I find it’s best to have a fresh directory for every boot, followed by mounting of fresh overlay file system:

rm -rf /mnt/.unionfs 2> /dev/null
mkdir -p /mnt/.unionfs/usr/local
mount_unionfs /mnt/.unionfs/usr/local /usr/local

Now installing Git actually works:

pkg install -y git

One could optionally also set Git configuration, especially user name and e-mail:

cat <<EOF > /root/.gitconfig
[system]
autocrlf = false
[core]
pager = less
whitespace = cr-at-eol
[user]
name = ^^Charlie Root^^
email = ^^root@my.home^^
EOF

If all this is placed in System, Advanced, Command scripts, it’ll get preserved with reboots.

[2018-07-22: NAS4Free has been renamed to XigmaNAS as of July 2018]

Changing FAT12 Label Under NAS4Free

Illustration

Part of my encrypted NAS setup is also key storage on TmpUsb. Idea of such USB is to self-erase its data (and thus my encryption keys) when power is lost. It’s not a full-proof system but enough to ensure any thief will get away with hardware only.

TmpUsb device behaves just as a normal USB drive with a twist that label changes are triggering various special behaviors. If one is setting up such disk remotely, the most significant operation is done by changing label to “ARMED” to actually make it erasable upon power loss.

And therein lies the problem - NAS4Free contains no command that can change the label for FAT12 disk. Well, I guess we’ll have to make such command ourselves.

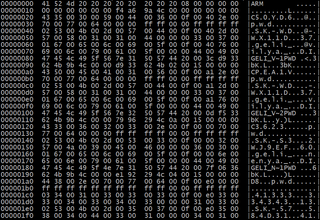
First a bit about FAT12 disk layout. Looking at the raw drive, the first 512-byte sector is occupied by master boot record. There we have layout of our partitions and their types. The only byte I am interested in is the partition type for the first partition located at the 451th position and holding a value 0x01 and denoting FAT12. This byte is important as to avoid accidentally overwriting some other disk upon label change.

The next two sectors belong to the FAT12 boot sector and are filled by a lot of important information. However, the label we’re searching for cannot be found albeit there is a very similar volume label field. Here we can also see, starting at byte 54, a type of file system. This time it’s written as FAT12 and is ideal as another double-check.

Nope, the paydirt is in fourth sector, the first 11 bytes are ones holding the disk label we need. You can see the whole sector using dd and hexdump:

dd if=/dev/da0 bs=512 skip=3 count=1 2>/dev/null | hexdump -Cv

The rest of sector (and a few afterward) are filled with directory entries using both short 8.3 MS-DOS name and long Unicode one. Quite interesting topic actually, but we need only to care about the first 11 bytes here.

The final script I ended up with actually uses dd internally and allows for setting custom label under NAS4Free’s limited FreeBSD environment. As it’s using bog standard bash, I expect it’s perfectly portable to other platforms too and modifying to do other manipulations of FAT structures should be easy enough.

And, as always, it’s available for download.

[2018-07-22: NAS4Free has been renamed to XigmaNAS as of July 2018]

IPv6 Privacy Extensions in XigmaNAS

Illustration

When you look at IPv6 address XigmaNAS assigns to your interface, you’ll notice the last 64 bits are always the same. FreeBSD (a baseline OS for both XigmaNAS and FreeNAS) generates them based on your interface MAC address (aka EUI-64). While this might be perfectly fine for the purpose of global IPv6 connectivity, it does leak your MAC address to the Internet.

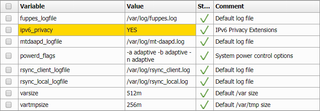
While support for privacy extension is present, unlike some other operating systems, XigmaNAS doesn’t have it turned on by default. However, changing this is very easy. Just go to System, Advanced, rc.conf and add ipv6_privacy=YES, followed by reboot.

You’ll notice your interface now has two global IPv6 addresses. One is still MAC-based (you can recognize it by ff:fe in the middle of last 64 bits) while the other has last 64 bits completely randomized. For all outgoing connections XigmaNAS will now use that randomized IP. Furthermore, XigmaNAS will generate a completely new IPv6 address every 24 hours and gradually deprecate the old one.

While this doesn’t do anything to hide your Internet activity (remember, your /64 prefix is assigned by ISP), it does make correlation of your activity by ad companies just a wee bit harder.

PS: You can also obtain the exactly same results by setting two sysctl.conf variables:

net.inet6.ipv6.use_tempaddr=1
net.inet6.ipv6.prefer_tempaddr=1

PPS: If you want to generate new address more (or less) often, check net.inet6.ip6.temppltime and net.inet6.ip6.tempvltime system variables.

[2018-06-05: This code has been added into XigmaNAS code base. Available as of 11.1.0.4 (revision 5606).]

[2018-07-22: NAS4Free has been renamed to XigmaNAS as of July 2018]

Disabling SSH Password Prompt

After cancelling my hosting, I noticed my e-mail reports stopped working. Since I also upgraded my server with a troublesome version, I originally didn’t connect those two. However, issue with reports persisted even after I fixed the e-mail issue.

Manually running report immediately identified the problem. You see, I login to every server using public key. As my login on DreamHost server was gone, SSH simply decided to fallback to keyboard authentication. And so report waited for keyboard input that was never to come.

Solution intended for this troublesome issue actually already exists in the form of BatchMode option. Appending -o BatchMode=yes to SSH command will cause it to rather fail than ask user for anything. Exactly what doctor prescribed for my report script.

With this update, my “standard” SSH crypto settings for the report got updated to:

ssh
  -2
  -o KexAlgorithms=diffie-hellman-group-exchange-sha256
  -c aes192-ctr
  -o MACs=hmac-sha2-256
  -o BatchMode=yes
  example.com