TmpUsb

Illustration

TmpUsb is presented to a computer as an USB disk drive 11 KB in size (7-8 KB usable). This drive can be then used to store any data (providing that size is not the issue) but primary idea is to use it for the encryption keys. Once all data has been copied to it, user would perform “arming” thus enabling self-erase after approximately 3 seconds of being unplugged.

Basic use case for such behavior would be a BitLocker key storage. Having encrypted server brings a lot of security benefits but with a cost of re-entering keys on every restart. BitLocker can work around that by allowing you to store keys on USB in order to decrypt content automatically. Unfortunately this means that, if your server is stolen, you also give your encryption key with it thus nullifying encryption.

By using TmpUsb your encryption keys will be deleted rendering data on stolen server completely unusable. While this won’t bring your server back, at least data won’t be readable any more.
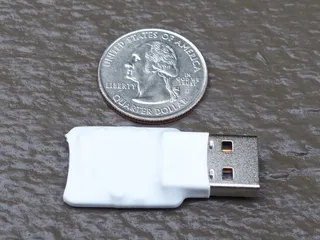

Usage

When you plug TmpUsb in for the first time, it will start in “Not Armed” mode, as visible from drive’s label. Visually you would recognize this mode by the fact that LED is on. At that time you can freely use it as you would any standard USB drive. At this time you would copy your encryption keys to it and change its label to “Arm” and unplug it.

On next plug-in (might be on another computer) LED will turn off and drive will be considered armed. In this state drive will still behave as a standard USB drive but only while it has power. If there is a power loss longer than approximately three seconds (configurable, to allow for computer reset) drive will self-erase and return to an empty state.

LED

There is a single LED on a drive. If it is on, drive hasn’t been armed and it is safe to unplug it without going into risk of losing data to self-erase. Once drive is armed, LED will turn off.

Upon self-erase, device will quickly blink three times. If self erasure was due to validation error (i.e., drive content was corrupted) it will blink five times.

Commands

All commands are entered by changing drive label. Casing is not important.

Arm

Gives command to TmpUsb to be “armed” on next plugin. This fits scenario where user prepares encryption keys on one computer, arms TmpUsb and then plugs it in on another computer. Only once TmpUsb has been plugged in for a second time, it is considered armed and any further label changes won’t change that status. In this mode TmpUsb will tolerate short power loss (approximate three seconds) but anything longer will trigger self-erase.

ArmMax

As with Arm command, this will cause TmpUsb to be armed on next plugin. However, unlike with Arm command, any power failure will trigger self-erasure regardless of power-loss duration. On most computers this means that self-erasure will be also triggered by a simple reset.

Armed

Immediately “arms” TmpUsb without need to wait until next plugin. This is useful in case where preparation of encryption keys is done on same computer where those keys are to be used. It is just a shortcut that skips need for unplug-plug that Arm command needs. Once armed, LED will be turned off and status will remain armed even if drive label gets futher changes.

Calibrate

If standard power-loss buffer duration (approximately three seconds) is not satisfactory, user can change drive label to “Calibrate” and unplug the drive. Once drive is plugged back in, it will determine duration it was plugged out for and use that as a new default. Notice that drive will be erased and its label will say what is raw ADC value for given time. Do try to avoid values less than 3. Due to nature of time keeping via the capacitor, values are really rough and they are unusable beyond 10 seconds. Value determined by this procedure will be used until either ArmMax or Reset are given. At that time TmpUsb will revert to default three seconds.

Forgetful

Drive will reset itself upon each plugin. Useful if you want to use it for temporary key export. Not your everyday setting.

Reset

On next plug-in TmpUsb will perform self-erasure together with reset of all settings.

ReadOnly

This command works only once drive has been armed. It will cause device to go into read-only mode immediately. No further writes to device will be possible until device is completely cleared (e.g., due to power loss). Upon going into read-only mode, device will quickly reset so that operating system can notice its read-only status. Self-reset will be omitted if ArmMax was used for arming.

Batch devices don’t support this command, Dave. You need to update the firmware.


Security

As expected, there are some security risks involved.

Major one is connected with fact that erasure of data, due to TmpUsb having no battery, is possible only on next plug-in. If attacker is fast enough, he can plug TmpUsb in another computer without triggering erasure. Mitigation strategy for this attack is using “ArmMax” command in order to trigger erasure as soon as power is lost.

Similarly, attacker can charge capacitor without actually turning TmpUsb on. On next plug-in TmpUsb will think that less time passed than it actually has. Mitigation strategy is also using “ArmMax” command.

Even using “ArmMax” you are not safe if attacker is technically savvy and has access to TmpUsb that is currently working. It can put another power source in parallel to USB and thus TmpUsb won’t be aware at any time that the power was lost. Mitigation is encasing microchip and other components into epoxy. Dirty job ahead.

Internal key storage is encrypted using the security feature of microcontroller itself. In ideal world this would mean that, even if attacker has direct access to chip, nobody would be able to read data without running it first. Of course, this is intended to stop normal attackers only. Somebody with unlimited resources (e.g., NSA) will not be deterred by this.

Regardless of these attacks, TmpUsb will probably protect you from 99.9% attackers, especially if they are not aware of its presence. It is not be–all and end–all device but it surely beats keeping keys on a normal USB drive.


FAQ

How to use it on BSD (e.g., with XigmaNAS)?

To use device on BSD, you will need this script (helps with drive label adjustments).


Known Issues

Since device has no battery, time is kept only by monitoring voltage decay on a big capacitor. Major downfall is the fact that such timing is imprecise and doesn’t allow for a big time spans. In practice TmpUsb can deal with up to 10 seconds of delay.

Since most operating systems cannot really format such a small drive and such attempt might possibly damage logical structure, decision has been made to check MBR and boot sector (including partition table) areas on every boot. Effect of this verification is that any change to verified areas is not possible and drive will self-erase if such change is noted.

Chip used for TmpUsb has flash specified for at least 10000 write cycles. Since there is no block remapping as it is custom on the modern flash drives, this roughly means that you can safely write to this drive approximately 5000 times (it does suffer from high write amplification). While it will probably handle a bit more, this is definitely not the device when constant writing is expected.

Total size of this drive is 11 KB. However, this is not a size user will have available. Six sectors (3 KB) are immediately taken by mandatory MBR and boot sector, followed by FAT and a root directory entries. OS only gets to see 8 KB. Once drive is plugged-in, some Windows will add its System Volume Information folder on each drive it sees and that means that it gets hit with additional 1 KB penalty and at least four directory entries are gone. Under Windows available size is thus 7-8 KB (depending on version) while we get 8 KB under Linux.