All things related to XigmaNAS (previously NAS4Free)

NAS4Free Serial Console on Supermicro A1SRi

Illustration

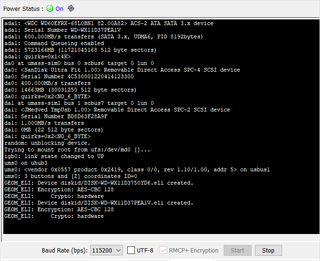
Having Supermicro A1SRi motherboard is awesome - especially when it comes to remote management over IPMI. However, as I have NAS4Free on it, one thing annoyed me all the time - why I don’t see anything in IPMI Text Console tab? It’s not that I really need it as iKVM works for me, but I find inactive things annoying. So I went to correct this grave omission.

Albeit it took me a while to configure it, the final setup is easy. Utter lack of documentation is what caused the drag.

First step is to enable console redirection in Supermicro’s BIOS. While COM1 is best left to the BIOS itself, COM2/SOL is ours for taking. The only thing needed is to enable second serial console.

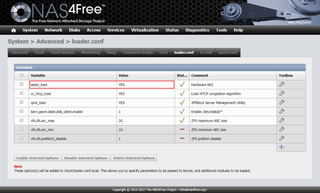
For the next (and final) step we must visit NAS4Free’s GUI under System, Advanced, loader.conf in order to setup four variables controlling the boot process:

NameValue
boot_multiconsYES
consolevidconsole comconsole
comconsole_port0x2F8
comconsole_speed115200

Using boot_multicons essentially tells FreeBSD to allow boot output to multiple consoles. Without this, only one console would be supported for boot messages.

That is crucial for the next console variable where we set console output to both video console (vidconsole) and to serial console (comconsole). And the order is important. While most messages will be mirrored on both outputs, some “userland” (e.g., application, rc.d, and script) messages will be displayed only on the first. I personally like to have that on the video console as it allows for color and looks nicer but your mileage (and needs) might vary.

Last two settings control which address the port is located at (COM2 is traditionally at 0x2F8) and the serial port speed has to match Supermicro’s default of 115200 bauds.

PS: Yes, these steps work on FreeNAS too.

[2018-07-22: NAS4Free has been renamed to XigmaNAS as of July 2018]

Fix NAS4Free's Non-Working Google SMTP After Upgrade

Illustration

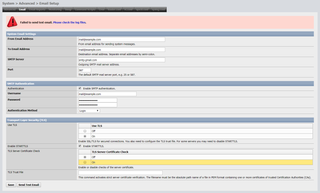
A few days after I updated NAS4Free to 11.1.0.4 (revision 5109), I noticed my e-mail reports were not arriving any longer. After making sure my script was working, I went onto checking my e-mail settings - first by sending a test e-mail.

There I received not really helpful message: “Failed to send test email. Please check the log files.” Further check in log showed equaly useless “root: Failed to send test email to: mail@example.com.” I guess it was time for the command line.

The easiest way to test e-mail is probably running msmtp directly from SSH and see what its issue is:

echo "Subject: Test" |& msmtp mail@example.com
 msmtp: account default from /usr/local/etc/msmtprc: cannot use tls_trust_file with tls_certcheck turned off

If you check that file, the offending line is indeed there:

cat /usr/local/etc/msmtprc
 account default
 domain example.com
 host smtp.gmail.com
 port 587
 protocol smtp
 from mail@example.com
 auth login
 user mail@example.com
 password 123
 tls on
 tls_starttls on
 tls_certcheck off
 !!tls_trust_file!! /usr/local/etc/ssl/cert.pem
 syslog LOG_MAIL

The easiest fix for this issue is to enable TLS Server Certificate Check in GUI. This will actually add a bit of security and there are no real downsides if you use Google’s SNMP as I do.

If you are using a custom e-mail server with self-signed certificate, removing offending line in post-startup script is your best bet:

sed -i -- '/^tls_trust_file/d' /usr/local/etc/msmtprc

Of course, proper solution would be for GUI to omit TLS trust file configuration when certificate check if off. Due to unrelated changes this seems to be already fixed in msmtp.in source file. Next version will have it all sorted out. :)

[2018-02-16: Issue is fixed in version 11.1.0.4.5127.]

[2018-07-22: NAS4Free has been renamed to XigmaNAS as of July 2018]

GELI With XTS-AES or AES-CBC?

If you are using GELI to encrypt disks on FreeNAS or NAS4Free, there are multiple algorithms you can use. However, in practice, for me this always becomes a choice between AES-XTS and AES-CBC. Since every modern processor had AES primitives supported in hardware, these two offer performance other algorithms cannot reach.

The current industry standard for disk encryption is XTS-AES and that is mode I usually default to. It has been made specifically to facilitate full-disk encryption and has no known attacks (other than malleability attack common to practically all such algorithms).

Using AES-CBC is not as crazy as it seems. While there is a known “watermark” attack, GELI is not vulnerable at it uses CBC-ESSIV. And, while it is still vulnerable against malleability attack, it’s more resilient than XTS to some (albeit rather unrealistic) attacks while sharing CBC’s “friendliness” to altering bits on per-block level.

In the absence of any new attack, you are probably fractionally more secure with XTS but realistically both XTS-AES and AES-CBC with ESSIV can be considered equivalent and well-suited for full-disk encryption. That said, as security is not concern, are there performance differences between those two?

And there are. At least on NAS4Free albeit I believe the same applies across the BSD family - including FreeNAS.

My ZFS mirror on i3-4010U used XTS-AES-128 for encryption and its median write speed was 197 MB/s. The same mirror had its write speed increased to 389 MB/s once both disks were set to use AES-CBC-128. Interestingly, changing the encryption mode on a single disk to CBC while the other was still using XTS also improved performance - all the way to 384 MB/s. Mind you there are no security benefits running two disks in different encryption modes. I just did it for fun. :)

My Atom C2558 server using software encryption with XTS-AES only wrote at 110 MB/s. Once both physical drives used AES-CBC, speed jumped to 162 MB/s. Again, changing only a single drive in mirror to CBC increased write speed to 157 MB/s.

The same server using hardware encryption could write 160 MB/s when both drives encrypted using XTS-AES. Both drives using AES-CBC achieved again 160 MB/s. Once more, the curiosity was half/half situation with write speed at 162 MB/s.

Based on these results it is obvious that AES-CBC performs much better than XTS-AES in some cases or both have the same speed at worst. The fact changing a single drive to CBC already brought 95% of improvement tells me that CPU was really straining with XTS despite hardware AES-NI support. On the slower CPU difference was non-existent albeit this was more related to its general slowness of AES-NI on Atom than to anything algorithm specific.

Intel’s own tests on the same generation (albeit vastly more powerful processors) shows that XTS implementation can actually be faster than CBC - especially when multiple cores can “exploit” XTS’ inherent parallelism.

This just shows that performance is highly dependent on everything in the pipeline - especially software support - and not just hardware. And one should be careful to occasionally retest if old assumptions are still valid. For example, the next version of BSD crypto library could improve performance of XTS to surpass CBC.

I personally will still stick with XTS-AES. Encryption and decryption speeds, while not exhilarating, are more than adequate for sharing files over Samba connections. While AES-CBC will surely enjoy support in the future, XTS is the one standardized for full-disk encryption. Unless a security issue is discovered, support for it will only get better with time.


PS: Malleability attack on AES-XTS and AES-CBC is actually not that problematic for my setup as ZFS includes data checksum. To be completely sure, for sensitive applications, one should think about using SHA-256 instead of default Fletcher-16 checksum.

PPS: GELI actually doesn’t use ESSIV as you would find it on Linux. However, its implementation is pretty much equivalent to it in both security and performance.

PPPS: For curious, I used the following command to test write speed, repeating the measurement 5 times:

dd if=/dev/zero of=/mnt/Temp/Test.tmp bs=4096 count=1048576

PPPPS: You can also get rough idea which encryption method is faster by running OpenSSL speed test:

openssl speed -evp aes-128-xts
openssl speed -evp aes-128-cbc

[2018-07-22: NAS4Free has been renamed to XigmaNAS as of July 2018]

Change Default Shell in NAS4Free

Albeit I love almost everything about NAS4Free and his cousin FreeNAS, I can never get adjusted to its shell choice. It might be that tcsh is an awesome shell, but I am much more accustomed to bash.

Standard FreeBSD (and Linux) approach is to use chsh command. However, that command is not present in NAS4Free. Fortunately, there is an alternative choice.

Command pw offers that and much more. To change shell, we simply execute the following command:

pw user mod root -s /bin/bash

While we cannot make this default, we can add it under System, Advanced, Command Scripts. If we add this command as Post Init script, the next login will greet us with bash prompt.

[2018-07-22: NAS4Free has been renamed to XigmaNAS as of July 2018] [2018-08-13: This change does result loss of console menu. There is a slightly different method without that downside.]

Speeding-Up GELI on NAS4Free

Illustration

If you are using GELI to encrypt ZFS disk as I do, there is a slight issue with default NAS4Free configuration. Disk access is slow and everything points toward encryption as culprit.

To test encryption speed, one approach can be to load zero geom and encrypt a few bytes.

kldload geom_zero
geli onetime -e aes-xts -l 128 -s 4096 /dev/gzero
dd if=/dev/gzero.eli of=/dev/null bs=1M count=256

My result was around 40 MB/s. Definitely not what I expected nor it comes even close to what’s needed to support full disk speed.

Further we can see that hardware crypto is supported and that GELI is not using it:

dmesg | grep AESNI
 Features2=0x43d8e3bf<SSE3,PCLMULQDQ,…,TSCDLT,^^AESNI^^,RDRAND>``

geli list | grep Crypto
 Crypto: software
 Crypto: software
 Crypto: software

By default NAS4Free doesn’t load AES encryption module. And AES without hardware support is not as impressive as one would expect.

Fortunately, it is simple to load it. Going to System, Advanced, loader.conf, and adding aesni_load=YES is all that is needed. After reboot, we can check if module is properly loaded:

kldstat | grep aesni.ko
 7    1 0xffffffff8ab3d000 bd50     aesni.ko

geli list | grep Crypto
 Crypto: hardware
 Crypto: hardware
 Crypto: hardware

If one repeats previous test, now speed is more reasonable 350 MB/s. Manually enabling hardware encryption module definitely pays off!

Here are results I saw on my ZFS machines:

ProcessorModeWithout AES-NIWith AES-NI
Intel Core i3-4010U @1.70GHzXTS60 MB/s780 MB/s
CBC75 MB/s750 MB/s
Intel Atom C2558 @2.40GHzXTS40 MB/s350 MB/s
CBC45 MB/s350 MB/s

PS: Yes, this works for FreeNAS too.

PPS: You can also load module for temporary testing using kldload aesni.

[2018-07-22: NAS4Free has been renamed to XigmaNAS as of July 2018]

HDD Health Analysis

Every day I get a daily report from my NAS. It includes bunch of data about ZFS datasets and general machine health. However, one thing was missing - I didn’t really capture hard disk SMART errors.

As disk will report a bunch of values in SMART, I first had to decide which ones to use. A great help here came from BackBlaze as they publish hard drive test data and stats. It is wealth of information and I recommend reading it all. If you decide on shortcut, one of links contains SMART stats they’ve found indicate data failure quite reliably.

First one is Reallocated Sectors Count (5). It is essentially counter of bad sectors found during drive’s operation. Ideally you want this number to be 0. As soon as it starts increasing, one should think about replacing the drive. All my drives so far have this value at 0.

Second attribute I track is Reported Uncorrectable Errors (187). This one shows number of errors that could not be corrected internally using ECC and that resulted in OS-visible read failure. Interestingly only my SSD cache supports this attribute.

One I decided not to track is Command Timeout (188) as, curiously, none of my drives actually report it. Looking into BackBlaze’s data it seems that this one is also the most unreliable of the bunch so no great loss here.

I do track Current Pending Sector Count (197) attribute. While this one doesn’t necessarily mean anything major is wrong and it is transient in nature (i.e. its value can change between some number and 0), I decided to track its value as it indicates potential issues with platter - even if data can be read at later time. This attribute is present (and 0) on my spinning disks while SSD doesn’t support it.

Fifth attribute they mentioned, Uncorrectable Sector Count (198), I do not track. While value could indicate potential issues with platters and disk surface, it is updated only via offline test. As I don’t do those, this value will never actually change. Interestingly, my SSD doesn’t even support this attribute.

I additionally track Power-On Hours (9). I do not have actual threshold nor I plan to replace the drive when it reaches certain value but it will definitely come in handy in correlation with other (potential) errors as all my disks support this attribute. Interestingly, BackBlaze found that failure rates significantly rise after three years. I do expect my drives to last significantly longer as my NAS isn’t stressed nearly as much as BackBlaze’s data center.

Lastly, I track Temperature (194). Again, I track it only to see if everything is ok with cooling. All my drives support it and, as expected, SSD’s temperature is about 10 degrees higher than for spinning drives.

Here is a small and incomplete bash example of commands I use to capture these stats on NAS4Free:

DEVICE=^^ada0^^
DISK_SMART_OUTPUT=`smartctl -a /dev/$DEVICE 2> /dev/null`
DISK_REALLOCATED=`echo "$DISK_SMART_OUTPUT" | egrep "^  5 Reallocated_Sector_Ct" | awk '{print $10}' | cut -dh -f1`
DISK_HOURS=`echo "$DISK_SMART_OUTPUT" | egrep "^  9 Power_On_Hours" | awk '{print $10}' | cut -dh -f1`
DISK_UNCORRECTABLE=`echo "$DISK_SMART_OUTPUT" | egrep "^187 Reported_Uncorrect" | awk '{print $10}' | cut -dh -f1`
DISK_TEMPERATURE=`echo "$DISK_SMART_OUTPUT" | egrep "^194 Temperature_Celsius" | awk '{print $10}' | cut -dh -f1`
DISK_PENDING=`echo "$DISK_SMART_OUTPUT" | egrep "^197 Current_Pending_Sector" | awk '{print $10}' | cut -dh -f1`

Note that I capture the whole smartctl output into a variable instead of multiple calls. This is just a bit of a time saver and there is no issue (other than speed) with simply calling smartctl multiple times. If you do decide to call it only once, do not forget quotes around “echoed” variable as they instruct bash to preserve whitespace.

PS: For curious, drives I use are 2x WD Red 4 TB (3.5"), 2x Seagate 2 TB (2.5"), and Mushkin 120GB (mSATA) SSD cache.

[2018-07-22: NAS4Free has been renamed to XigmaNAS as of July 2018]

Changing Ls Colors on NAS4Free

There is one thing I hate on my NAS4Free server - dark blue color when listing directories using ls command. It is simply an awful choice.

From Linux I knew about LS_COLORS variable and its configuration. However, NAS4Free is not Linux. And while similarities are plentiful, some things are simply not working the same.

Fortunately, one can always consult man page and see FreeBSD uses LSCOLORS variable with wildly different configuration. Curious can look at full configuration but suffice to say I was happy with just changing directory entry from blue (e) to bright blue (E).

To do this in my .bashrc I added:

export LSCOLORS="^^E^^xfxcxdxbxegedabagacad"

PS: How to preserve .bashrc over reboots is exercise left to reader because it depends on your system. Suffice to say is that either ZFS mount point or simply appending in postinit script work equally well.

[2018-07-22: NAS4Free has been renamed to XigmaNAS as of July 2018]

Encrypted ZFS for My Backup Machine

I already wrote about my ZFS setup. However, for my new machine I made a few changes. However, setup is still NAS4Free based.

The very first thing I forgot last time is randomizing the disks upfront. While not increasing security of new data, it does remove any old unencrypted bits you might have laying around. Even if disk is fresh, you don’t want zeros showing where your data is. Dangerous utility called dd comes handy here (once for each disk):

dd if=/dev/urandom of=/dev/ada0 bs=1M
dd if=/dev/urandom of=/dev/ada1 bs=1M

This takes a while but fortunately it is possible to see current progress with Ctrl+T. Do use tmux to keep session alive as this will take long time (with a big disk, more than a day is not unexpected).

Next, instead of using glabel, I decided to use the whole disk. That makes it easier to move disk later to other platform. No, I am not jumping BSD ship but I think having setup that can change environments is really handy for emergency recovery.

While ZFS can handle using device names like ada0 and ada1 and all shenanigans that come with their dynamic order, I decided to rely on serial number of drive. Normally device labels containing serial number are found under /dev/diskid/ directory. However, NAS4Free doesn’t have them on by default.

To turn them on, we go to System, Advanced, and loader.conf tab. There we add kern.geom.label.disk_ident.enable=1 and reboot. After this, we can use /dev/diskid/* for drive identification.

Those drives I then encrypt and attach each drive:

geli init -e AES-XTS -l 128 -s 4096 /dev/diskid/^^DISK-WD-WCC7KXXXXXXX^^
geli init -e AES-XTS -l 128 -s 4096 /dev/diskid/^^DISK-WD-WCC7KYYYYYYY^^

geli attach /dev/diskid/^^DISK-WD-WCC7KXXXXXXX^^
geli attach /dev/diskid/^^DISK-WD-WCC7KYYYYYYY^^

Finally, I can create the pool. Notice that I put quota around 80% of the total pool capacity. Not only this helps performance but it also prevents me from accidentally filling the whole pool. Dealing with CoW file system when it is completely full is something you want to avoid. And also, do not forget .eli suffix.

zpool create -o autoexpand=on -m none -O compression=on -O atime=off -O utf8only=on -O normalization=formD -O casesensitivity=sensitive -O quota=3T Data mirror /dev/diskid/^^DISK-WD-WCC7KXXXXXXX^^.eli /dev/diskid/^^DISK-WD-WCC7KYYYYYYY^^.eli

zdb | grep ashift
            ashift: 12

Once pool was created, I snapshotted each dataset on old machine and sent it over network. Of course, this assumes your pool is named Data, you are working from “old” machine, and new machine is at 192.168.1.2:

zfs snapshot -r ^^Data^^@Migration
zfs send -Rv ^^Data^^@Migration | ssh ^^192.168.1.2^^ zfs receive -Fs ^^Data^^

This step took a while (more than a day) as all datasets had to be recursively sent. Network did die a few times but resumable send saved my ass.

First I would get token named receive_resume_token from the destination:

zfs get receive_resume_token

And resume sending with:

zfs send -v -t ^^<token>^^ | ssh ^^192.168.1.2^^ zfs receive -Fs ^^Data/dataset^^

Unfortunately resume token does not work with recursion so each dataset will have to be separately specified from that moment onward.

Once bulk of migration was done, I shut every single service on old server. After that I took another (much smaller) snapshot and sent it over network:

zfs snapshot -r ^^Data^^@MigrationFinal
zfs send -Ri ^^Data^^@Migration ^^Data^^@MigrationFinal | ssh ^^192.168.1.2^^ zfs receive -F ^^Data^^

And that is it - shutdown the old machine and bring services up on the new one.

PS: If newly created machine goes down, it is enough to re-attach GELI disks followed by restart of ZFS daemon:

geli attach /dev/diskid/^^DISK-WD-WCC7KXXXXXXX^^
geli attach /dev/diskid/^^DISK-WD-WCC7KYYYYYYY^^
/etc/rc.d/zfs onestart

[2018-07-22: NAS4Free has been renamed to XigmaNAS as of July 2018]
My Backup ZFS Machine

Illustration

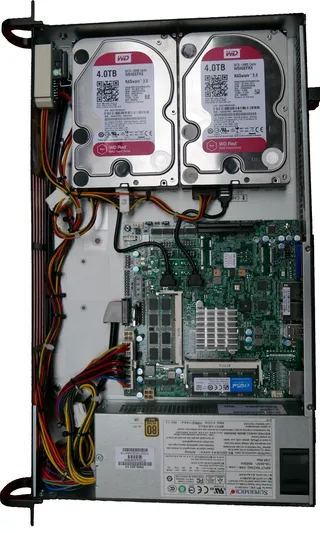
With my current ZFS pool getting close to its 2 TB limit I started to think about expanding it a bit. However, before doing anything with main NAS server, I decided to get the backup server up to speed. Reason is simple: while I am not a ZFS newbie, I don’t move pools on regular basis and moving backup server’s data will give me nice practice opportunity so I have procedure pinned down when I go to deal with the main storage.

My main parameters were to build machine capable of at least ZFS mirror, be reasonably easy to hide as it will be situated in living room, be as quiet as possible, and cost no more than $300 for all the hardware excluding disks. Note that nowhere I have any conditions on its speed - it is a backup machine I hopefully will never touch again.

For the case I went with Supermicro SC504-203B 19" 1U rack mountable chassis. Some of you might be reasonable wondering which drugs I am taking that causes me to think of 19" rack case as unobtrusive and easy to fit in living room. Well, you are missing a detail that my TV stand is piece of solid wood with opening that is about 25" wide and 2" tall. Just enough for me to slide the case below and for it never to be visible again.

As point of interest, you might notice Supermicro offers SC504-203B and SC505-203B rack cases that have seemingly identical specs. It took me a while to figure out the only difference: 504 has all the connectors in the back and 505 has the motherboard connectors at the front. For my case, more common setup of connectors at the back was better, but your mileage might vary.

Other than its perfect size, this case is one of rare in the lower price range to have enough place for two 3.5" drives. As I am really not too happy with my current situation of backup on a single (albeit) ZFS-formatted drive, upgrading backup to a mirrored combo seemed like a long delayed improvement. Other than that, case has an efficient power supply (80+ Gold) alongside a wide selection of compatible boards.

And there is also a bummer - not all mini-ITX boards can fit this case. Better said, they will fit the case but their IO shield will be a tad too high for an 1U format. Yes, you can always go without the shield or by frankensteining the solution but I actually found a reasonably priced Supermicro board.

I decided to go with X10SBA-L board instead of similarly priced but seemingly more powerfull X10SBA. The “L” board doesn’t have additional Marvell chip and thus it has only two SATA 2.0 ports (Marvell brings additional four SATA 3.0 ports), it has one USB 3.0 and three USB 2.0 ports where Marvell offers additional two 2.0 ports, it has m-SATA port (which cannibalizes one of SATA 3.0 ports), and lastly it lacks eDP. For me neither of those were breaking deal as I intended to use only two disks with the single USB 3.0 port carrying Nas4Free installation.

A bit controversial decision is lack of ECC memory support that is not really frowned upon when dealing with ZFS. In reality, I couldn’t find any ECC board that would fit within my budget. And, while memory is important for ZFS, let’s not forget that this is just a backup machine and that memory errors are usually not catastrophic. Plan is to have ECC RAM on my next ZFS server. But my backup server - mah…

Speaking of memory, I essentially selected the cheapest 2x 4GB modules from manufacturer I trust. While I have bought Crucial, I would have taken Corsair, Kingston, or Samsung the same.

For disks I opted to go with WD Red 4TB model for now. As my current data actually fits into 2.5" 2TB drive, space-wise I have quite a buffer for the next year and probably much longer. I was toying with the idea to use Seagate Ironwolf due to its attractive 6TB price, but noise level made me stick with WD Red. To minimize any potential issue affecting the whole batch, I actually bought disks at two different places (NewEgg and B&H).

A few curiosities were observed while pairing motherboard and case. First one is lack of opening for display port on the back. While slightly annoying, I found it bearable since HDMI opening, while grossly oversized, was accessible. If you really need display port you can order separate part number MCP-260-00068-0B but it will cost you $25.

Another one is mismatch between chassis power supply that has only 20-pin ATX connector and motherboard that requires 24-pin connector. As motherboard is really modest as far as power consumption goes, plugging 20-pin connector and leaving 4 leftmost pins empty works fine.

I also connected front-panel connector to PCI bracket in order to bring those ports to the outside. I only did it because I had bracket already available. Likewise, I swapped SATA cables that arrived with motherboard with shorter, round ones. This is just purely for cosmetics.

Without further ado, here is the itemized list:

Supermicro SuperChassis 504-203B$100
Supermicro X10SBA-L$149
Crucial 8GB DDR3L Kit (2 x 4GB)$54
SATA cable, 6", right-angle2x $7
TOTAL$317

Unable to Execute File From NAS4Free Share

Illustration

I use NAS4Free based server for all my file sharing needs. Give it a bit of ZFS turbo and you have a reliable setup.

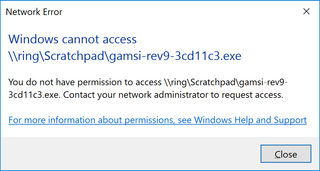
However, I noticed one quirk if you will. From my computer I could execute installations located on the network share while my kids were greeted with “Windows cannot access…” error. Cause was clear. My kids had read-only access while I had full rights. And it was definitely that, as I could use chmod +x to make file executable and go on my marry way.

Doing it recursively over all directories would have solved the problem but not necessarily permanently as any newly created file would need the same adjustment. And yes, it would be possible to force inheritance of attributes from parent but that seemed overly restrictive - not even taking into consideration that my NAS4Free command line would suddenly auto complete every executable file in directory.

Fortunately, Samba 4.1 has a simple solution for it - acl allow execute always. This option than “fakes” executable attribute without setting it on the underlying system. It is as close as it gets to “have your cake and eat it too”.

NAS4Free unfortunately doesn’t have this option exposed to user. However, it does have free form field for configuration parameters. Solution is just finding Auxiliary parameters under Services, CIFS/SMB and adding acl allow execute always = true into a text box. Short restart later and any restricted Windows user will be able to execute files from the network share.

[2018-07-22: NAS4Free has been renamed to XigmaNAS as of July 2018]