Programming in C#, Java, and god knows what not

Visual Studio 2019

Illustration

Visual Studio 2019 is among us and, thanks to multiple release previews, it seems as it was always here. From C# developer point of view, it’s not a revolution but a nice, steady improvement.

The first change you will notice is the new Start window. While it can get crowded if you deal with a lot of projects and it could definitely use a search function, it’s much better than what Visual Studio 2017 had to offer.

The next visual change is that menu got merged with title bar. While this has no functional impact on menu management, it does provide your editor with much needed vertical space. You can see that this was coded by young developers as you cannot blindly double-click at 0,0 to close solution anymore.

The most important new feature for me as a C# developer is break point on data. While I didn’t need it often, I definitely felt C++ envy when I did. Now C# developers can simply set a single breakpoint on data itself instead peppering bunch of them all over the code hoping to catch the rogue update.

Visual Studio Live Share is feature I could see used massively in teaching environment. A long time ago I taught coding and the most difficult part was going over examples on projected screen. It was annoying having to setup Visual Studio specially for projector (e.g. text size) instead of my standard environment. Now presenter gets to work in his own environment and each other connected party (read-only or editable) gets to use their settings too. Pure comfort. :)

There is quite a few other improvements, be it in performance or new flows and you can check release notes for more information.

Or, since Download is available, install and enjoy!

Replacing Bitmap In-Place

Illustration

Sometime even the simplest application can cause the exception. For example let’s just open an image, edit it, and save it afterward. Something like this:

var image = new Bitmap("test.jpg");
// do something with image
image.Save("test.jpg");

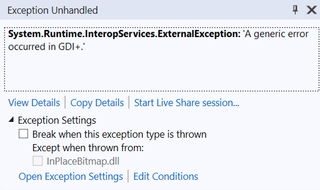
This code will throw the really helpful “A generic error occurred in GDI+.” exception.

Fortunately, there is more than one way to skin this cat. Rather similar (and equivalent) code will work:

Bitmap image;
using (var stream = new FileStream("test.jpg", FileMode.Open)) {
    image = (Bitmap)Bitmap.FromStream(stream);
}
// do something with image
image.Save("test.jpg");

A slightly different embodiment of the same idea.

Post-Quantum Cryptography – Round Two

See also round 1 and round 3.


After a bit more than a year since round one, we are now in the round two of post-quantum cryptography standardization process.

NIST Status Report trimmed original list of 69 algorithms to 26 that will be further studied. Based on the previous experience I would think there will be a third round in a year or so but NIST leaves open a possibility that we’ll immediately get the two finalists (one for public key exchange and one for signing).

My Star Trek key signing favorite (CRYSTALS-DILITHIUM) is actually still in the game and a further analysis is encouraged - probably as close as it gets to a positive review from NIST. It’s key exchange brother CRYSTALS-KYBER might have gone a bit too far with it’s “fishy” security proof but more analysis is needed there.

Star Wars universe is also strong with NewHope key exchange algorithm. Force is indeed strong within this one and I would dare to say it remains a strong favorite - especially due to it’s current use in Chrome.

NTRU Prime is still in there but NIST did notice a bit overly optimistic security level claims that might need to be adjusted in the future. I believe constant-time decryption this algorithm brings is a really interesting thing - especially when it comes to hardware and side-channel attacks.

I noted FALCON for its performance with a small memory footprint and that won it enough points to get into round two. However, difficulty of correct implementation and a huge potential for side-channel attacks might leave it here.

DAGS, which I loved for it’s tweakability of server/client load unfortunately stayed in round one. Likewise, RLCE-KEM noted for its performance was left behind too - largely due to complexity of (correct) implementation.

One algorithm I didn’t note in round one is Three Bears. Not only it has an awesome name and uses Mersenne primes but it also offers excellent performance. Might be a worthy challenger to NewHope.

Next update in 12-18 months. :)

Displaying EOL Symbol in Visual Studio Code

inline right

As soon as I started playing with Visual Studio Code a bit more, I found it’s whitespace rendering function lacking. While it does render spaces and tabs, I found it hard to deal with the absence of EOL marking. Yes, Visual Studio Code does show that information in status line and the whole thing is not really per line setting as Code will “normalize” line endings upon load but I simply missed those buggers.

I did find a couple extensions doing it but none really worked seamlessly as I wanted them. For one, they had a separate setting for turning them on/off. While I do love my EOL characters, I don’t want to see them all the time and I definitely don’t want to go into settings to change their state when there’s perfectly good Toggle Render Whitespace menu option available. Moreover, I wanted color of EOL to fit with the existing whitespace theme rendering instead configuring it separately.

I guess it was time to make my own extension.

Well, first, there is a really good guide through building simple extension. While it might not go deep into the topic, you will have both working extension and knowledge how to debug it by the time you’re done.

Secondly, if you go into %USERPROFILE%\.vscode\extensions directory (on Windows), you will see all extensions there - including their source code. I might not be the biggest fan of JavaScript (or TypeScript) but I am definitely the fan of learning by example. If you see some other extension doing something really close to what you need, you can see how it’s working and start from there.

Lastly, publishing extension is easy too. Assuming you got your package setup correctly, you’re just a few lines away from having it in the wild world.

To sum it up, creating and publishing extension was rather interesting and easy experiment. While JavaScript and occasionally flaky documentation did cause me to spend way too much time on this, it wasn’t all too bad. Debugging experience is acceptable and it feels nice to actually make something you’ll use. Not sure I’ll repeat it any time soon but I will definitely keep it in mind.

If it sounds interesting, you can install extension from within Visual Studio Code if you search for Render CRLF, check it’s marketplace page, or take a look at the source code.
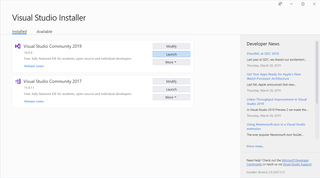
Image.FromStream Doesn't Always Preserve Exif Data

Reading Exif files within C# is easy. For example, if you want to know camera model, it is enough to simply loop through image’s properties and read it:

private static string GetCameraModel(Image image) {
    foreach (var property in image.PropertyItems) {
        if (property.Id == ExifTag.CameraModel) { //0x0110
            return ASCIIEncoding.ASCII.GetString(property.Value).Trim('\0');
        }
    }
    return null; //no model found
}

However, if you want to do anything with the file you cannot simply load it with Image.FromFile as .NET keeps image open all the way until disposal. Easy enough, just load image with Image.FromStream, like this:

Image image;
using (var stream = new FileStream(this.File.FullName, FileMode.Open, FileAccess.Read)) {
    image = Image.FromStream(stream);
}
return GetCameraModel(image);

Image loaded in this manner will not contain any Exif - just the image data. The default stream loader just tossed everything that’s not picture away. If you want to preserve picture, you need to explicitly tell it:

Image image;
using (var stream = new FileStream(this.File.FullName, FileMode.Open, FileAccess.Read)) {
    image = Image.FromStream(stream, useEmbeddedColorManagement: true, validateImageData: true);
}
return GetCameraModel(image);

Now you can read all the Exif data you can handle. :)


PS: Interestingly, it seems that on Windows 7 it works either way.

Unscaled Doesn't Mean It Won't Scale

One application I created had to show a simple, fixed image on screen. As it’s size is fixed and no resizing is needed, one might assume following code would be sufficient:

var left = (ClientRectangle.Width - bitmap.Width) / 2;
var top = (ClientRectangle.Height - bitmap.Height) / 2;
e.Graphics.DrawImageUnscaled(bitmap, left, top);
e.Graphics.DrawRectangle(SystemPens.WindowText, top, left, bitmap.Width, bitmap.Height);

Illustration

However, running this code might result in image significantly larger than the rectangle.

You see, DrawImageUnscaled will not necessarily ignore all scaling. It will attempt to preserve physical size - not size in pixels. So, if you have a screen punching above ancient 96 DPI, you will see scaling happen.

So, if you want to draw unscaled image, just use the normal DrawImage function and specify the size yourself.

Annotating Icons

Placing icon in tray is usually quite straightforward. You usually just take application icon and assign it to NotifyIcon. But what if you want to add a small annotation to tray icon (e.g. small shield)?

Well, you can do something like this. Just get application icon and draw another image on it. Yes, it does require a bit of calculation to get it into the bottom right corner but nothing that a little math cannot handle.

private static Icon GetAnnotatedIcon(Bitmap annotation) {
  var icon = GetApplicationIcon();

  if (icon != null) {
    var image = icon.ToBitmap();
    if (icon != null) {
      using (var g = Graphics.FromImage(image)) {
        g.DrawImage(annotation, (int)g.VisibleClipBounds.Width - annotation.Width - 2, (int)g.VisibleClipBounds.Height - annotation.Height - 2);
        g.Flush();
      }
    }
    return Icon.FromHandle(image.GetHicon());
  }
  return null;
}

There is only one magic moment above - how to get application icon. Fortunately, a bit of P/Invoke goes a long way.

private static Icon GetApplicationIcon() {
  var hLibrary = NativeMethods.LoadLibrary(Assembly.GetEntryAssembly().Location);
  if (!hLibrary.Equals(IntPtr.Zero)) {
    var hIcon = NativeMethods.LoadImage(hLibrary, "#32512", NativeMethods.IMAGE_ICON, 20, 20, 0);
    if (!hIcon.Equals(System.IntPtr.Zero)) {
      var icon = Icon.FromHandle(hIcon);
      if (icon != null) { return icon; }
    }
  }
  return null;
}

private static class NativeMethods {
  public const UInt32 IMAGE_ICON = 1;

  [DllImport("user32.dll", CharSet = CharSet.Unicode)]
  static extern internal IntPtr LoadImage(IntPtr hInstance, String lpIconName, UInt32 uType, Int32 cxDesired, Int32 cyDesired, UInt32 fuLoad);

  [DllImport("kernel32.dll", CharSet = CharSet.Unicode)]
  static extern internal IntPtr LoadLibrary(string lpFileName);
}

And yes, this code doesn’t take DPI into account so your high-definition icon might suffer - let’s leave that for some other post. :)

Changing Git Commit Message

Every once in a while I figure a typo as I am hitting git commit. Mind you, it’s not that I am making a typo once in a while - I do typos all the time - I only notice them once in a while. :)

What follows is a common pair of commands:

git reset --soft HEAD~
git commit -m"Corrected spelling."

As I did with other git operations I do often enough, I decided to make it an alias:

git config --global alias.redo '!git reset --soft HEAD~ && git commit'

Now I can use a single git command to do correction:

git redo -m"Corrected spelling."

Even better, if comment is not given, command will simply move the latest commit back into the staging area.

Might not be a huge change but it does make a common operation faster.

Omitting Quotes From DebuggerDisplay

Using DebuggerDisplay is both simple and really helps with troubleshooting. However, its automatic quoting of strings can sometime result in less than optimal tooltip display.

For example, if you have Key and Value field with “Foo” and “Bar” as their respective content, you might end up with the following attribute:

DebuggerDisplay("{Key}: {Value}");

This will result in "Foo": "Bar" tooltip text. While not a big deal, these excessive quotes can be a bit of annoyance. Fortunately, you can tell DebuggerDisplay to stops its auto-quoting:

DebuggerDisplay("{Key,nq}: {Value,nq}");

This will result in much nicer-looking Foo: Bar output.

TimeSpan and HH:mm

Illustration

Time printing and parsing is always “fun” regardless of language but, for most of time C#, actually has it much better than one would expect. However, sometime one can get surprised by small details.

One application had the following (extremely simplified) code writing time entries:

var text = someDate.ToString("HH:mm", CultureInfo.InvariantCulture);

Other application had the (also simplified) parsing code:

var someTime = TimeSpan.ParseExact(text, "HH:mm", CultureInfo.InvariantCulture);

And all I got was System.FormatException: 'Input string was not in a correct format.'

Issue was not in text, all entries were valid time. Nope, issue was in a slight difference between custom DataTime and custom TimeSpan specifiers.

Reading documentation it’s really easy to note the first error as these is a clear warning: “The custom TimeSpan format specifiers do not include placeholder separator symbols.” In short that means we cannot use colon (:) as a TimeSpan separator. Nope, we need to escape it using backslash (\) character. I find this one mildly annoying as not implementing time separators into TimeSpan seems like a pretty basic functionality.

But there is also a second error that’s be invisible if you’re not watching carefully. TimeSpan has no knowledge of H specifier. It understands only its lowercase brother h. I would personally argue this is wrong. If any of those two had to be used, it should have been H as it denotes time more uniquely.

In any case, the corrected code was as follows:

var someTime = TimeSpan.ParseExact(text, "hh\\:mm", CultureInfo.InvariantCulture);

Ideally one would always want to use the same format for output as the input but just because semantics of one class are the same as the other for your use case, you cannot count of format specifier to be the same.