Programming in C#, Java, and god knows what not

Twofish in C#

As one of the five AES competition finalists, Twofish algorithm is well known and appreciated. Yes, Rijndael ended up being AES at the end but, unlike other finalists, Twofish is still widely used.

As I tried to read some Twofish-encrypted files I’ve noticed one sad fact - C# support is severely lacking. Yes, there is one reasonably good free implementation on CodeProject but it doesn’t really play nicely with CryptoStream due to lack of any padding support. So, since I had some free time on my hands, I’ve decided to roll my own implementation.

I won’t go too much into the details - do check the code yourself. Suffice to say it can be inserted wherever SymmetricAlgorithm can be used. It supports CBC and ECB encryption modes with no, zero, or PKCS#7 padding. You can chose if you are going to deal with encryption yourself or decide to be at the mercy of CryptoStream.

Basis for this code was Twofish reference implementation in C. Yes, I am aware recommendation is to use the optimized version instead but I find reference code much more readable and it made porting so much easier. I did however use MDS table lookup from the optimized version as it pretty much doubles the speed. Some time in the future I might consider optimizing it further but, as I have no pressing need, it might be a while.

It should be reasonably easy to follow Twofish code and only confusion will probably arise from the use of DWord structure with the overlapping fields. Yes, you can have the exactly same functionality with bitwise operations but overlapping structure does help performance quite a bit (around 25%). As I am using unoptimized reference code, one might argue implementation is not a speed champ to start with. However I believe this actually makes code even a bit more readable so I saw no reason to resist the temptation.

Probably the same amount of time I’ve spent on code was spent on setting up the test environment. While the basic test cases for full block transformations were covered by the official test vectors, the more expansive test cases with padding were pretty much non-existent. And let’s not even get into the Monte Carlo tests and all the insanity brewing within.

In any case, download is available (or check a GitHub link). Those a bit more interested in validity can check tests too.

Visual Studio 2015

Illustration

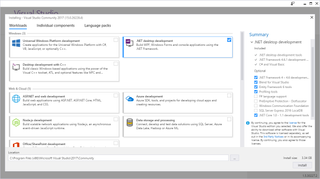
Rejoice, Visual Studio 2015 is here.

Newest member of family is a Community edition and that one will probably be the most popular choice out there for all that can legally own it. Those working for “the man” will find Professional and Enterprise edition at their rather steep prices ($500 and $2500 respectively).

Pleasant surprise is that Express editions are also available for those who cannot use Community edition and their boss is too cheap to get them Professional. This is also an edition which comes with least strings attached so don’t discount it immediately.

There might be no revolutionary feature but lot of small improvements (mostly driven by Roslyn) do make it a slightly better environment for all things .NET.

Retrieving Commit Number in Git

As I moved from Mercurial to Git I got hit with annoying problem. You see, in mercurial it is trivial to get commit number and commit hash. All you need is:

FOR /F "delims=" %%N IN ('hg id -i 2^> NUL') DO @SET HG_NODE=%%N%
FOR /F "delims=+" %%N IN ('hg id -n 2^> NUL') DO @SET HG_NODE_NUMBER=%%N%

Yes, it is not the most beautiful code but it does get the job done. With -i parameter we get hash and -n is what gives us commit number. And commit number is so useful for automated builds. Yes, hash will uniquely identify the build but humans tend to work better with numbers - e.g. setup-53-1d294c0f2737.exe is much better than setup-1d294c0f2737.exe alone. If numbers are there it becomes trivial to determine what is the latest build.

Mercurial has also one more trick in its sleeve. If changes are not committed yet, it will add small plus sign to its output, e.g. setup-53-1d294c0f2737+.exe. Now with one glance in a full directory you can determine order in which builds were done, what branch are they on, and if all changes were committed at the time of build.

How do you do the same in Git?

Getting revision number is trivial. Just ask git to count them all:

FOR /F "delims=" %%N IN ('git rev-list --count HEAD') DO @SET VERSION_NUMBER=%%N%

Getting hash is similarly easy:

FOR /F "delims=" %%N IN ('git log -n 1 --format^=%%h') DO @SET VERSION_HASH=%%N%

But there is one problem here. Hash is exactly the same whether all changes are committed or not, i.e. there is no plus sign if there are some uncommitted changes during build. And I believe such indication is crucial for any automated build environment. Fortunately Git will give you wanted information with a bit effort:

git diff --exit-code --quiet
IF ERRORLEVEL 1 SET VERSION_HASH=%VERSION_HASH%+

So final code to get Git hash and commit number equivalent to what I had in Mercurial was:

FOR /F "delims=" %%N IN ('git log -n 1 --format^=%%h') DO @SET VERSION_HASH=%%N%
git diff --exit-code --quiet
IF ERRORLEVEL 1 SET VERSION_HASH=%VERSION_HASH%+

Git and Windows Cannot Access the Specified Device

I am not really sure what happened (although I am willing to place some blame on Git file attribute handling) but suddenly some of my batch files started reporting “Windows cannot access the specified device, path, or file. You may not have the appropriate permissions to access the item.” when I try to start them from Windows Explorer. Annoyingly I could still start that same batch from Windows command line. Only double-click wouldn’t work.

After short investigation culprit was found in the permissions. Some application (Git) changed permissions for the file to include only read permissions. As soon as I changed permissions to include executable, I could start script again. Heck there is even a way to get executable attribute into Git repository so this can be avoided in the future. However, I took this as an opportunity to update permissions for my drive.

Drive in question is NTFS but not because I need any permission handling capabilities. Mostly it is because way NTFS handles small files is superior to any other Windows-supported file system. So my permissions on given drive are literally just allowing all users access. With time and different computers this changed a bit so reset was in order. I wanted to allow all users full drive access.

After starting Command Prompt as an administrator first mandatory task was to switch to that drive. Not only that this allows me to use relative paths further down the road but it also makes it less likely that any errors (e.g. due to accidentally forgotten parameter) would impact my system drive.

A:

Next step was to take ownership of my whole drive, forcing change when necessary:

TAKEOWN /F * /R /D Y
 SUCCESS: The file (or folder): "A:\Test\Test1.txt" now owned by user "TEST\Josip".
 SUCCESS: The file (or folder): "A:\Test\Test2.txt" now owned by user "TEST\Josip".
 SUCCESS: The file (or folder): "A:\Test\Test3.txt" now owned by user "TEST\Josip".
...

Since previous command left a lot of output, I also used /setowner option of ICACLS. There is no benefit to this one other than showing me stats and ensuring a file hasn’t been missed. Yes, you can even use this command instead of TAKEOWN but it has no option of forcing ownership change so you might need TAKEOWN regardless.

ICACLS .\ /setowner Josip /T /C /Q
Successfully processed 119121 files; Failed processing 0 files

Next I set my root directory to allow all Users, Administrators, and SYSTEM groups in. From previous run I had Everyone and BUILTIN set so I decided to remove them while I am at it.

ICACLS .\ /grant:r Users:F Administrators:F SYSTEM:F /inheritance:e /remove Everyone /remove BUILTIN
 processed file: .\
 Successfully processed 1 files; Failed processing 0 files

And last step was what I really wanted. Just reset all permissions.

ICACLS * /reset /T /C /Q
 Successfully processed 119120 files; Failed processing 0 files

And now I have my drive just as I wanted it.

PS: If you just wanna sort out Git, you can also update executable bit and avoid whole issue.

Embedding Resources Without Pesky Resources Folder

Illustration

Adding image resources to your C# application is close to trivial. One method is to open your Resources.resx file and simply add bitmaps you wish to use. However, this leaves your with all images in Resources folder. Some people like it that way but I prefer to avoid it - I prefer the old-style system of keeping it all in your resource file.

To have all images included in resource instead being in a separate folder, just select offending resources and press F4 to bring Properties window. Under Persistence simply select Embedded in .resx and your resources are magically (no real magic involved) embedded into resx file as Base-64 encoded string. Only thing remaining is to delete leftover folder.

You use resources from application same as you normally would.

BOM Away, in Git Style

Some time ago I made a Mercurial hook (killbom) that would remove BOM from UTF-8 encoded files. As I switched to Git, I didn’t want to part with it so it was a time for rewrite. Unlike Mercurial, there is no global hook mechanism. You will need to add hook for each repository you want it in.

Start is easy enough. Just create pre-commit file in .git/hooks directory, Looking from the base of the repository file name would thus be .git/hooks/pre-commit. Content of that file would then be as follows:

#!/bin/sh

git diff --cached --diff-filter=ACMR --name-only -z | xargs -0 -n 1 sh -c '
    for FILE; do
        file --brief "$FILE" | grep -q text
        if [ $? -eq 0 ]; then
            cp "$FILE" "$TEMP/KillBom.tmp"
            git checkout -- "$FILE"

            sed -b -i -e "1s/^\xEF\xBB\xBF//" "$FILE"
            NEEDSADD=`git diff --diff-filter=ACMR --name-only | wc -l`
            if [ $NEEDSADD -ne 0 ]; then
                sed -b -i -e "1s/^\xEF\xBB\xBF//" "$TEMP/KillBom.tmp"
                echo "Removed UTF-8 BOM from $FILE"
                git add "$FILE"
            fi

            cp "$TEMP/KillBom.tmp" "$FILE"
            rm "$TEMP/KillBom.tmp"
        else
            echo "BINARY $FILE"
        fi
    done
' sh

ANYCHANGES=`git diff --cached --name-only | wc -l`
if [ $ANYCHANGES -eq 0 ]; then
    git commit --no-verify
    exit 1
fi

What this script does is first getting list of all modified files separated by the null character so that we can deal with spaces in the file names.

git diff --cached --diff-filter=ACMR --name-only -z

For each of these files we then perform replacing of the first three bytes if they are 0xEF, 0xBB, 0xBF:

sed -b -i -e "1s/^\xEF\xBB\xBF//" "$FILE"

What follows is a bit of a mess. Since it is really hard to get information whether file has been changed without temporary files, I am abusing git to check if file has been changed since it was first staged. If that is the case, assumption will be made that it was due to sed before it. If that assumption is not correct, your commit will have one extra file. As people don’t have same file changed in both staged and un-staged are, I believe risk is reasonably low.

After all files are processed, final check is made whether anything is available for commit. If there are no files in staging area, current commit will be terminated and new commit will be started with --no-verify option. Only reason for this change is so that standard commit message can be written in cases when removal of UTF-8 BOM results in no actual files to commit. Replacing it with message “No files to commit” would work equally well.

While my goal of getting BOM removed via the hook has been reasonably successful, Git hook model is really much worse than one Mercurial has. Not only that global (local) hooks are missing but having multiple hooks one after another is not really possible. Yes, you can merge scripts together in a file but that means you’ll need to handle all exit scenarios for each hook you need. And let’s not even get into how portable these hooks are between Windows and Linux.

If you are wondering what is all that $TEMP operation, it is needed in case of interactive commits. Committing just part of file is useful but didn’t play well with this hook. Saving a copy on side sorted that problem.

Download for current version of pre-commit hook can be found at GitHub.

PS: Instead of editing pre-commit file directly, you can also create it somewhere else and create a symbolic link at proper location.

PPS: I have developed and tested this hook under Windows. It should work under Linux too, but your mileage might vary depending on exact distribution.

[2015-07-12: Added support for interactive commits.] [2015-11-17: Added detection for text/binary.]

Moving From Mercurial to Git (Part 2)

With decision to move away from Git, next big step was to transfer existing repositories. While there is a semi-reasonable Git support on Windows, any major dealing with Git is made much easier if you have Linux laying around. In my case decision was to deal with CentOS.

First step was to install all stuff we’ll need - Git, Mercurial and git-remote-hg script:

yum -y install git
yum -y install mercurial
yum -y install wget
mkdir ~/bin
wget https://raw.github.com/felipec/git-remote-hg/master/git-remote-hg -O ~/bin/git-remote-hg
chmod +x ~/bin/git-remote-hg

With that it was time to clone the first repository:

git clone hg::https://bitbucket.org/jmedved/vhdattach

In ideal world this would be all and we are close. If omitted, this step would skip reproducing branching structure on Git. But, while we are at it, I wanted to recreate branching structure I’m used to. Since conversion process leaves all branches inside remotes/origin/branches path, I wanted to move things around a bit:

cd vhdattach
git branch -a | grep 'remotes/origin/branches' | grep -v default | xargs -n 1 -I _ echo _ | cut -d/ -f 4 | xargs -n 1 -I _ git branch _ remotes/origin/branches/_
git branch

Next (optional) step was to fix my old commits:

git filter-branch --env-filter '

OLD_EMAIL="unknown"
CORRECT_NAME="Josip Medved"
CORRECT_EMAIL="jmedved@jmedved.com"

if [ "$GIT_COMMITTER_EMAIL" = "$OLD_EMAIL" ]
then
    export GIT_COMMITTER_NAME="$CORRECT_NAME"
    export GIT_COMMITTER_EMAIL="$CORRECT_EMAIL"
fi
if [ "$GIT_AUTHOR_EMAIL" = "$OLD_EMAIL" ]
then
    export GIT_AUTHOR_NAME="$CORRECT_NAME"
    export GIT_AUTHOR_EMAIL="$CORRECT_EMAIL"
fi
' --tag-name-filter cat -- --branches --tags

Since my move to Git was intended to be final I also wanted to change origin. My new home was to be GitHub:

git remote rm origin
git remote add origin git@github.com:medo64/vhdattach.git
git push --all

With that my move was complete.


Part 1

[2020-05-01: There is a bit newer version of this guide.]

Moving From Mercurial to Git (Part 1)

I used to be a huge fan of Visual Basic. When Visual Basic .NET arrived it seemed as most logical thing to use it instead of newfangled C#. However, it became clear quite quickly that Visual Basic is second-class citizen in that universe. Outside of a few exceptions, C# would get everything first. Whether it is a new feature or support for a new platform, Visual Basic would lag behind. So I switched and I haven’t looked back.

Reason why I tell this story is because I am doing similar switch again. I love Mercurial. It is a beautiful distributed versioning system which hides all complexity from a user whether it is in a command line or a great GUI client. It is modern, smart, and well designed system. Any fault with it is just nitpicking and more than outweighed by its features. All that said, Mercurial is also a second-class citizen.

Other distributed source control system almost everybody has heard of is Git. It is powerful and it has reasonable command line interface (although that wasn’t always the case). What it doesn’t have is proper GUI support nor it is equally well designed as Mercurial - especially when it comes to multiplatform support. Git is a bunch of different tools and it shows (you can make a hobby out of finding different commands that do exactly the same thing). However, fact is that you can get used to its shortcomings.

Community gathering around Git is much bigger than anything Mercurial can offer. Small part of it is due to its undeniable power. But I believe big part is due to being Linus’ baby. That gave it an early boost and, once you get used to its peculiarities, there is simply no reason to go to the other versioning system. And more people brings even more people in. And gets more people working on development. So peculiarities became bugs and get fixed. And platform liveliness brings even more people and better. Positive reinforcement at its best.

Simple search for Git vs Mercurial hosting or Git vs Mercurial push best illustrates the difference in usage. Git has simply won. Mind you, that doesn’t mean that Mercurial is going to die - I surely hope not. But it is going to be always an alternative choice.

All that said, I will be moving my open source project to GitHub. Private projects I don’t intend to share will stay with BitBucket but I will be switching them to Git as I do updates. Only things staying on Mercurial will be projects I am sharing with others and those I don’t update at all.

And time with Mercurial wasn’t really wasted - far from it. I would go as far to tell that it is the best distributed version control for taking the first steps. Pretty much all things I’ve learned can transfer directly to Git.

So long and thanks for all the fish.


Part 2

Easiest Black Bitmap

For one program of mine I had a lot of dynamic resource fetching to do. Unfortunately, sometimes a lookup in resources would return null bitmap. Whether that was due to the missing resource or because of a wrong key is of less importance. I didn’t want system to crash but I did want for program to crash just because bitmap was missing. But I did want to have that clearly visible so that I could catch it.

One idea was to use dummy resource, e.g.:

item.Image = (bitmap != null) ? bitmap : dummyBitmap;

However, I didn’t like that solution due to a potential resource release at other places. Nothing worse then releasing resource in use somewhere else. And I was more in the mood for one-liner - resources be damned.

But how to create an bitmap and color it at the same time (by default, bitmap is transparent)? Well, we could always create one without alpha channel, e.g.:

item.Image = (bitmap != null) ? bitmap : new Bitmap(size, size, PixelFormat.Format8bppIndexed);

This will make your bitmap one big black rectangle. It might not be ideal but it is definitely noticeable.

PS: Since I wanted this only during debugging, my final code ended up being just a smidge more complicated:

#if DEBUG
    item.Image = (bitmap != null) ? bitmap : new Bitmap(size, size, PixelFormat.Format8bppIndexed);
#else
    if (bitmap != null) { item.Image = bitmap; }
#endif

Using C# to Remove ReFS Integrity Stream

Illustration

As I moved my data drive to ReFS, I was faced with a problem of removing integrity stream for virtual disks. For performance reasons Microsoft doesn’t work with ReFS integrity streams and thus I had to disable it for all VHD files I had.

Since I use my own VHD Attach to attach disks, I also wanted to integrate removal of integrity stream upon opening the disk. And that meant C# solution was strongly preferred. As functionality is rather new, Windows API was the only way.

First course of action is, of course, to open the file. Only important thing is to have have both read and write access:

var handle = NativeMethods.CreateFile(
    fileName,
    NativeMethods.GENERIC_READ | NativeMethods.GENERIC_WRITE,
    FileShare.None,
    IntPtr.Zero,
    FileMode.Open,
    0,
    IntPtr.Zero);

Once we have a handle, we can can use DeviceIoControl to set checksum type to none.

var newInfo = new NativeMethods.FSCTL_SET_INTEGRITY_INFORMATION_BUFFER() {
    ChecksumAlgorithm = NativeMethods.CHECKSUM_TYPE_NONE
};
var newInfoSizeReturn = 0;

NativeMethods.DeviceIoControl(
    handle,
    NativeMethods.FSCTL_SET_INTEGRITY_INFORMATION,
    ref newInfo,
    Marshal.SizeOf(newInfo),
    IntPtr.Zero,
    0,
    out newInfoSizeReturn,
    IntPtr.Zero
);

Those two simple commands are all that takes. Sample (with actual API definitions) is available for download.

And rant for the end - it was annoyingly hard to find resources for this. Yes, some resources do exist (albeit without examples) but to find them you need to know what you are searching for. Since I knew Set-FileIntegrity PowerShell cmdlet does it somehow, I used Process Monitor tool to capture what exactly was happening. There I got a hint toward DeviceIoControl function and things got a bit easier. To keep it a bit interesting, documentation also lies that “The integrity status can only be changed for empty files.” Only confidence in Process Monitor’s capture kept me going in that direction.

Maybe it is me getting older but I have a feeling Windows API documentation is getting worse and worse. I hated Windows 7 documentation for virtual disk support and I thought that was the lowest quality Microsoft can do. But not much seems improved with newer versions. Gone are the times when new feature would get an example or two and more than a blog post as a design document.

I believe ReFS should deserve more.