Microsoft Windows and all that goes with it

BitLocker on Asus N56VJ

I am a big fan of full disk encryption. It is more of a political issue for me than security one. While I probably have no data that other would find worth stealing a laptop for, I value my privacy and I don’t want just anybody snooping around. And anyway, full disk encryption is always a good policy when having company’s data around. I don’t want to be one to leek company’s private info just because I read it on my personal laptop.

On my Asus N56VJ this proved slightly more difficult than expected. As soon as I would enable bit locker, Windows would go into Recovery and stayed there. Result was unusable system. After fiddling with Windows and BIOS options, I have found problem. Asus’ quick BIOS initialization left computer in an unhappy state that didn’t properly initialize USB drives.

Solution was just going to BIOS and changing Fast Boot to Disabled (together with already Enabled Legacy USB Support).

A Bit of Blur

Illustration

First time you install Windows 8.1 on high-DPI monitor, you will see a lot of blurring. Built-in applications will be really clear but third party applications that looked nice in Windows 8 suddenly got uglier.

It is not that Windows got dumber with new version. They actually got much smarter and now they can scale content properly over multiple different monitors. That is, one monitor can be 96 dpi, other 120 dpi, and third one can be 200 dpi. And all will work nicely.

However, this comes at the cost of blurriness for applications that haven’t declared themselves as DPI aware. Adding this to manifest is relatively easy for an application developer but I will leave that story for some other time. Question here will be whether user can help himself to deal better with “broken” applications.

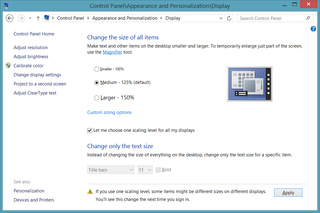
If you don’t care for proper scaling across multiple displays, you can just turn it off. Go to Control PanelAppearance and PersonalizationDisplay. There just select Let me choose one scaling level for all my displays and you will be greeted with old scaling settings. Select 125% and, after log off, all applications will look sharp again.

PS: Same manifest request (and associated blurring) was present in Windows 7 but Windows 8 relaxed check a bit (if your display was up to 125% scale). I am a bit disappointed with applications that don’t have it configured yet (e.g. Google Chrome).

Installing Windows 8.1 (Or 8) Without a Product Key

Illustration

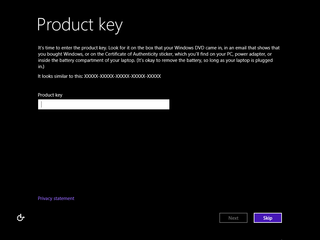
One great feature Windows 7 was possibility to install them without needing a key. Instead of entering 25-digit key, you could just select skip and Windows would give you 30 days after install to setup everything before requiring valid product key.

I found this really useful during setup of a new machine when I would have multiple reinstalls while trying out various drivers and performing their troubleshooting. Only once I was perfectly satisfied with machine, I would activate it.

More than once I also used this feature to reproduce a bug in different OS language (e.g. German). Mind you, I did have keys for that particular version (MSDN subscription is a great thing) but I was regularly too lazy to look key up for a version that would essentially get installed and deleted within a day.

Thus I was really pissed off when I found that feature was missing in Windows 8. But I was wrong. Feature is still present in setup. Only now it requires some preparation first.

Very first step is to copy all files from Windows DVD. Assuming that you have your DVD at letter W: and that you want staging directory at C:\Windows81, this would be:

ROBOCOPY W:\ C:\Windows81 /MIR
…

Once copy operation has completed, we need to create ei.cfg in C:\Windows81\sources directory. In my case I wanted to specify Professional edition expecting retail key so I created file with following content:

[EditionID]
Professional
[Channel]
Retail
[VL]
0

Only thing missing is creating new ISO file that we can burn on DVD. While this is not strictly necessary if you are creating bootable USB, I find having pre-prepared image an useful step. If nothing else, it is easier to backup a single ISO file than over a writable USB.

For bootable image creation we need Windows Assessment and Deployment Kit (or Windows ADK) for desired Windows version. Since I wanted to adjust Windows 8.1, I downloaded Windows ADK for Windows 8.1 but Windows 8 ADK is also freely available. Only thing that you really need to install for this guide are Deployment Tools. All other stuff you can uncheck.

To create bootable ISO image, I enter cmd.exe and there execute:

CD "C:\Program Files (x86)\Windows Kits\8.1\Assessment and Deployment Kit\Deployment Tools\x86\Oscdimg"

OSCDIMG.EXE -u1 -bC:\Windows81\boot\etfsboot.com C:\Windows81 D:\Windows81.iso
 OSCDIMG 2.56 CD-ROM and DVD-ROM Premastering Utility
 Copyright (C) Microsoft, 1993-2012. All rights reserved.
 Licensed only for producing Microsoft authorized content.
 Scanning source tree (2000 files in 803 directories)
 Scanning source tree complete (2094 files in 867 directories)
 Computing directory information complete
 Image file is 3984359424 bytes
 Writing 2094 files in 867 directories to D:\Windows81.iso
 100% complete
 Final image file is 3990419456 bytes
 Done.

This will create bootable Windows81.iso image in a root directory of your second drive. If you have a single drive, place file into a subdirectory. Otherwise file will be written in Virtual store (usually at %USERPROFILE%\AppData\Local\VirtualStore).

Finally we have image that will not ask you for key during install and it will allow you to skip key entry for 30 days. Just burn it to CD or make bootable USB and you are ready to go.

PS: This also means that you can use your Windows 8 key to activate Windows 8.1 after installation is done. While Windows 8 key won’t work during installation, it will work nicely once everything is fully installed.

PPS: If you omit EditionID from ei.cfg, you will get an option to select edition that you would like (Professional or Core).

PPPS: No, this is not a hack. Microsoft has it all documented (both ei.cfg and oscdimg.exe).

[2013-10-20: You can download ISO directly from Microsoft (see instructions at SuperSite).]
Windows 8.1

Illustration

Last week Microsoft announced Windows 8.1 preview and I decided to install it on my personal machine. I mean, what could go wrong?

Installation process was really simple. First there was a quick fix for Store, followed by quick restart, Store-based install, and an 0xc0210000 error code. After some troubleshooting and a question later, problem went away when I disabled all startup applications. I would not call this a rock solid installation process in any case. But it did work (eventually).

First thing you might notice after reboot is that DPI is all wrong. Not only that Windows will not recognize high-DPI screen as they used to but, if you manually select larger text, they will also make everything blurry. Only way to get things back to normal is to select one scaling level for all displays. Once that box is checked you will be able to set DPI without blurriness.

Mind you, this might as well be issue with a graphics driver. Windows 8.1 changed driver model slightly once more and Intel HD 4000 has not received update yet. Most visible consequence of this are occasional video artifacts and a missing screen brightness adjustments. Fresh install of Intel graphics driver sorted this out.

I thought search cannot get much more wrong than what we got with Windows 8. I was semi-correct. Finally applications, settings, and files are searched together (as they were in Windows 7). However, you will get only first four hits to chose. Rest of screen will be taken with Internet search suggestions. Nice way to waste space.

Start button is a joke. Instead of full featured and loved implementation we had in Windows 7, there is a button that supports few menu options when right-clicked. Judging by the attention to details it was probably implemented by a janitor. I guess it is not all bad news because finally you can disable upper-left and upper-right hot corners. Yippee, close button is usable once more without fighting with charms menu.

There are few new Metro-style applications slowly taking over functionality from their desktop equivalents. For example, we have fully functional Metro Calculator. Oh no, wait, it misses Programmer mode. I guess that student developing it ran out of time. Most other applications that are metro-lized suffer same issue. They are just not finished so they will miss features or two when compared to their desktop brothers.

Explorer got a slight update. Not only it is called File Explorer these days but it also offers This PC as start page instead of My Computer. Some poor soul worked his heart out for this one.

Not all changes are superficial though. SkyDrive got more integrated and I find that a good thing (as does NSA :)). New DPI model shows promises in cases where you have two monitors with different DPI settings. And lets not forget boot to desktop.

It is a bit unfair to judge Windows based on just a preview, but I have a feeling that Windows 8.1 are going to be just bunch of fixes and applications that should have been there from day one with Windows 8. Regardless of my bickering, they are improvement over Window 8 and things are bound to get better once install procedure is fixed and manufacturers get their drivers in order.

As far as I am concerned, possibility to disable upper-corner charms and “everywhere” search are reason enough to upgrade. Especially since it will be free.

OS X Trash

Illustration

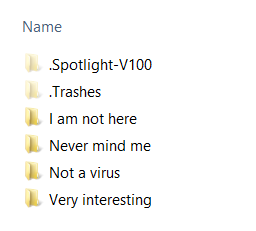
As a developer I find it useful to show hidden files. And every time I borrow my USB to someone with OS X I find two new hidden folders: .Trashes and .Spotlight-V100. While these folders are important for OS X functioning (equivalents of Recycle bin and File Indexer) they are very annoying to see on USB. Only if there was a way to these folders more hidden…

Well, you can always set system attribute. While Windows don’t allow you to manage it through interface, this attribute is nothing special. Once you go to Command prompt, commands are really easy (assuming G: drive):

G:
ATTRIB +s +h .Spotlight-V100
ATTRIB +s +h .Trashes

Yes, folders will still be there but far from an eye. :)

P.S.: Just deleting these folders will not really work. They just re-appear next time USB goes to visit OS X.

P.P.S.: This “fix” will not work if you uncheck Hide protected operating system files option.

P.P.P.S.: And shame you OS X for not setting this attribute yourself.

Dual Boot Windows 8 in Different Time Zones

Illustration

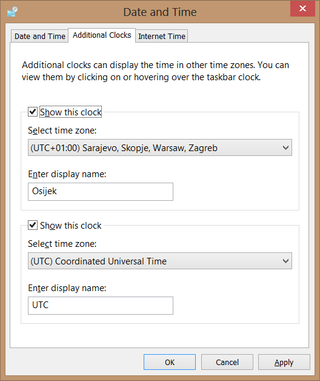
I spend my life in two time zones - CET and PST/PDT. Coincidentally I also have Windows 8 dual boot. I thought that it would be nice if each installation ran in its own time zone. I mean, how hard can it be?

I knew about RealTimeIsUniversal registry flag from a while back. I knew about some dangers involved with setting it. I knew why it is not UTC by default. I even knew that Microsoft does not really encourage use of that flag. But it seemed so perfect match for what I wanted to do - keep BIOS clock in UTC so that each Windows installation can have its own clock. If that meant that twice a year at 2 AM I would need to deal with broken system, so be it.

I carefully set flag in registry for both systems, rebooted, and went into despair mode. Using this flag caused whatever was local time on last shutdown to be used as UTC time on next boot. Every startup was bringing me further and further into past. It took me a while to find reason for it.

One benefit that Windows Time service provides is syncing back running clock value to BIOS on Windows shutdown. Since those two clocks are independent of one another and running clock is almost sure to be more accurate, this is something that you would expect and want. Unfortunately Windows Time service doesn’t care for RealTimeIsUniversal flag and thus it (incorrectly) writes local time. On next Windows startup that value is used (correctly) as UTC time.

One solution was to disable Windows Time Service and deal with another NTP client but I decided against it. I actually liked Windows Time service and its features, least of which is fully functioning SNTP server hidden deep inside. I simply decided that living in single time-zone would work just fine.

Difficult question is whether this behavior (or lack thereof) is a bug. I would argue yes.

I am aware that I used “feature” that was most likely someone’s pet project and never properly supported by Microsoft. I am aware that burden of compatibility with previous Windows versions will mean that UTC can never be default clock. I am aware that BIOS will show weird time that might confuse users. But I don’t care.

Any user that would like to have UTC time in a CMOS is not a sort of user that would be confused by BIOS time mismatch. It is most probably user that swears at Windows every time they boot Linux distribution of their choice. Or it is Windows dual boot user sick of Windows adjusting daylight saving for each instance separately.

And I don’t care that RealTimeIsUniversal is not supported. What is Microsoft waiting for? It is year 2013 and UTC has been with us for a long time now.

I don’t even care that kernel behaves correctly and it is Windows Time service at fault. Both components are part of Windows and they should work correctly together. We are not in world of legacy Linux distributions where Install All would fail with bunch of errors and developers blaming each other for using unsupported library. If Windows had one advantage it is integration of various parts in a single system. Don’t sell me that “component owner” story.

Will this get ever fixed? I doubt it. There is not enough people needing it and most of them are just used to current behavior anyhow. While this feature would bring harmony into Universe, 99.9% of Windows users wouldn’t even think about turning it on. Only way this will get implemented is if it becomes somebody’s pet project once more. And even then only to break once more in more distant version.

Consider this whole post as a grumbling of someone in need. :)

Sorry for Windows 8

Illustration

It seems that Windows 8.1 will be a free upgrade for all Windows 8 users. I know quite a few people who might be thinking that hell is nearing freezing point. :)

Jury is still out in regards to what exactly Windows 8.1 brings but in all likeness it will be to Windows 8 what Windows 7 were to Vista. There might be few minor internal features but I suspect that most of work will be done on customer facing front.

My wishes include combined search for Apps/Settings/Files, booting directly in desktop mode, and removing hot-spot from upper-left corner. Yes, I am easy to please. :)

Forced Change

For a long time my text editor of choice was PSPad. Over time I got very much used to it and it became standard part of all my installations. Yes, few versions back it had some toolbars that you could deselect if you wanted to. I guess if Oracle can pack a crap with Java installation, so can everybody else.

Nitpickers would say that you can always download files without installer and copy them on system manually. In my opinion, installer is integrated part of software experience and, if you don’t have installer, software is unsuitable for any use. It will get on my system only if it offers something that you cannot otherwise get. I have few such tools and almost all of them are part of Sysinternals family.

Latest version of PSPad went a bit too far for me. In EULA you will find that “PSPad editor installer contains third party bundled software provided by InstallMonetizer.” And there is no way to install PSPad without getting it on your system. No checkbox, no anything. Just a paragraph that is visible ONLY if you scroll down to the very end of EULA. Yes, we all read those.

There is only one real replacement for it - Notepad++. It comes at same price point (freeware) and it covers most of my text editing needs. No, it does not have hex mode. No, it does not know how to wrap and unwrap HTML and XML. But those operations I used rarely anyhow. Most important feature at this time is clean installation.

Other program I had to replace is GOM Player and I already wrote a bit about it. Something that used to be nice and comfortable player became bundling annoyance during installation and upgrades. It might seem that I have some sort of fetish when it comes to Korean media players.

My new choice is named PotPlayer and I haven’t found a thing missing compared to GOM Player. Downside is that home page comes only in Korean which is not really language I understand. Fortunatelly, there is up-to-date list change log in English and there is an English installation.

Now only if I could find some other Java installation…

PS: And don’t even mention KMPlayer. It is bundled with Softronic’s download manager.

UEFI Windows 8 Install on Asus N56VJ

First thing I always do on a new computer is fresh installation of Windows from USB. With Asus N56VJ I had an issue. Everything worked when I used BIOS compatibility mode, but UEFI boot failed.

In order to create USB installation media I used Microsoft’s Windows 7 USB/DVD download tool. Use of that tool results in NTFS on USB. UEFI usually requires FAT32 installation media. Therefore I had to create bootable medium myself as I used to do..

Procedure is actually simple. Just write DISKPART on start screen and you will be greeted with security prompt after which you will have old-fashioned textual interface. In my case USB was disk 3 (you can deduce it based on size) but your case will probably differ. Double check which disk you are selecting because DISKPART does destroy data:

DISKPART> LIST DISK
  Disk ###  Status         Size     Free     Dyn  Gpt
  --------  -------------  -------  -------  ---  ---
  Disk 0    Online          476 GB      0 B        *
  Disk 1    Online          931 GB      0 B
  Disk 2    Online         7168 MB      0 B
  Disk 3    Online         7648 MB      0 B

DISKPART> SELECT DISK 3
Disk 3 is now the selected disk.

DISKPART> CLEAN
DiskPart succeeded in cleaning the disk.

DISKPART> CREATE PARTITION PRIMARY
DiskPart succeeded in creating the specified partition.

DISKPART> FORMAT FS=FAT32 QUICK
  100 percent completed

DiskPart successfully formatted the volume.

DISKPART> ACTIVE
DiskPart marked the current partition as active.

DISKPART> EXIT

Assuming that your, newly created and empty, USB drive is under letter U: and your Windows installation disk is at W:, you can use XCOPY to transfer files. Press + to get a prompt where you can enter following command:

[PID]
Value=XXXXX-XXXXX-XXXXX-XXXXX-XXXXX

After copy finishes, we have a Windows installation USB on our hands. Since Asus stores its Windows key in a BIOS you will have an issue if you want to apply your own Windows key - setup just never asks for it. One solution is to create PID.txt under U:\sources. It should have following content (with XXXXX-XXXXX-XXXXX-XXXXX-XXXXX being your key):

[plain] [PID] Value=XXXXX-XXXXX-XXXXX-XXXXX-XXXXX [/plain]

Next step is to boot machine while pressing <F2> to enter BIOS. Since boot is extremely fast, I always need a few attempts to get inside. :)

In BIOS we just select USB disk under Boot Override on Save & Exit tab. Once setup starts, proceed as normal. Windows will create GPT disk and all needed partitions itself.

[2014-09-20: Same procedure works for Windows 8.1 too]

Death and Its Consequences

My love/hate relationship with HP 6730b ended in ultimate death for one of us last Thursday. I cannot say it came as a surprise because it started acting up after (accidental) fall off a desk in a lab.

From that time on it would sometimes power off if tilted or shaken. Since I used it mostly as my work desktop, I just took care not to tilt it and I was golden. My goal was to prolong its life until I get back home. I almost succeeded.

Since Friday was a working day, I had to find suitable solution before morning was up. To make things worse, installation I needed was in bootable Windows 7 vhd on top of a Windows 8 system.

I took my other laptop and swapped hard disk nervously awaiting Windows 8 boot loader to give me some nonsense about incompatible drivers. Windows 7 booted up, detected new chipset and graphics card, and rebooted. Next boot brought me to perfectly working desktop.

Yes, Office did complain about license. Yes, passwords for wireless networks were forgotten. Yes, not all drivers were in order. But, you know what? I survived my work day just fine.

Last time I did this procedure it was on Windows XP and it was a pain-in-the-ass to sort everything out. It is nice to see that Windows boot and driver handling has improved tremendously during years.