World of networks

DNS over HTTPS for Mikrotik

Illustration

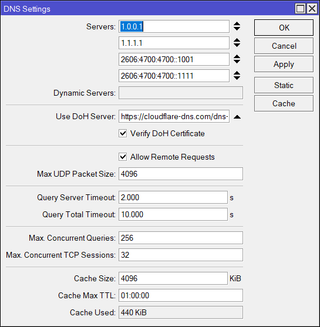
With everything moving to HTTPS, there’s still one component that gets overlooked - DNS. Most of time lookups are still done via essentially plain-text protocol. And it’s not for the lack of encrypted alternatives as there are at least three different ways of doing it: DNS over HTTPS (DoH), DNS over TLS (DoT), and DNSCrypt. When it comes to Mikrotik, choice narrows a bit and only DNS over HTTPS is supported.

Realistically, DoH is enough. DoT might be a bit more elegant implementation at a lower OSI layer but both clients and public servers seem to prefer DoH due to it’s heavy reliance on HTTPS layer ubiquitous to pretty much any application these days. DNSCrypt never got off the ground and we pretty much can ignore it.

So, today’s task is to set Mikrotik router to use DNS over HTTPS lookups.

To start it all off, we first need to download CA certificate store. And yes, we could skip this step and simply not check certificates but I feel that leaves too much space for man-in-the-middle attach. Downloading one file every few years will not kill anybody.

/tool fetch url=https://curl.se/ca/cacert.pem
      status: finished
       total: 199KiB
    duration: 1s

/certificate import file-name=cacert.pem passphrase=""
     certificates-imported: 128``
     private-keys-imported: 0
            files-imported: 1
       decryption-failures: 0
  keys-with-no-certificate: 0

With certificates in place, we get to setup DNS over HTTPs.

/ip dns
set use-doh-server=^^https://cloudflare-dns.com/dns-query^^ verify-doh-cert=yes

And that’s it. To verify it working, you can visit https://1.1.1.1/help and look for “Using DNS over HTTPS (DoH)” line.


That said, one could notice one glaring issue - we still have our original DNS servers listed. And I personally do this intentionally as a fallback method. However, that does leak a bit of information and, if someone blocks our DNS resolver, can force plain-text legacy lookups.

To harden system a bit, first we need to add static entries for DNS IPs (you can find them out with nslookup cloudflare-dns.com).

/ip dns static
add name=cloudflare-dns.com address=^^2606:4700::6810:f8f9^^
add name=cloudflare-dns.com address=^^2606:4700::6810:f9f9^^
add name=cloudflare-dns.com address=^^104.16.248.249^^
add name=cloudflare-dns.com address=^^104.16.249.249^^

With static entries in place, we can clear the legacy DNS servers.

/ip dns
set servers=""

And, if we’re using DHCP, we need to disregard DNS IPs provided by upstream too.

/ip dhcp-client
set 0 use-peer-dns=no

/ipv6 dhcp-client
set 0 use-peer-dns=no

And now all DNS lookups done by router are done using DoH and nothing else.
Transparent Mikrotik

Wyze Base Station created an interesting conundrum for my network. Unlike most IoT devices, it requires a cable connection. Place where I wanted to place it didn’t have any. So, the choice was to either bring a new cable or figure some other method. Of course, some other method it is.

As often, my hammer for those situation was Mikrotik device. In this case mAP lite. Idea was to create a transparent bridge (or as close to it as possible) between the Base Station and my network. Ideally, it would even keep MAC address of base station.

This is what I ended up going with:

/interface wireless
set [ find default-name=wlan1 ] ssid=^^SSID^^ mode=station-pseudobridge frequency=auto

/interface wireless security-profiles
set [ find default=yes ] authentication-types=wpa2-psk wpa2-pre-shared-key=^^key^^

/interface bridge
add name=bridge1 protocol-mode=none

/interface bridge port
add bridge=bridge1 interface=wlan1
add bridge=bridge1 interface=ether1

First step was to switch wireless into station-pseudobridge mode. While it has a lot of warnings (mostly due to L2 bridging being tricky with wireless), it’s actually ideal for this situation as one device it connects to will be the sole user of it.

Once wireless security has been setup, all remaining is to create a bridge with both wireless and wired interface.

And that’s it.

Configuring HTTP/2 for WordPress on Ubuntu

Last year I wrote this exact article only to find out it’s no longer current. So, as I rebuilt my web server on a new VM, I decided to bring it a bit of update for PHP 7.4

The first step, of course, is enabling HTTP/2 module:

a2enmod http2

Second step is adding HTTP/2 protocol definition to /etc/apache2/apache2.conf:

Protocols h2 h2c http/1.1
H2Direct on
H2ModernTLSOnly on

Followed by Apache’s restart:

systemctl restart apache2

In ideal world this would be it. But, despite Apache starting without error, a check via Developer Tools will show HTTP 1.1 is still in use. So we need an additional PHP with FastCGI support:

apt-get install php7.4-fpm

Furthermore, we need some modules enabled and disabled:

a2dismod php7.4
a2dismod mpm_prefork
a2enmod mpm_event
a2enmod proxy_fcgi
a2enconf php7.4-fpm

Of course, addition to /etc/apache2/apache2.conf is needed too:

<Files "*.php">
   SetHandler "proxy:unix:/var/run/php/php7.4-fpm.sock|fcgi://localhost/"
</Files>

If you configured prefork before, you also need to remove it’s configuration. In my case StartServers, MinSpareServers, MaxSpareServers, MaxClients, and MaxRequestsPerChild settings had to go.

Of course, another Apache restart is upon us:

systemctl restart apache2

Congratulations! HTTP/2 should be working now.

Automatic Mangling

Mikrotik routers give you a lot of control over traffic. If you stick with IPv4, it’s possible to nicely subdivide your network and use queues to traffic-shape any user’s bandwidth based on IP address. But things are not as easy when you allow IPv6. Suddenly your simple queues are essentially broken and tracking users becomes quite a lot more difficult.

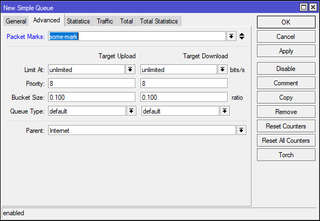
For exactly that purpose, you have firewall mangle rules. In its simplest form, you just use MAC address as a condition to mark your connection and then you use that connection mark to mark each packet. In Mikrotik’s lingo, that would be something like this:

/ip firewall mangle add
    chain=forward
    src-mac-address=^^12:34:56:78:90:12^^
    connection-state=new
    action=mark-connection
    new-connection-mark=^^some-mark^^

/ip firewall mangle add
    chain=forward
    connection-mark=^^some-mark^^
    action=mark-packet
    new-packet-mark=^^some-mark^^
    passthrough=no

Illustration

Now you can use this packet mark in a simple queue as a condition instead of the subnet or IP. If you go further and create these mange rules in /ipv6 section as you did for /ip, you have yourself an easy way to track traffic even on per-MAC resolution.

The real challenge then becomes entering all these rules into the router. In order to fill this, it’s best to have a script as executing all these commands manually is really error prone. I like to keep this in a file looking something like this:

12:34:56:78:90:ab user1-mark
23:45:67:89:0a:bc user1-mark
34:56:78:90:ab:cd user2-mark

Using this I don’t necessarily track or limit traffic per device but per user. As long as all user’s MAC addresses result in the same mark, queue doesn’t really care.

I mark all automatic entries with !AUTO! in the comment field. Any time I want to update firewall rules, I make sure to delete the old ones first:

OLD_V4_ENTRIES=`ssh router.home "/ip firewall mangle print without-paging" | grep ";;; !AUTO!" | awk '{print $1}' | xargs | tr ' ' ','`
if [[ "$OLD_V4_ENTRIES" != "" ]]; then
    ssh router.home "/ip firewall mangle remove numbers=$OLD_V4_ENTRIES"
fi

OLD_V6_ENTRIES=`ssh router.home "/ipv6 firewall mangle print without-paging" | grep ";;; !AUTO!" | awk '{print $1}' | xargs | tr ' ' ','`
if [[ "$OLD_V6_ENTRIES" != "" ]]; then
    ssh router.home "/ipv6 firewall mangle remove numbers=$OLD_V6_ENTRIES"
fi

With old entries gone, we can add new entries using something like this:

cat ^^~/MAC.dat^^ | grep -v '^#' | while read ENTRY; do
    MAC=`echo "$ENTRY" | xargs | cut -sd' ' -f1`
    MARK=`echo "$ENTRY" | xargs | cut -sd' ' -f2`
    if [[ "$MAC" != "" ]] && [[ "$MARK" != "" ]]; then
        echo "$MAC $MARK"
        ssh -n router.home "/ip firewall mangle add chain=forward src-mac-address=$MAC connection-state=new action=mark-connection new-connection-mark=$MARK comment=\"!AUTO!\""
        ssh -n router.home "/ip firewall mangle add chain=forward connection-mark=$MARK action=mark-packet new-packet-mark=$MARK passthrough=no comment=\"!AUTO!\""
        ssh -n router.home "/ipv6 firewall mangle add chain=forward src-mac-address=$MAC connection-state=new action=mark-connection new-connection-mark=$MARK comment=\"!AUTO!\""
        ssh -n router.home "/ipv6 firewall mangle add chain=forward connection-mark=$MARK action=mark-packet new-packet-mark=$MARK passthrough=no comment=\"!AUTO!\""
    fi
done

Script above will go over the whole file, skipping all the comments, and assuming the first field in line is MAC address and the second is the mark you want to assign it. Then it will just add mangle pair to both IPv4 and the IPv6 firewall rules.

The last step is to force firewall to clear the existing connections so it can mark them with the new marks.

ssh -n router.home "/ip firewall connections remove [find]"
ssh -n router.home "/ipv6 firewall connections remove [find]"

Only thing now is to create simple queue based on each mark. And yes, that can be automated too. :)

IPv6 Prefix Delegation with NetPlan

No. That’s the short of it.

Longer version starts with me setting up my new Ubuntu server and deciding to use netplan to setup network interfaces. Nothing too big. Just a few bonds here and there. And all seemed fine until I tried to setup email and noticed the following message in syslog:

postfix/smtp[49721]: connect to alt1.aspmx.l.google.com[209.85.146.27]:25: Connection timed out
postfix/smtp[49721]: connect to aspmx5.googlemail.com[2607:f8b0:4002:c08::1b]:25: Network is unreachable

Once I double-checked, I noticed syslog was right - I only had link-local address assigned to interface. Ok, so DHCPv6 only turns on DHCP and not prefix delegation I use for my network. Easy-peasy, that’s surely matter of just turning on the correct setting…

Or finding a matching bug. Yep, prefix delegation that’s perfectly valid and well supported IPv6 address allocation method is not supported.

But ticket did solve my problem. As advised, I simply reverted to use networkd (don’t forget to use systemctl enable systemd-networkd).


PS: Here are my networkd files that work with IPv6 PD.

[NetDev]
Name=bond0
MACAddress=00:25:90:ba:31:40
Kind=bond

[Bond]
Mode=802.3ad
LACPTransmitRate=fast
MIIMonitorSec=100ms
TransmitHashPolicy=layer2+3
[Match]
Name=bond0

[DHCP]
RouteMetric=100
UseMTU=true

[Network]
DHCP=yes
IPv6PrefixDelegation=yes
IPv6PrivacyExtensions=true
LinkLocalAddressing=ipv6
ConfigureWithoutCarrier=yes
[Match]
PermanentMACAddress=00:25:90:ba:31:40

[Network]
Bond=lan
[Match]
PermanentMACAddress=00:25:90:ba:31:41

[Network]
Bond=lan

Rebooting RB1100HAx4 via Reset Button

One thing that annoyed me about my Mikrotik RB1100HAx4 router was the need to unplug darn thing when I wanted to reboot it. It does have reset button but the darn thing is just there for resetting configuration. Simple reboot was not the part of the repertoire.

Well, that changed with RouterOS 6.47. As of them there is a few more options under settings - most notably reset button configuration. Now action on reset button can be configured.

And it’s easy enough.

/system routerboard reset-button
set enabled=yes on-event="/log info message=(\"Reset button\")\r\n/system reboot"

PS: This works with vast majority of Mikrotik routers and switches. But not all so your mileage may wary.

Using Mikrotik's Router to Detect Power Outage

Before I had CyberCard, I still had a need to monitor if my system was running off the UPS power. If my server could detect power out and shut down other devices, my battery life would keep server up for longer.

If you have Mikrotik’s router with two power supplies and an SSH connection to the same there is a trick you can use - Mikrotik can show you each power supply state. If you take care to plug one power supply into the UPS and the other one into the non-UPS outlet, you suddenly have a detector.

ssh -i ~/.ssh/id_rsa admin@router.home "/system health print"
            voltage: 23.6V
            current: 426mA
        temperature: 50C
  power-consumption: 10W
       psu1-voltage: 24.4V
       psu2-voltage: 0V

Even better, the voltage doesn’t go immediately to 0 V as soon as power is out so there is a delay built-in. So, script is as easy as detecting 0V on the output. Something like this.

ssh -i ~/.ssh/id_rsa admin@^^router.home^^ "/system health print" \
  | egrep 'psu[12]-voltage' | grep -q '0V' && echo "Do Something!"

PS: If you’re interested in the whole script around this, you can download it here.

Multiple IPv6 Networks with Mikrotik

Illustration

Setting up IPv6 for home network is simple enough with Mikrotik. I actually already wrote about it and that IPv6 guide is still perfectly valid. However, what if you have multiple bridges and a single IPv6 address won’t do (e.g. home and guest network)?

Well, first you need to be lucky enough to have provider willing to give you multiple /64 prefixes as stateless address autoconfiguration (SLAAC) cannot work with prefix longer than that.

For this to work you need a prefix hint to let your provider know you want something bigger. Despite RIPE recommending at least /56 prefix length, my Comcast-provided connection gives /60 at most even if you request a shorter prefix.

/ipv6 dhcp-client
add interface=^^ether1^^ pool-name=general-pool6 request=prefix prefix-hint=::/48 add-default-route=yes

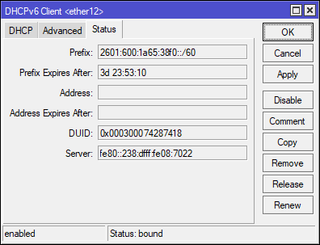
Once you receive IP allocation, check on Status tab you indeed got something shorter than /64. If you got only /64 allocation, you will not be able to have two independent networks. In my case, /60 enables me up to 16 networks.

Next we add additional router address to use for advertisement.

/ipv6 address
add address=::1 from-pool=general-pool6 interface=^^bridge2^^ advertise=yes

Lastly, we need to setup router announcements.

/ipv6 nd
add interface=^^bridge2^^ ra-interval=20s-60s

And that’s it. Now your guests can enjoy IPv6 too.

LACP Between Mikrotik and XigmaNAS

Illustration

My Mikrotik RB100AHx4 network router has only 1 Gbps ports and recently I have started noticing the need for a bit more bandwidth toward my NAS. As this router has no SFP+ ports, there is no easy way to increase speed. However, since my NAS machine has 4 network ports, there is a way forward - LACP.

While there are many ways to aggregate network links, I found 802.3ad link aggregation is the way to go. Not only all modern network devices support it but it also comes almost without any costs in the terms of CPU processing. To make it better, it also allows unbalanced links (e.g. router is LACP while NAS is just a single port setup). While this is not a desired end state, it makes both initial setup and potential later troubleshooting much easier. While not the focus of my setup, additional resilience of link to the cable damage is nothing to frown about either.

To create link aggregation on Mikrotik’s side, one has to first remove all ports from existing bridge (Bridge, Ports). Then we can create the new bond interface (Interfaces, Bonding) with mode set to 802.3ad and transmit hash policy set to layer 2 and 3. All interfaces we want to bond together should be listed under slaves. Assuming we want a 3-port bond, it would be something like this:

/interface bonding
add name=bonding-nas slaves=^^ether1^^,^^ether2^^,^^ether3^^ mode=802.3ad transmit-hash-policy=layer-2-and-3

Once bond interface is created, just add it to a bridge as you would any other interface (Bridge, Ports) and your work on Mikrotik side is done.

Illustration

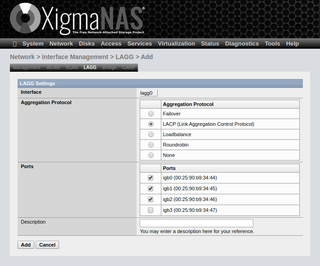
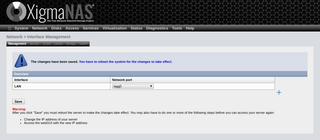
On XigmaNAS, setup is equally easy. Due to LACP gracefully handling our currently asymmetric link, we can simply connect to the web GUI as we normally would. There go into Network, Interface Management, LAGG tab. Add a new interface selecting LACP (Link Aggregation Control Protocol) as protocol and by clicking all the ports you want to participate. Then go back to Network, Interface Management and select newly created interface (lagg0) from LAN’s dropdown menu. Once you save the settings, you can go ahead and reboot your NAS.

Enjoy your bandwidth and resilience increase!

While LACP is nice don’t expect wonders from it. As far as resiliency goes, things are as you would expect them - if you set it up with 3 ports as I did, you can lose 2 cables before connectivity is gone. For bandwidth things are not as simple. Just having 802.3ad link makes no difference if you have just a single connection. All packets are still going to travel over only a single cable (mandatory to avoid packet reordering). Since most test tools use just one connection, you will see no improvement.

Even when you are dealing with multiple connections, you depend on the gods of hashing. As your hash space is only N wide (3 for examples above), you might have multiple connections sharing the same hash and thus the same physical link while rest of links stay bored. Only if you have many different connections you can count on approximately equal traffic distribution and full benefits. For my NAS setup this is not really an issue as I can count on multiple connections from either one (SMB3) or multiple machines.

Not a magic bullet but it’s a cheap way to double bandwidth as long as you are aware of limitations.


PS: Once setup is done, you can try setting up fast LACP rate (lacp-rate=1s). This will enable for faster detection of link failures when interface itself is up but there is a problem between devices (e.g. you have damaged cable or misbehaving switch in between). In reality, you probably don’t need it but you might as well turn it on if network equipment supports it.

PPS: Asynchronous port setup is beneficial only during deployment. If you set 4-port LACP on one side and 2-port LACP on another, you are not reaping any benefits for two extra ports. When you are done with configuration you always want the same port count on both network devices.

Curious Case of Missing DHCP Renewal

Most of my network is based on Mikrotik routers and they serve me well. Even though I have decent mix of different operating systems present and I never had any issues. Until I got Ubuntu 19.10 Server up and running.

At the first glance, all worked perfectly and then suddenly machine would stop responding. Quick check from console interface pointed toward the culprit - there was no IP address present. Check on Mikrotik for DHCP leases was showing “waiting” state. Manually running dhclient on Ubuntu did temporarily resolve problem only to have address gone at the next DHCP expiration interval.

For some reason Ubuntu 19.10 Server would do DHCP once and then give up on further renewals. It was as if dhclient was crashing. Check of the syslog has shown curious entries:

systemd-networkd: eno1: DHCPv4 address 192.168.1.103/24 via 192.168.1.1
systemd-networkd: eno1: Could not set DHCPv4 route: Network is unreachable
systemd-networkd: eno1: Failed

I had DHCP classless static route option set on my Mikrotik and it seems dhclient really didn’t like my setup with multiple CIDRs. As soon as I removed all entries except for the default one, it started working properly.

On a hunch, I tried changing the network order to have default route as the first one and it worked. What also worked was omitting default gateway altogether and only having narrower CIDR definitions.

There is nothing in RFC3442 forcing this order and either ordering works for all other clients - including non-server Ubuntu 19.10. I guess something in Ubuntu Server configuration is making dhclient misbehave when things are not exactly how it wants it.

However, considering either ordering is perfectly valid, I decided to take a simpler route and update my classless route definition.