World of networks

Adding Mikrotik DDSN as a Subdomain

Illustration

If you need remote access, one of things you’ll notice about Mikrotik devices is there is no support for DDNS. Yes, you could always create a script for it but there is nothing built-in.

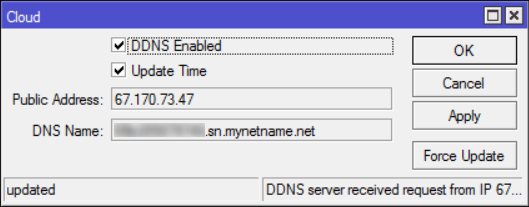
However, Mikrotik does offer quite similar functionality out-of-box for a year now. In Cloud menu you just select DDNS enabled and Mikrotik your public IP will be located at <serial>.sn.mynetname.net. It is not as nice as having custom name with DynDNS, but usable nonetheless.

However, if you have your own domain, you can make it a bit more friendlier. Find where you can edit DNS entries at your registrar (Manage Domain with DreamHost) and add a new CNAME entry. For name you can put whatever you want and for value put Mikrotik’s DNS name (<serial>.sn.mynetname.net).

After a few minutes (damn DNS propagation :)) you’ll see your DNS entry working.

PS: You can verify status with nslookup myname.mydomain.com.

Isolating Mikrotik LAN Ports

Illustration

For a home project of mine, I have decided on Mikrotik’s hEX PoE lite due to its awesome capability to power other devices.

Outside of PoE, I needed a standard Internet router - WAN on port 1 and LAN on other ports - but with a twist. I wanted to have LAN ports isolated from each other while still being able to access WAN. Something that on almost any wireless box you get as a checkbox turned out to be a actually non-existent.

However, beauty of a bit more manageable and complicated device is that you can define a lot of functionality yourself. For this particular scenario, solution was in adjusting the firewall.

To setup firewall, the easiest way is to connect via WinBox and go into New Terminal. There we can just execute following commands:

/ip firewall filter
add action=accept chain=forward connection-state=established comment="Allow established"
add action=accept chain=forward connection-state=related comment="Allow related"
add action=accept chain=forward out-interface=ether1 comment="Allow WAN"
add action=drop chain=forward comment="Drop everything else"

First two allow any established and related connection unconditionally. Third one allows anything going out to WAN interface. Packets coming into that interface will have to be either established or related so there is no reason for another accept there. Final rule is to drop all other traffic.

With just these four rules, all LAN ports are isolated while still being capable of Internet acess.

Limiting Bandwidth on MAP Lite

Illustration

As I wanted to have a separate wireless network for few of my IoT experiments and taking into consideration how secure IoT devices are (hint: not secure at all), I decided to go with a mini access point. Securing IoT gets much easier with a separate physical device.

Device had to be 2.4 GHz AP, allow for remote management, and cheap. One beautiful device matching all criteria was MikroTik mAP lite. Mikrotik devices are usually more of an European thing and, compared to other wireless devices, a bit harder to obtain in States. For example, I bought mine from ICD Group because Amazon didn’t carry any.

I haven’t used MikroTik for a while now but I remembered its WinBox interface fast enough. And I remembered how it saves its settings immediately thus punishing you for any error. It is definitely not the most friendly user interface nor I can call it excellent for beginners. But it is powerful enough to be worth learning.

Anyhow, with basic configuration done I wanted to limit upstream bandwidth toward my main router. From Queues menu I just added new queue, set Target to “ether1”, and assigned Max limit for both upload (256 kbit/s) and download (64 kbit/s). Short speed test later and I was confused. Speed wasn’t being restricted at all. And traffic figures were unreasonably low. Something weird was going on.

A bit of troubleshooting and I found the culprit. Once I changed in IP->Firewall the defcon entry from “fasttrack connection” to “accept”, my queue started limiting as it should.