One of the features I added to Bimil was NTP client support for time-based two-factor authentication. For this I needed NTP server so I turned to ntp.org pool and requested vendor zone. Once zone got approved I suddenly had infinite* amount of NTP servers at my disposal.
So, when I decided to give Linode’s $5 virtual server a try, I didn’t want just to create dummy machine. I also wanted to do something for community. As NTP pool service is one of invisible pillars of Internet-connected devices and I was really happy such service was provided for free to myself, it was easy to decide. I am going to build NTP server.
Creating account on linode was a breeze as it was creating the machine. It was literally, click-next, click-next process. Once I finally logged on to it, the first action was to update system to the latest packages. Surprisingly, on Linode there was literally nothing to do - all was already up to date. Awesome!
yum update -y
 …
 No packages marked for update
By default, Linode’s CentOS installation has firewall disabled. As this server will be open to public, enabling firewall is not the worst idea ever:
systemctl start firewalld

systemctl enable firewalld

firewall-cmd --state
 running
And, while dealing with firewall, you might as well allow NTP through and check if configuration is correct:
firewall-cmd --permanent --add-service ntp
 success

firewall-cmd --reload
 success

firewall-cmd --list-all
 public (active)
  target: default
  icmp-block-inversion: no
  interfaces: eth0
  sources:
  services: ssh dhcpv6-client ^^ntp^^
  ports:
  protocols:
  masquerade: no
  forward-ports:
  source-ports:
  icmp-blocks:
  rich rules:
With firewall configuration completed, you can finally install NTP:
yum install -y ntp
And this brings you to the most involved part of the process. You need to go over available stratum 1 time servers and select between four and seven of them for your devious synchronization purposes. Which servers should you select? As long as they are reasonably close (in the terms of network distance) you will be fine.
Using your favorite editor, you need to adjust /etc/ntp.conf file. Following ntp.org recommendations always worked for me but with a slight adjustment in the form of a separate log file and forcing IPv4 resolving for servers. Quite a few IPv6 capable servers only serve clients over IPv6 and don’t like other servers via the same. I personally use the following configuration (don’t forget to adjust servers names):
driftfile /var/lib/ntp/drift

restrict -4 default kod limited nomodify notrap nopeer noquery
restrict -6 default kod limited nomodify notrap nopeer noquery

restrict -4 127.0.0.1
restrict -6 ::1

server -4 ^^clock.fmt.he.net^^ iburst
server -4 ^^clock.sjc.he.net^^ iburst
server -4 ^^usno.hpl.hp.com^^ iburst
server -4 ^^clepsydra.dec.com^^ iburst
server -4 ^^tick.ucla.edu^^ iburst
server -4 ^^time-a.timefreq.bldrdoc.gov^^ iburst
server -4 ^^time-c.timefreq.bldrdoc.gov^^ iburst

logfile /var/log/ntp.log
With configuration ready, it is the moment of truth - start the NTP daemon and configure its automatic startup upon boot. Don’t forget to disable chrony too:
systemctl start ntpd
systemctl enable ntpd
systemctl disable chronyd
With all up, wait for couple minutes while checking state with ntpstat or ntpq. Forgetting it for hour or two will save you lot of angst :) I consider sync good enough whenever pooling interval goes to 1024s.
watch "ntpq -np ; echo ; ntpstat"
      remote           refid      st t when poll reach   delay   offset  jitter                                                            ``==============================================================================``
 *66.220.9.122    .CDMA.           1 u   41  512  377    2.022    6.680   6.798
 +216.218.254.202 .CDMA.           1 u   77 1024  377    2.127    5.663   6.180
 +204.123.2.72    .GPS.            1 u  257  512  377    4.908    2.753   5.031
 +204.123.2.5     .GPS.            1 u   40  512  377    5.232    5.278   6.052
 +164.67.62.194   .GPS.            1 u  532  512  377    9.978   -0.637   3.795
 +132.163.4.101   .NIST.           1 u  362 1024  377   35.226    5.489   7.610
 +132.163.4.103   .NIST.           1 u  430  512  377   35.148    5.353   7.607
 synchronised to NTP server (66.220.9.122) at stratum 2
   time correct to within 19 ms
   polling server every 1024 s
It will take some time for other servers to “discipline” yours so do be patient. If servers are showing INIT refid for a while, this might indicate a permanent issue (e.g. server might be down) or just something temporary (e.g. server might be overloaded). If server is not reachable for a while, toss it out and select another one from stratum 1 list (followed by systemctl restart ntpd).
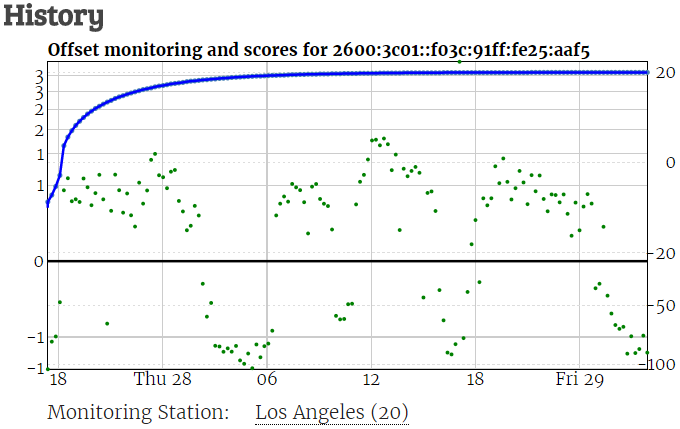
I personally gave server an hour or two to get into the shape before proceeding with the final step - adding it to pool. This can be done at ntp.org management pages and it is as easy as simply adding server using either host name or IP address.
After monitoring server for some time and assuming its time is stable, your score will raise and you get to be the part of the collective NTP pool.
* some restrictions apply