All things ZFS

Changing ZFS Key Location

Back when I was creating my original pool, I decided to use password prompt as my encryption key unlocking method. And it was good. But then I wanted to automate this a bit. I wanted my key to be read of USB drive.

To do that one can simply prepare a new key and point the pool toward it.

dd if=/dev/urandom of=^^/usb/key.dat^^ bs=32 count=1
zfs change-key -o keylocation=file://^^/usb/key.dat^^ -o keyformat=raw Pool

Of course, it’s easy to return it back to password prompt too:

zfs change-key -o keylocation=prompt -o keyformat=passphrase Pool

Simple enough.

Testing Native ZFS Encryption Speed (20.10)

[2020-11-02: There is a newer version of this post]

Illustration

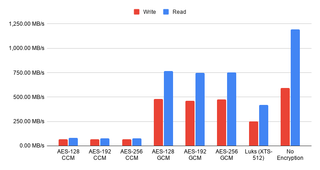
Back in the days of Ubuntu 20.04, I did some ZFS native encryption testing. Results were not promising to say the least but they were done using ZFS 0.8.3 on Ubuntu 20.04. There was a hope that Ubuntu 20.10 bringing 0.8.4 would have a lot of performance improvements. So I repeated my testing.

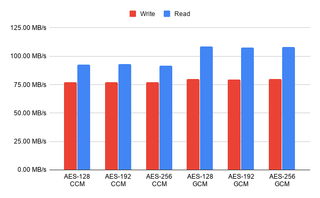
First I tested CCM and saw that results were 10-15% lower than in 20.04. However, this was probably not due to ZFS changes as both Luks and no-encryption numbers dropped too. As my testing was done on a virtual machine, it might not be anything related to Ubuntu at all. For all practical purposes, you can view those results as unchanged.

However, when I tested GCM encryption speed, I had to repeat test multiple times because I couldn’t believe the results I was seeing. ZFS native encryption using GCM was only about 25% slower than no encryption at all and handily beating Luks numbers. Compared to the last year’s times, GCM encryption got a fivefold improvement. That’s what I call optimization.

Last year I suggested going with native ZFS encryption only when you are really interested in ZFS having direct physical access to drives or if you were interested in encrypted send/receive. For performance critical scenarios, Luks was the way to go.

Now I can honestly recommend going with the native ZFS encryption (provided you use GCM). It’s as fast as Luks, allows ZFS to handle physical drives directly, and simplifies the setup. The only scenario where Luks still matters is if you want to completely hide your disk content as native encryption does leak some metadata (e.g., dataset properties). And no, you don’t need to upgrade to 20.10 for the speed as some performance improvements have been backported to 20.04 too.

I have migrated my own main file server to ZFS native encryption some time ago mostly to give ZFS direct disk access and without much care for array speed. Now there is no reason not to use it on desktop either.


PS: You can take a peek at the raw data if you’re so inclined.

PPS: Test procedure is in the previous post so I didn’t bother repeating it here.

Manually Installing Ubuntu 20.04 on Surface Go

I love ZFS but it definitely doesn’t fit every situation. One situation it doesn’t fit is Surface Go. Not only device is low on RAM but it’s also low on disk space. And ZFS really hates when it doesn’t have enough disk space.

Now, one can install Ubuntu perfectly well without any shenanigans. Just follow a guide on how to boot install USB and you’re golden. But I like my installations to be a bit special. :)

After booting into Ubuntu desktop installation one needs a root prompt. All further commands are going to need root credentials anyhow.

sudo -i

The very first step should be setting up a few variables - disk, pool, host name, and user name. This way we can use them going forward and avoid accidental mistakes. Just make sure to replace these values with ones appropriate for your system.

DISK=/dev/disk/by-id/^^ata_disk^^
HOST=^^desktop^^
USER=^^user^^

Disk setup is really minimal .

blkdiscard $DISK

sgdisk --zap-all                       $DISK

sgdisk -n1:1M:+63M -t1:EF00 -c1:EFI    $DISK
sgdisk -n2:0:+448M -t2:8300 -c2:Boot   $DISK
sgdisk -n3:0:0     -t3:8309 -c3:Ubuntu $DISK

sgdisk --print                         $DISK

I usually encrypt just the root partition as having boot partition unencrypted does offer advantages and having standard kernels exposed is not much of a security issue.

cryptsetup luksFormat -q --cipher aes-xts-plain64 --key-size 512 \
    --pbkdf pbkdf2 --hash sha256 $DISK-part3

Since crypt device name is displayed on every startup, for Surface Go I like to use host name here.

cryptsetup luksOpen $DISK-part3 $HOST

Now we can prepare all needed partitions.

yes | mkfs.ext4 /dev/mapper/$HOST
mkdir /mnt/install
mount /dev/mapper/$HOST /mnt/install/

yes | mkfs.ext4 $DISK-part2
mkdir /mnt/install/boot
mount $DISK-part2 /mnt/install/boot/

mkfs.msdos -F 32 -n EFI $DISK-part1
mkdir /mnt/install/boot/efi
mount $DISK-part1 /mnt/install/boot/efi

To start the fun we need debootstrap package.

apt install --yes debootstrap

And then we can get basic OS on the disk. This will take a while.

debootstrap focal /mnt/install/

Our newly copied system is lacking a few files and we should make sure they exist before proceeding.

echo $HOST > /mnt/install/etc/hostname
sed "s/ubuntu/$HOST/" /etc/hosts > /mnt/install/etc/hosts
sed '/cdrom/d' /etc/apt/sources.list > /mnt/install/etc/apt/sources.list
cp /etc/netplan/*.yaml /mnt/install/etc/netplan/

If you are installing via WiFi, you might as well copy your wireless credentials:

mkdir -p /mnt/install/etc/NetworkManager/system-connections/
cp /etc/NetworkManager/system-connections/* /mnt/install/etc/NetworkManager/system-connections/

Finally we’re ready to “chroot” into our new system.

mount --rbind /dev  /mnt/install/dev
mount --rbind /proc /mnt/install/proc
mount --rbind /sys  /mnt/install/sys
chroot /mnt/install \
    /usr/bin/env DISK=$DISK HOST=$HOST USER=$USER \
    bash --login

Let’s not forget to setup locale and time zone.

locale-gen --purge "en_US.UTF-8"
update-locale LANG=en_US.UTF-8 LANGUAGE=en_US
dpkg-reconfigure --frontend noninteractive locales

dpkg-reconfigure tzdata

Now we’re ready to onboard the latest Linux image.

apt update
apt install --yes --no-install-recommends linux-image-generic linux-headers-generic

Followed by boot environment packages.

apt install --yes initramfs-tools cryptsetup keyutils grub-efi-amd64-signed shim-signed tasksel

Since we’re dealing with encrypted data, we should auto mount it via crypttab. If there are multiple encrypted drives or partitions, keyscript really comes in handy to open them all with the same password. As it doesn’t have negative consequences, I just add it even for a single disk setup.

echo "$HOST  UUID=$(blkid -s UUID -o value $DISK-part3)  none \
    luks,discard,initramfs,keyscript=decrypt_keyctl" >> /etc/crypttab
cat /etc/crypttab

To mount boot and EFI partition, we need to do some fstab setup too:

echo "UUID=$(blkid -s UUID -o value /dev/mapper/$HOST) \
    / ext4 noatime,nofail,x-systemd.device-timeout=5s 0 1" >> /etc/fstab
echo "PARTUUID=$(blkid -s PARTUUID -o value $DISK-part2) \
    /boot ext4 noatime,nofail,x-systemd.device-timeout=5s 0 1" >> /etc/fstab
echo "PARTUUID=$(blkid -s PARTUUID -o value $DISK-part1) \
    /boot/efi vfat noatime,nofail,x-systemd.device-timeout=5s 0 1" >> /etc/fstab
cat /etc/fstab

Now we get grub started and update our boot environment.

KERNEL=`ls /usr/lib/modules/ | cut -d/ -f1 | sed 's/linux-image-//'`
update-initramfs -u -k $KERNEL

Grub update is what makes EFI tick.

update-grub
grub-install --target=x86_64-efi --efi-directory=/boot/efi --bootloader-id=Ubuntu \
    --recheck --no-floppy

Finally we install out GUI environment. I personally like ubuntu-desktop-minimal but you can opt for ubuntu-desktop. In any case, it’ll take a considerable amount of time.

tasksel install ubuntu-desktop-minimal

Short package upgrade will not hurt.

apt dist-upgrade --yes

The only remaining task before restart is to create the user, assign a few extra groups to it, and make sure its home has correct owner.

sudo adduser --disabled-password --gecos '' $USER
usermod -a -G adm,cdrom,dip,lpadmin,plugdev,sudo $USER
passwd $USER

As install is ready, we can exit our chroot environment.

exit

And unmount our disk:

umount /mnt/install/boot/efi
umount /mnt/install/boot
mount | tac | awk '/\/mnt/ {print $3}' | xargs -i{} umount -lf {}

After the reboot you should be able to enjoy your installation.

reboot

PS: If you are doing install on normal desktop, check similar ZFS-based installation guide.

Encrypted ZFS Root on Ubuntu Server 20.04 (with USB Unlock)

It’s all nice and dandy to setup unencrypted ZFS on server or setting it up with boot encryption. However, what if we want to use USB to unlock the encrypted drive? And no, it’s not as crazy as it seems. Scenarios are actually plentiful.

One scenario is when you have your servers encrypted (as realistically everybody should) but you don’t necessarily want (or can) enter the password. If you can plug in USB with a key and make ZFS use that key, you suddenly have password-less boot without connecting to the server. After boot is done, you can unplug the USB and store it somewhere safe. And this can be done by literally anybody you trust - it doesn’t have to be you.

My favorite scenario is using it with self-erasing USB drive. You place the encryption key on the small drive and it will be there for every boot. You can use your server as you normally would. However, if power is lost, your key will disappear and content of server will not be accessible anymore. When would such crazy scenario happen you ask? Well, if anybody is stealing your server they have to unplug it first. And yes, your server is gone but at least your data is not.

I admit I never had that scenario happen to me - fortunately all my servers are still accounted for. But I did RMA disk drives. And worrying about erasing the data when you cannot access it anymore is a bit too late.

Whatever might be your case, let me guide you through setting up natively-encrypted ZFS with a key on the USB drive.

Once you enter the shell of the installation media, the very first step is setting up a few variables - location of disk and USB drive, followed by pool and host name. This way we can use them going forward and avoid accidental mistakes. Make sure to replace these values with the ones appropriate for your system.

DISK=/dev/disk/by-id/^^ata-xxx^^
USB=/dev/disk/by-id/^^usb-xxx^^
POOL=^^Ubuntu^^
HOST=^^server^^

Next let’s sort out question of the encryption key. Assumption is that the key will be on the first partition of the FAT formatted USB drive and we’ll mount it at /tmpusb. While you could create the key material directly, I personally prefer the passphrase as it makes life easier in the case of recovery. If you already have the passphrase on the drive just skip the last command as it will overwrite it.

mkdir /tmpusb
mount -t vfat -o rw "$USB-part1" /tmpusb
echo -n "^^password^^" > /tmpusb/boot.pwd

General idea of my disk setup is to maximize amount of space available for pool with the minimum of supporting partitions. If you are installing on SSD blkdiscard will trim all the data. You can safely ignore any errors on disks that don’t support it.

blkdiscard $DISK 2>/dev/null

sgdisk --zap-all                        $DISK

sgdisk -n1:1M:+127M -t1:EF00 -c1:EFI    $DISK
sgdisk -n2:0:+512M  -t2:8300 -c2:Boot   $DISK
sgdisk -n3:0:0      -t3:8309 -c3:Ubuntu $DISK

sgdisk --print                          $DISK

To kick off the fun of the installation we need debootstrap and zfsutils-linux package.

apt update
apt install --yes debootstrap zfsutils-linux

Now we’re ready to create system ZFS pool.

zpool create -o ashift=12 -o autotrim=on \
    -O compression=lz4 -O normalization=formD \
    -O acltype=posixacl -O xattr=sa -O dnodesize=auto -O atime=off \
    -O encryption=aes-256-gcm -O keyformat=passphrase -O keylocation=file:///tmpusb/boot.pwd \
    -O canmount=off -O mountpoint=none -R /mnt/install $POOL $DISK-part3
zfs create -o canmount=noauto -o mountpoint=/ $POOL/System
zfs mount $POOL/System

Assuming UEFI boot, two additional partitions are needed - one for EFI and one for booting. I don’t have ZFS pool for boot partition but a plain old ext4 as I find potential fixup works better that way.

yes | mkfs.ext4 $DISK-part2
mkdir /mnt/install/boot
mount $DISK-part2 /mnt/install/boot/

mkfs.msdos -F 32 -n EFI $DISK-part1
mkdir /mnt/install/boot/efi
mount $DISK-part1 /mnt/install/boot/efi

Bootstrapping Ubuntu on the newly created pool is next. This will take a while.

debootstrap focal /mnt/install/

zfs set devices=off $POOL

Our newly copied system is lacking a few files and we should make sure they exist before proceeding.

echo $HOST > /mnt/install/etc/hostname
sed '/cdrom/d' /etc/apt/sources.list > /mnt/install/etc/apt/sources.list
cp /etc/netplan/*.yaml /mnt/install/etc/netplan/

Finally we’re ready to “chroot” into our new system.

mount --rbind /dev  /mnt/install/dev
mount --rbind /proc /mnt/install/proc
mount --rbind /sys  /mnt/install/sys
chroot /mnt/install /usr/bin/env DISK=$DISK USB=$USB POOL=$POOL bash --login

Let’s not forget to setup locale and time zone.

locale-gen --purge "en_US.UTF-8"
update-locale LANG=en_US.UTF-8 LANGUAGE=en_US
dpkg-reconfigure --frontend noninteractive locales

dpkg-reconfigure tzdata

To mount EFI and boot partitions, we need to do some fstab setup too:

echo "PARTUUID=$(blkid -s PARTUUID -o value $DISK-part2) \
    /boot ext4 noatime,nofail,x-systemd.device-timeout=5s 0 1" >> /etc/fstab
echo "PARTUUID=$(blkid -s PARTUUID -o value $DISK-part1) \
    /boot/efi vfat noatime,nofail,x-systemd.device-timeout=5s 0 1" >> /etc/fstab
cat /etc/fstab

Now we’re ready to onboard the latest Linux image.

apt update
apt install --yes --no-install-recommends linux-image-generic linux-headers-generic

Followed by the boot environment packages.

apt install --yes zfs-initramfs plymouth grub-efi-amd64-signed shim-signed

Now it’s time to setup boot scripts to ensure USB drive is mounted before ZFS needs it. I found that initramfs’ init-premount directory is the ideal spot.

cat << EOF > /usr/share/initramfs-tools/scripts/init-premount/tmpusb
#!/bin/sh -e

PREREQ="udev"
prereqs() {
    echo "\$PREREQ"
}

case \$1 in
    prereqs)
        prereqs
        exit 0
    ;;
esac

USB="$USB"
POOL="$POOL"

echo "Waiting for \$USB"
for I in \`seq 1 20\`; do
    if [ -e "\$USB" ]; then break; fi
    echo -n .
    sleep 1
done
echo

sleep 2

if [ -e "\$USB" ]; then
    mkdir /tmpusb
    mount -t vfat -o ro "\$USB-part1" /tmpusb
    if [ \$? -eq 0 ]; then
        exit 0
    else
        echo "Error mounting \$USB-part1" >&2
    fi
else
    echo "Cannot find \$USB" >&2
fi
exit 1
EOF
# chmod 755 /usr/share/initramfs-tools/scripts/init-premount/tmpusb

# cat << EOF > /usr/share/initramfs-tools/scripts/init-bottom/tmpusb
#!/bin/sh -e

PREREQ="udev"
prereqs() {
    echo "\$PREREQ"
}

case \$1 in
    prereqs)
        prereqs
        exit 0
    ;;
esac

if [ -e "/tmpusb" ]; then
    umount /tmpusb
    rmdir /tmpusb
fi
EOF

chmod 755 /usr/share/initramfs-tools/scripts/init-bottom/tmpusb

The first script will wait for USB drive if needed and mount it at /tmpusb for ZFS to find. Second script is there just for a bit of cleanup.

If USB drive is not mounted, this will cause boot to fail. If we want ZFS to ask for the passphrase instead (despite having file as the keylocation) a further customization is needed. But note these commands might need adjustment and they definitely need to be repeated each time ZFS package is updated. I might go into the details in some future post but suffice to say this is really not future-proof solution but it’s the minimum set of changes that I could make sed work with.

sed -i 's/load-key/load-key -L prompt/' /usr/share/initramfs-tools/scripts/zfs
sed -i '0,/load-key/ {s/-L prompt//}' /usr/share/initramfs-tools/scripts/zfs
sed -i '/KEYSTATUS=/i \\t\t\t$ZFS load-key "${ENCRYPTIONROOT}"' /usr/share/initramfs-tools/scripts/zfs
sed -i '/KEYSTATUS=/i \\t\t\tKEYLOCATION=prompt' /usr/share/initramfs-tools/scripts/zfs

In lieu of warning, suffice it to say these changes to zfs script are suitable only for this scenario and don’t really work for anything else.

Now we get grub started and update our boot environment. Due to Ubuntu 19.10 having some kernel version kerfuffle, we need to manually create initramfs image. This is also a good moment to check if our script is in.

KERNEL=`ls /usr/lib/modules/ | cut -d/ -f1 | sed 's/linux-image-//'`
update-initramfs -u -k $KERNEL

lsinitramfs /boot/initrd.img-$KERNEL | grep tmpusb

Grub update is what makes EFI tick.

update-grub 2>/dev/null
grub-install --target=x86_64-efi --efi-directory=/boot/efi --bootloader-id=Ubuntu \
    --recheck --no-floppy

Short package upgrade will not hurt.

apt dist-upgrade --yes

We can omit creation of the swap dataset but I personally find its good to have it just in case.

zfs create -V 4G -b $(getconf PAGESIZE) -o compression=off -o logbias=throughput \
    -o sync=always -o primarycache=metadata -o secondarycache=none $POOL/Swap
mkswap -f /dev/zvol/$POOL/Swap
echo "/dev/zvol/$POOL/Swap none swap defaults 0 0" >> /etc/fstab
echo RESUME=none > /etc/initramfs-tools/conf.d/resume

This is a good time to install other packages (e.g.,openssh-server) and do any setup you might need (e.g.,firewall). If nothing else, then setup root password so you have a way to log in (I personally prefer to create another user and leave root passwordless).

passwd

As installation is finally done, we can exit our chroot environment.

exit

And cleanup mount points.

umount /mnt/install/boot/efi
umount /mnt/install/boot
mount | grep -v zfs | tac | awk '/\/mnt/ {print $3}' | xargs -i{} umount -lf {}
zpool export -a

After the reboot you should be able to enjoy your installation.

reboot

Ubuntu Server 20.04 on UEFI ZFS Without Encryption

Illustration

With Ubuntu 20.04 Desktop there is a (still experimental) ZFS setup option in the addition to long time manual ZFS installation option. For Ubuntu Server we’re still dependent on the manual steps.

Steps here follow my 19.10 server guide but without the encryption steps. While I normally love having encryption enabled, there are situations where it gets in the way. Most notable example is a machine which you cannot access remotely to enter encryption key.

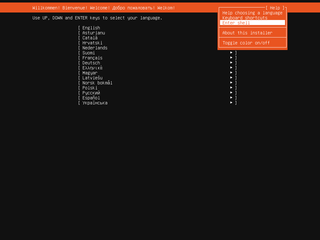
To start with installation we need to get to the root prompt. Just find Enter Shell behind Help menu item (Shift+Tab comes in handy) and you’re there.

The very first step is setting up a few variables - disk, pool, host name, and user name. This way we can use them going forward and avoid accidental mistakes. Make sure to replace these values with the ones appropriate for your system. It’s a good idea to use something unique for the pool name (e.g., host name). I personally also like having pool name start with uppercase but there is no real rule here.

DISK=/dev/disk/by-id/^^ata_disk^^
POOL=^^Ubuntu^^
HOST=^^server^^
USER=^^user^^

To start the fun we need debootstrap and zfsutils-linux package. Unlike desktop installation, ZFS package is not installed by default.

apt install --yes debootstrap zfsutils-linux

General idea of my disk setup is to maximize amount of space available for pool with the minimum of supporting partitions. If you are planning to have multiple kernels, increasing boot partition size might be a good idea. Major change as compared to my previous guide is partition numbering. While having partition layout different than partition order had its advantages, a lot of partition editing tools would simply “correct” the partition order to match layout and thus cause issues down the road.

blkdiscard $DISK

sgdisk --zap-all                        $DISK

sgdisk -n1:1M:+127M -t1:EF00 -c1:EFI    $DISK
sgdisk -n2:0:+512M  -t2:8300 -c2:Boot   $DISK
sgdisk -n3:0:0      -t3:8309 -c3:Ubuntu $DISK

sgdisk --print                          $DISK

Now we’re ready to create system ZFS pool.

zpool create -o ashift=12 -O compression=lz4 -O normalization=formD \
    -O acltype=posixacl -O xattr=sa -O dnodesize=auto -O atime=off \
    -O canmount=off -O mountpoint=none -R /mnt/install $POOL $DISK-part3
zfs create -o canmount=noauto -o mountpoint=/ $POOL/root
zfs mount $POOL/root

Assuming UEFI boot, two additional partitions are needed. One for EFI and one for booting. Unlike what you get with the official guide, here I don’t have ZFS pool for boot partition but a plain old ext4. I find potential fixup works better that way and there is a better boot compatibility. If you are thinking about mirroring, making it bigger and ZFS might be a good idea. For a single disk, ext4 will do.

yes | mkfs.ext4 $DISK-part2
mkdir /mnt/install/boot
mount $DISK-part2 /mnt/install/boot/

mkfs.msdos -F 32 -n EFI $DISK-part1
mkdir /mnt/install/boot/efi
mount $DISK-part1 /mnt/install/boot/efi

Bootstrapping Ubuntu on the newly created pool is next. As we’re dealing with server you can consider using --variant=minbase rather than the full Debian system. I personally don’t see much value in that as other packages get installed as dependencies anyhow. In any case, this will take a while.

debootstrap focal /mnt/install/

zfs set devices=off $POOL

Our newly copied system is lacking a few files and we should make sure they exist before proceeding.

echo $HOST > /mnt/install/etc/hostname
sed '/cdrom/d' /etc/apt/sources.list > /mnt/install/etc/apt/sources.list
cp /etc/netplan/*.yaml /mnt/install/etc/netplan/

Finally we’re ready to “chroot” into our new system.

mount --rbind /dev  /mnt/install/dev
mount --rbind /proc /mnt/install/proc
mount --rbind /sys  /mnt/install/sys
chroot /mnt/install /usr/bin/env DISK=$DISK POOL=$POOL USER=$USER bash --login

Let’s not forget to setup locale and time zone. If you opted for minbase you can either skip this step or manually install locales and tzdata packages.

locale-gen --purge "en_US.UTF-8"
update-locale LANG=en_US.UTF-8 LANGUAGE=en_US
dpkg-reconfigure --frontend noninteractive locales

dpkg-reconfigure tzdata

Now we’re ready to onboard the latest Linux image.

apt update
apt install --yes --no-install-recommends linux-image-generic linux-headers-generic

Followed by boot environment packages.

apt install --yes zfs-initramfs grub-efi-amd64-signed shim-signed

To mount EFI and boot partitions, we need to do some fstab setup too:

echo "PARTUUID=$(blkid -s PARTUUID -o value $DISK-part2) \
    /boot ext4 noatime,nofail,x-systemd.device-timeout=1 0 1" >> /etc/fstab
echo "PARTUUID=$(blkid -s PARTUUID -o value $DISK-part1) \
    /boot/efi vfat noatime,nofail,x-systemd.device-timeout=1 0 1" >> /etc/fstab
cat /etc/fstab

Now we get grub started and update our boot environment. Due to Ubuntu 19.10 having some kernel version kerfuffle, we need to manually create initramfs image. As before, boot cryptsetup discovery errors during mkinitramfs and update-initramfs as OK.

KERNEL=`ls /usr/lib/modules/ | cut -d/ -f1 | sed 's/linux-image-//'`
update-initramfs -u -k $KERNEL

Grub update is what makes EFI tick.

update-grub
grub-install --target=x86_64-efi --efi-directory=/boot/efi --bootloader-id=Ubuntu \
    --recheck --no-floppy

Since we’re dealing with computer that will most probably be used without screen, it makes sense to install OpenSSH Server.

apt install --yes openssh-server

I also prefer to allow remote root login. Yes, you can create a sudo user and have root unreachable but that’s just swapping one security issue for another. Root user secured with key is plenty safe.

sed -i '/^#PermitRootLogin/s/^.//' /etc/ssh/sshd_config
mkdir /root/.ssh
echo "^^<mykey>^^" >> /root/.ssh/authorized_keys
chmod 644 /root/.ssh/authorized_keys

If you’re willing to deal with passwords, you can allow them too by changing both PasswordAuthentication and PermitRootLogin parameter. I personally don’t do this.

sed -i '/^#PasswordAuthentication yes/s/^.//' /etc/ssh/sshd_config
sed -i '/^#PermitRootLogin/s/^.//' /etc/ssh/sshd_config
sed -i 's/^PermitRootLogin prohibit-password/PermitRootLogin yes/' /etc/ssh/sshd_config
passwd

Short package upgrade will not hurt.

apt dist-upgrade --yes

We can omit creation of the swap dataset but I personally find its good to have it just in case.

zfs create -V 4G -b $(getconf PAGESIZE) -o compression=off -o logbias=throughput \
    -o sync=always -o primarycache=metadata -o secondarycache=none $POOL/swap
mkswap -f /dev/zvol/$POOL/swap
echo "/dev/zvol/$POOL/swap none swap defaults 0 0" >> /etc/fstab
echo RESUME=none > /etc/initramfs-tools/conf.d/resume

If one is so inclined, /home directory can get a separate dataset too.

rmdir /home
zfs create -o mountpoint=/home $POOL/home

And now we create the user and assign a few extra groups to it.

adduser --disabled-password --gecos '' $USER
asermod -a -G adm,cdrom,dip,plugdev,sudo $USER
chown -R $USER:$USER /home/$USER
passwd $USER

Consider enabling firewall. While you can go wild with firewall rules, I like to keep them simple to start with. All outgoing traffic is allowed while incoming traffic is limited to new SSH connections and responses to the already established ones.

apt install --yes man iptables iptables-persistent

iptables -F
iptables -X
iptables -Z
iptables -P INPUT DROP
iptables -P FORWARD DROP
iptables -P OUTPUT ACCEPT
iptables -A INPUT -i lo -j ACCEPT
iptables -A INPUT -m conntrack --ctstate ESTABLISHED,RELATED -j ACCEPT
iptables -A INPUT -p tcp --dport 22 -j ACCEPT
iptables -A INPUT -p icmp -j ACCEPT
iptables -A INPUT -p ipv6-icmp -j ACCEPT

netfilter-persistent save

As install is ready, we can exit our chroot environment.

exit

And cleanup our mount points.

umount /mnt/install/boot/efi
umount /mnt/install/boot
mount | grep -v zfs | tac | awk '/\/mnt/ {print $3}' | xargs -i{} umount -lf {}
zpool export -a

After the reboot you should be able to enjoy your installation.

reboot

Testing Native ZFS Encryption Speed

[2020-11-02: There is a newer version of this post]

As I wrote about installing ZFS with the native encryption on the Ubuntu 20.04, it got me thinking… Should I abandon my LUKS-setup and switch? Well, I guess some performance testing was in order.

For this purpose I decided to go with the Ubuntu Server (to minimize impact desktop environment might have) inside of the 2 CPU Virtual Machine with 24 GB of RAM. Two CPUs should be enough to show any multithreading performance difference while 24 GB of RAM is there to give home to our ZFS disks. I didn’t want to depend on disk speed and variation it gives. For the testing purpose I only care about the relative speed difference and using the RAM instead of the real disks would give more repeatable results.

For OS I used Ubuntu Server with ZFS packages, carved a chunk of memory for RAM disks, and limited ZFS ARC to 1G.

sudo -i &lt;&lt; EOF
    apt update
    apt dist-upgrade -y
    apt install -y zfsutils-linux
    grep "/ramdisk" /etc/fstab || echo "tmpfs  /ramdisk  tmpfs  rw,size=20G  0  0" \
        | sudo tee -a /etc/fstab
    grep "zfs_arc_max" /etc/modprobe.d/zfs.conf || echo "options zfs zfs_arc_max=1073741824" \
        | sudo tee /etc/modprobe.d/zfs.conf
    reboot
EOF

With the system in pristine state, I created data used for testing (random 2 GiB).

dd if=/dev/urandom of=/ramdisk/data.bin bs=1M count=2048

Data disks are just bunch of zeros (3 GB each) and the (RAID-Z2) ZFS pool has the usual stuff but with compression turned off and sync set to always in order to minimize their impact on the results.

for I in {1..6}; do dd if=/dev/zero of=/ramdisk/disk$I.bin bs=1MB count=3000; done
echo "12345678" | zpool create -o ashift=12 -O normalization=formD \
    -O acltype=posixacl -O xattr=sa -O dnodesize=auto -O atime=off \
    -O encryption=^^aes-256-gcm^^ -O keylocation=prompt -O keyformat=passphrase \
    -O compression=off -O sync=always -O mountpoint=/zfs TestPool raidz2 \
    /ramdisk/disk1.bin /ramdisk/disk2.bin /ramdisk/disk3.bin \
    /ramdisk/disk4.bin /ramdisk/disk5.bin /ramdisk/disk6.bin

To get write speed, I simply copied the data file multiple times and took the time reported by dd. To get a single figure, I removed the highest and the lowest value averaging the rest.

sudo -i &lt;&lt; EOF
    sudo dd if=/ramdisk/data.bin of=/zfs/data1.bin bs=1M
    sudo dd if=/ramdisk/data.bin of=/zfs/data2.bin bs=1M
    sudo dd if=/ramdisk/data.bin of=/zfs/data3.bin bs=1M
    sudo dd if=/ramdisk/data.bin of=/zfs/data4.bin bs=1M
    sudo dd if=/ramdisk/data.bin of=/zfs/data5.bin bs=1M
EOF

For reads I took the file that was written and dumped it to /dev/null. Averaging procedure was the same as for writes.

sudo -i &lt;&lt; EOF
    sudo dd if=/zfs/data1.bin of=/dev/null bs=1M
    sudo dd if=/zfs/data2.bin of=/dev/null bs=1M
    sudo dd if=/zfs/data3.bin of=/dev/null bs=1M
    sudo dd if=/zfs/data4.bin of=/dev/null bs=1M
    sudo dd if=/zfs/data5.bin of=/dev/null bs=1M
EOF

Illustration

With all that completed, I had my results.

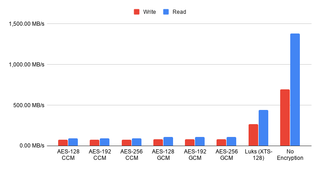
I was quite surprised how close a different bit sizes were in the performance. If your processor supports AES instruction set, there is no reason not to go with 256 bits. Only when you have an older processor without the encryption support does the 128-bit crypto make sense. There was a 15% difference when it comes to the read speeds in the favor of the GCM mode so I would probably go with that as my cipher of choice.

However, once I added measurements without the encryption and for the LUKS-based crypto I was shocked. I expected thing to go faster without the encryption but I didn’t expect such a huge difference. Also surprising was seeing the LUKS encryption to have triple the performance of the native one.

Illustration

Now, this test is not completely fair. In the real life, with a more powerful machine, and on the proper disks you won’t see such a huge difference. The sync=always setting is a performance killer and results in more encryption calls than you would normally see. However, you will still see some difference and good old LUKS seems like the winner here. It’s faster out of box, it will use less CPU, and it will encrypt all the data (not leaving metadata in the plain as ZFS does).

I will also admit that comparison leans toward apples-to-oranges kind. Reason to use ZFS’ native encryption is not due to its performance but due to the extra benefits it brings. Part of those extra cycles go into the authentication of each written block using a strong MAC. Leaving metadata unencrypted does leak a bit of (meta)data but it also enables send/receive without either side even being decrypted - just ideal for a backup box in the untrusted environment. You can backup the data without ever needing to enter password on the remote side. Lastly let’s not forget allowing ZFS direct access to the physical drives allows it to shine when it comes to the fault detection and handling of the same. You will not get anything similar if you are interfacing over the virtual device.

Personally, I will continue using the LUKS-based full disk encryption for my desktop machines. It’s just much faster. And I probably won’t touch my servers for now either. But I have a feeling that really soon I might give native ZFS encryption a spin.

[2020-11-01: Newer updates of 0.8.3 (0.8.3-1ubuntu12.4) have greatly improved GCM speed. With those optimizations GCM mode is now faster than Luks. For more details check 20.10 post.]


PS: You can take a peek at the raw data if you’re so inclined.

Installing UEFI ZFS Root on Ubuntu 20.04 (with Native Encryption)

There is a newer version of this guide for Ubuntu 21.10.


Technically, I already have a guide for encrypted ZFS setup on Ubuntu 20.04. However, that guide used Geli and, as correctly one reader noted in comments (thanks Alex!), there was no reason not to use ZFS’ native encryption. So, here is adjusted variant of my setup.

First of all, Ubuntu 20.04 has a ZFS setup option as of 19.10. You should use it instead of the manual installation procedure unless you need something special. Namely, manual installation allows for encryption, in addition to the custom pool layout and naming. You should also check the great Root on ZFS installation guide that’s part of ZFS-on-Linux project for a full picture. I find its final ZFS layout a bit too complicated for my taste but there is a lot of interesting tidbits on that page. Here is my somewhat simplified version of the same, intended for a singe disk installation.

After booting into Ubuntu desktop installation we want to get a root prompt. All further commands are going to need root credentials anyhow.

sudo -i

The very first step should be setting up a few variables - disk, pool, host name, and user name. This way we can use them going forward and avoid accidental mistakes. Just make sure to replace these values with ones appropriate for your system.

DISK=/dev/disk/by-id/^^ata_disk^^
POOL=^^ubuntu^^
HOST=^^desktop^^
USER=^^user^^

General idea of my disk setup is to maximize amount of space available for pool with the minimum of supporting partitions. If you are planning to have multiple kernels, increasing boot partition size might be a good idea.

blkdiscard $DISK

sgdisk --zap-all                        $DISK

sgdisk -n1:1M:+127M -t1:EF00 -c1:EFI    $DISK
sgdisk -n2:0:+512M  -t2:8300 -c2:Boot   $DISK
sgdisk -n3:0:0      -t3:8309 -c3:Ubuntu $DISK

sgdisk --print                          $DISK

Finally we’re ready to create system ZFS pool. Note that you need to encrypt it at the moment it’s created.

zpool create -o ashift=12 -o autotrim=on \
    -O compression=lz4 -O normalization=formD \
    -O acltype=posixacl -O xattr=sa -O dnodesize=auto -O atime=off \
    -O encryption=aes-256-gcm -O keylocation=prompt -O keyformat=passphrase \
    -O canmount=off -O mountpoint=none -R /mnt/install $POOL $DISK-part3

On top of this encrypted pool, we can create our root dataset.

zfs create -o canmount=noauto -o mountpoint=/ $POOL/root
zfs mount $POOL/root

Assuming UEFI boot, two additional partitions are needed. One for EFI and one for booting. Unlike what you get with the official guide, here I don’t have ZFS pool for boot partition but a plain old ext4. I find potential fixup works better that way and there is a better boot compatibility. If you are thinking about mirroring, making it bigger and ZFS might be a good idea. For a single disk, ext4 will do.

yes | mkfs.ext4 $DISK-part2
mkdir /mnt/install/boot
mount $DISK-part2 /mnt/install/boot/

mkfs.msdos -F 32 -n EFI $DISK-part1
mkdir /mnt/install/boot/efi
mount $DISK-part1 /mnt/install/boot/efi

To start the fun we need debootstrap package.

apt install --yes debootstrap

Bootstrapping Ubuntu on the newly created pool is next. This will take a while.

debootstrap focal /mnt/install/

zfs set devices=off $POOL

Our newly copied system is lacking a few files and we should make sure they exist before proceeding.

echo $HOST > /mnt/install/etc/hostname
sed "s/ubuntu/$HOST/" /etc/hosts > /mnt/install/etc/hosts
sed '/cdrom/d' /etc/apt/sources.list > /mnt/install/etc/apt/sources.list
cp /etc/netplan/*.yaml /mnt/install/etc/netplan/

If you are installing via WiFi, you might as well copy your wireless credentials. Don’t worry if this returns errors - that just means you are not using wireless.

mkdir -p /mnt/install/etc/NetworkManager/system-connections/
cp /etc/NetworkManager/system-connections/* /mnt/install/etc/NetworkManager/system-connections/

Finally we’re ready to “chroot” into our new system.

mount --rbind /dev  /mnt/install/dev
mount --rbind /proc /mnt/install/proc
mount --rbind /sys  /mnt/install/sys
chroot /mnt/install \
    /usr/bin/env DISK=$DISK POOL=$POOL USER=$USER \
    bash --login

Let’s not forget to setup locale and time zone.

locale-gen --purge "en_US.UTF-8"
update-locale LANG=en_US.UTF-8 LANGUAGE=en_US
dpkg-reconfigure --frontend noninteractive locales

dpkg-reconfigure tzdata

Now we’re ready to onboard the latest Linux image.

apt update
apt install --yes --no-install-recommends linux-image-generic linux-headers-generic

Followed by boot environment packages.

apt install --yes zfs-initramfs grub-efi-amd64-signed shim-signed tasksel

To mount boot and EFI partition, we need to do some fstab setup.

echo "PARTUUID=$(blkid -s PARTUUID -o value $DISK-part2) \
    /boot ext4 noatime,nofail,x-systemd.device-timeout=5s 0 1" >> /etc/fstab
echo "PARTUUID=$(blkid -s PARTUUID -o value $DISK-part1) \
    /boot/efi vfat noatime,nofail,x-systemd.device-timeout=5s 0 1" >> /etc/fstab
cat /etc/fstab

Now we get grub started and update our boot environment.

KERNEL=`ls /usr/lib/modules/ | cut -d/ -f1 | sed 's/linux-image-//'`
update-initramfs -u -k $KERNEL

Grub update is what makes EFI tick.

update-grub
grub-install --target=x86_64-efi --efi-directory=/boot/efi --bootloader-id=Ubuntu \
    --recheck --no-floppy

Finally we install out GUI environment. I personally like ubuntu-desktop-minimal but you can opt for ubuntu-desktop. In any case, it’ll take a considerable amount of time.

tasksel install ubuntu-desktop-minimal

Short package upgrade will not hurt.

apt dist-upgrade --yes

We can omit creation of the swap dataset but I personally find a small one handy.

zfs create -V 4G -b $(getconf PAGESIZE) -o compression=off -o logbias=throughput \
    -o sync=always -o primarycache=metadata -o secondarycache=none $POOL/swap
mkswap -f /dev/zvol/$POOL/swap
echo "/dev/zvol/$POOL/swap none swap defaults 0 0" >> /etc/fstab
echo RESUME=none > /etc/initramfs-tools/conf.d/resume

If one is so inclined, /home directory can get a separate dataset too.

rmdir /home
zfs create -o mountpoint=/home $POOL/home

The only remaining task before restart is to create the user, assign a few extra groups to it, and make sure its home has correct owner.

adduser --disabled-password --gecos '' $USER
usermod -a -G adm,cdrom,dip,lpadmin,plugdev,sudo $USER
passwd $USER

As install is ready, we can exit our chroot environment.

exit

And cleanup our mount points.

umount /mnt/install/boot/efi
umount /mnt/install/boot
mount | grep -v zfs | tac | awk '/\/mnt/ {print $3}' | xargs -i{} umount -lf {}
zpool export -a

After the reboot you should be able to enjoy your installation.

reboot


PS: There are versions of this guide using the native ZFS encryption for other Ubuntu versions: 22.04 and 20.04

PPS: For LUKS-based ZFS setup, check the following posts: 20.04, 19.10, 19.04, and 18.10.

[2020-06-27: Added blkdiscard and autotrim.]

Installing UEFI ZFS Root on Ubuntu 20.04

There is a newer version of this guide for Ubuntu 20.04, but with native ZFS encryption.


Ubuntu 20.04 has a ZFS setup option as of 19.10. And frankly, you should use it instead of the manual installation procedure. However, manual installation does offer it’s advantages - especially when it comes to pool layout and naming. If manual installation is needed, there is a great Root on ZFS installation guide that’s part of ZFS-on-Linux project but its final ZFS layout is a bit too complicated for my taste. Here is my somewhat simplified version of the same, intended for a singe disk installations.

After booting into Ubuntu desktop installation we want to get a root prompt. All further commands are going to need root credentials anyhow.

sudo -i

The very first step should be setting up a few variables - disk, pool, host name, and user name. This way we can use them going forward and avoid accidental mistakes. Just make sure to replace these values with ones appropriate for your system.

DISK=/dev/disk/by-id/^^ata_disk^^
POOL=^^Ubuntu^^
HOST=^^desktop^^
USER=^^user^^

General idea of my disk setup is to maximize amount of space available for pool with the minimum of supporting partitions. If you are planning to have multiple kernels, increasing boot partition size might be a good idea.

blkdiscard $DISK

sgdisk --zap-all                        $DISK

sgdisk -n1:1M:+127M -t1:EF00 -c1:EFI    $DISK
sgdisk -n2:0:+512M  -t2:8300 -c2:Boot   $DISK
sgdisk -n3:0:0      -t3:8309 -c3:Ubuntu $DISK

sgdisk --print                          $DISK

Unless there is a major reason otherwise, I like to use disk encryption.

cryptsetup luksFormat -q --cipher aes-xts-plain64 --key-size 512 \
    --pbkdf pbkdf2 --hash sha256 $DISK-part3

I like to use disk name as the name of mapped (encrypted) luks device when I open it, but really anything goes.

LUKSNAME=<code>basename $DISK</code>
cryptsetup luksOpen $DISK-part3 $LUKSNAME

Finally we’re ready to create system ZFS pool.

zpool create -o ashift=12 -o autotrim=on \
    -O compression=lz4 -O normalization=formD \
    -O acltype=posixacl -O xattr=sa -O dnodesize=auto -O atime=off \
    -O canmount=off -O mountpoint=none -R /mnt/install $POOL /dev/mapper/$LUKSNAME
zfs create -o canmount=noauto -o mountpoint=/ $POOL/root
zfs mount $POOL/root

Assuming UEFI boot, two additional partitions are needed. One for EFI and one for booting. Unlike what you get with the official guide, here I don’t have ZFS pool for boot partition but a plain old ext4. I find potential fixup works better that way and there is a better boot compatibility. If you are thinking about mirroring, making it bigger and ZFS might be a good idea. For a single disk, ext4 will do.

yes | mkfs.ext4 $DISK-part2
mkdir /mnt/install/boot
mount $DISK-part2 /mnt/install/boot/

mkfs.msdos -F 32 -n EFI $DISK-part1
mkdir /mnt/install/boot/efi
mount $DISK-part1 /mnt/install/boot/efi

To start the fun we need debootstrap package.

apt install --yes debootstrap

Bootstrapping Ubuntu on the newly created pool is next. This will take a while.

debootstrap focal /mnt/install/

zfs set devices=off $POOL

Our newly copied system is lacking a few files and we should make sure they exist before proceeding.

echo $HOST > /mnt/install/etc/hostname
sed "s/ubuntu/$HOST/" /etc/hosts > /mnt/install/etc/hosts
sed '/cdrom/d' /etc/apt/sources.list > /mnt/install/etc/apt/sources.list
cp /etc/netplan/*.yaml /mnt/install/etc/netplan/

If you are installing via WiFi, you might as well copy your wireless credentials:

mkdir -p /mnt/install/etc/NetworkManager/system-connections/
cp /etc/NetworkManager/system-connections/* /mnt/install/etc/NetworkManager/system-connections/

Finally we’re ready to “chroot” into our new system.

mount --rbind /dev  /mnt/install/dev
mount --rbind /proc /mnt/install/proc
mount --rbind /sys  /mnt/install/sys
chroot /mnt/install \
    /usr/bin/env DISK=$DISK POOL=$POOL USER=$USER LUKSNAME=$LUKSNAME \
    bash --login

Let’s not forget to setup locale and time zone.

locale-gen --purge "en_US.UTF-8"
update-locale LANG=en_US.UTF-8 LANGUAGE=en_US
dpkg-reconfigure --frontend noninteractive locales

dpkg-reconfigure tzdata

Now we’re ready to onboard the latest Linux image.

apt update
apt install --yes --no-install-recommends linux-image-generic linux-headers-generic

Followed by boot environment packages.

apt install --yes zfs-initramfs cryptsetup keyutils grub-efi-amd64-signed shim-signed tasksel

Since we’re dealing with encrypted data, we should auto mount it via crypttab. If there are multiple encrypted drives or partitions, keyscript really comes in handy to open them all with the same password. As it doesn’t have negative consequences, I just add it even for a single disk setup.

echo "$LUKSNAME UUID=$(blkid -s UUID -o value $DISK-part3) none \
    luks,discard,initramfs,keyscript=decrypt_keyctl" >> /etc/crypttab
cat /etc/crypttab

To mount boot and EFI partition, we need to do some fstab setup too:

echo "PARTUUID=$(blkid -s PARTUUID -o value $DISK-part2) \
    /boot ext4 noatime,nofail,x-systemd.device-timeout=5s 0 1" >> /etc/fstab
echo "PARTUUID=$(blkid -s PARTUUID -o value $DISK-part1) \
    /boot/efi vfat noatime,nofail,x-systemd.device-timeout=5s 0 1" >> /etc/fstab
cat /etc/fstab

Now we get grub started and update our boot environment.

KERNEL=<code>ls /usr/lib/modules/ | cut -d/ -f1 | sed &#039;s/linux-image-//&#039;</code>
update-initramfs -u -k $KERNEL

Grub update is what makes EFI tick.

update-grub
grub-install --target=x86_64-efi --efi-directory=/boot/efi --bootloader-id=Ubuntu \
    --recheck --no-floppy

Finally we install out GUI environment. I personally like ubuntu-desktop-minimal but you can opt for ubuntu-desktop. In any case, it’ll take a considerable amount of time.

tasksel install ubuntu-desktop-minimal

Short package upgrade will not hurt.

apt dist-upgrade --yes

We can omit creation of the swap dataset but I personally find a small one handy.

zfs create -V 4G -b $(getconf PAGESIZE) -o compression=off -o logbias=throughput \
    -o sync=always -o primarycache=metadata -o secondarycache=none $POOL/swap
mkswap -f /dev/zvol/$POOL/swap
echo "/dev/zvol/$POOL/swap none swap defaults 0 0" >> /etc/fstab
echo RESUME=none > /etc/initramfs-tools/conf.d/resume

If one is so inclined, /home directory can get a separate dataset too.

rmdir /home
zfs create -o mountpoint=/home $POOL/home

The only remaining task before restart is to create the user, assign a few extra groups to it, and make sure its home has correct owner.

sudo adduser --disabled-password --gecos '' $USER
usermod -a -G adm,cdrom,dip,lpadmin,plugdev,sudo $USER
passwd $USER

As install is ready, we can exit our chroot environment.

exit

And cleanup our mount points.

umount /mnt/install/boot/efi
umount /mnt/install/boot
mount | grep -v zfs | tac | awk '/\/mnt/ {print $3}' | xargs -i{} umount -lf {}
zpool export -a

After the reboot you should be able to enjoy your installation.

reboot

PS: There are versions of this guide using the native ZFS encryption for other Ubuntu versions: 21.10 and 20.04

PPS: For LUKS-based ZFS setup, check the following posts: 22.10, 19.10, 19.04, and 18.10.

[2020-05-18: Changed boot partition size to 512M (was 384M). Reason is ever increasing size of kernel making it difficult to do future upgrades without going through cleanups if you use multiple kernels.]

[2020-06-27: Added blkdiscard and autotrim.]

ZFS Ubuntu Server 19.10 Without Encryption

I already wrote on how to setup ZFS on both desktop and server Ubuntu 19.10. And both guides have two things in common. They use UEFI booting and they both make use of encryption. But what if there is a good reason why we don’t want encryption? What if there is no way to enter password? How do we install server then? Well, procedure is quite similar to the one already explained.

Entering root prompt from within Ubuntu Server installation is not hard if you know where to look. Just find Enter Shell behind Help menu item (Shift+Tab comes in handy).

The very first step should be setting up few variables - disk, pool, host name, and user name. This way we can use them going forward and avoid accidental mistakes. Just make sure to replace these values with ones appropriate for your system.

DISK=/dev/disk/by-id/^^ata_disk^^
POOL=^^ubuntu^^
HOST=^^server^^
USER=^^user^^

To start the fun we need debootstrap and zfsutils-linux package. Unlike desktop installation, ZFS pacakage is not installed by default.

apt install --yes debootstrap zfsutils-linux

General idea of my disk setup is to maximize amount of space available for pool with the minimum of supporting partitions. If you are planning to have multiple kernels, increasing boot partition size might be a good idea. Major change as compared to my previous guide is partition numbering. While having partition layout different than partition order had its advantages, a lot of partition editing tools would simply “correct” the partition order to match layout and thus cause issues down the road.

sgdisk --zap-all                        $DISK

sgdisk -n1:1M:+127M -t1:EF00 -c1:EFI    $DISK
sgdisk -n2:0:+384M  -t2:8300 -c2:Boot   $DISK
sgdisk -n3:0:0      -t3:BF01 -c3:Ubuntu $DISK

sgdisk --print                          $DISK

Without any encryption, we’re now ready to create system ZFS pool.

zpool create -o ashift=12 -O compression=lz4 -O normalization=formD \
    -O acltype=posixacl -O xattr=sa -O dnodesize=auto -O atime=off \
    -O canmount=off -O mountpoint=none -R /mnt/install $POOL $DISK-part3
zfs create -o canmount=noauto -o mountpoint=/ $POOL/root
zfs mount $POOL/root

Assuming UEFI boot, two additional partitions are needed. One for EFI and one for booting. Unlike what you get with the official guide, here I don’t have ZFS pool for boot partition but a plain old ext4. I find potential fixup works better that way and there is a better boot compatibility. If you are thinking about mirroring, making it bigger and ZFS might be a good idea. For a single disk, ext4 will do.

yes | mkfs.ext4 $DISK-part2
mkdir /mnt/install/boot
mount $DISK-part2 /mnt/install/boot/

mkfs.msdos -F 32 -n EFI $DISK-part1
mkdir /mnt/install/boot/efi
mount $DISK-part1 /mnt/install/boot/efi

Bootstrapping Ubuntu on the newly created pool is next. As we’re dealing with server you can consider using --variant=minbase rather than the full Debian system. I personally don’t see much value in that as other packages get installed as dependencies anyhow. In any case, this will take a while.

debootstrap eoan /mnt/install/

zfs set devices=off $POOL

Our newly copied system is lacking a few files and we should make sure they exist before proceeding.

echo $HOST > /mnt/install/etc/hostname
sed "s/ubuntu-server/$HOST/" /etc/hosts > /mnt/install/etc/hosts
sed '/cdrom/d' /etc/apt/sources.list > /mnt/install/etc/apt/sources.list
cp /etc/netplan/*.yaml /mnt/install/etc/netplan/

Finally we’re ready to “chroot” into our new system.

mount --rbind /dev  /mnt/install/dev
mount --rbind /proc /mnt/install/proc
mount --rbind /sys  /mnt/install/sys
chroot /mnt/install /usr/bin/env DISK=$DISK POOL=$POOL USER=$USER bash --login

Let’s not forget to setup locale and time zone. If you opted for minbase you can either skip this step or manually install locales and tzdata packages.

locale-gen --purge "en_US.UTF-8"
update-locale LANG=en_US.UTF-8 LANGUAGE=en_US
dpkg-reconfigure --frontend noninteractive locales

dpkg-reconfigure tzdata

Now we’re ready to onboard the latest Linux image.

apt update
apt install --yes --no-install-recommends linux-image-generic linux-headers-generic

Followed by boot environment packages.

apt install --yes zfs-initramfs grub-efi-amd64-signed shim-signed

To mount EFI and boot partitions, we need to do some fstab setup too:

echo "PARTUUID=$(blkid -s PARTUUID -o value $DISK-part2) \
    /boot ext4 noatime,nofail,x-systemd.device-timeout=1 0 1" >> /etc/fstab
echo "PARTUUID=$(blkid -s PARTUUID -o value $DISK-part1) \
    /boot/efi vfat noatime,nofail,x-systemd.device-timeout=1 0 1" >> /etc/fstab
cat /etc/fstab

Now we get grub started and update our boot environment. Due to Ubuntu 19.10 having some kernel version kerfuffle, we need to manually create initramfs image. As before, boot cryptsetup discovery errors during mkinitramfs and update-initramfs as OK.

KERNEL=`ls /usr/lib/modules/ | cut -d/ -f1 | sed 's/linux-image-//'`
update-initramfs -u -k $KERNEL

Grub update is what makes EFI tick.

update-grub
grub-install --target=x86_64-efi --efi-directory=/boot/efi --bootloader-id=Ubuntu \
    --recheck --no-floppy

Since we’re dealing with computer that will most probably be used without screen, it makes sense to install OpenSSH Server.

apt install --yes openssh-server

I also prefer to allow remote root login. Yes, you can create a sudo user and have root unreachable but that’s just swapping one security issue for another. Root user secured with key is plenty safe.

sed -i '/^#PermitRootLogin/s/^.//' /etc/ssh/sshd_config
mkdir /root/.ssh
echo "^^<mykey>^^" >> /root/.ssh/authorized_keys
chmod 644 /root/.ssh/authorized_keys

If you’re willing to deal with passwords, you can allow them too by changing both PasswordAuthentication and PermitRootLogin parameter. I personally don’t do this.

sed -i '/^#PasswordAuthentication yes/s/^.//' /etc/ssh/sshd_config
sed -i '/^#PermitRootLogin/s/^.//' /etc/ssh/sshd_config
sed -i 's/^PermitRootLogin prohibit-password/PermitRootLogin yes/' /etc/ssh/sshd_config
passwd

As fstab won’t work properly when you have ZFS starting first, we can place manual mount in crontab as a workaround until ZFS gets systemd loader.

( crontab -l ; echo "@reboot mount /boot ; mount /boot/efi" ) | crontab -

Short package upgrade will not hurt.

apt dist-upgrade --yes

We can omit creation of the swap dataset but I personally find a small one handy.

zfs create -V 4G -b $(getconf PAGESIZE) -o compression=off -o logbias=throughput \
    -o sync=always -o primarycache=metadata -o secondarycache=none $POOL/swap
mkswap -f /dev/zvol/$POOL/swap
echo "/dev/zvol/$POOL/swap none swap defaults 0 0" >> /etc/fstab
echo RESUME=none > /etc/initramfs-tools/conf.d/resume

If one is so inclined, /home directory can get a separate dataset too.

rmdir /home
zfs create -o mountpoint=/home $POOL/home

And now we create the user.

adduser $USER

The only remaining task before restart is to assign extra groups to user and make sure its home has correct owner.

usermod -a -G adm,cdrom,dip,plugdev,sudo $USER
chown -R $USER:$USER /home/$USER

Also consider enabling firewall:

apt install --yes man iptables iptables-persistent

While you can go wild with firewall rules, I like to keep them simple to start with. All outgoing traffic is allowed while incoming traffic is limited to new SSH connections and responses to the already established ones.

sudo apt install --yes man iptables iptables-persistent
for IPTABLES_CMD in "iptables" "ip6tables"; do
    $IPTABLES_CMD -F
    $IPTABLES_CMD -X
    $IPTABLES_CMD -Z
    $IPTABLES_CMD -P INPUT DROP
    $IPTABLES_CMD -P FORWARD DROP
    $IPTABLES_CMD -P OUTPUT ACCEPT
    $IPTABLES_CMD -A INPUT -i lo -j ACCEPT
    $IPTABLES_CMD -A INPUT -m conntrack --ctstate ESTABLISHED,RELATED -j ACCEPT
    $IPTABLES_CMD -A INPUT -p tcp --dport 22 -j ACCEPT
done
iptables -A INPUT -p icmp -j ACCEPT
ip6tables -A INPUT -p ipv6-icmp -j ACCEPT
netfilter-persistent save

As install is ready, we can exit our chroot environment.

exit

And cleanup our mount points.

umount /mnt/install/boot/efi
umount /mnt/install/boot
mount | grep -v zfs | tac | awk '/\/mnt/ {print $3}' | xargs -i{} umount -lf {}
zpool export -a

After the reboot you should be able to enjoy your installation.

reboot

Ubuntu Server 19.10 on ZFS

Illustration

With Ubuntu 19.10 Desktop there is finally (experimental) ZFS setup option or option to install ZFS manually. However, getting Ubuntu Server installed on ZFS is still full of manual steps. Steps here follow my desktop guide closely and assume you want UEFI setup.

Entering root prompt from within Ubuntu Server installation is not hard if you know where to look. Just find Enter Shell behind Help menu item (Shift+Tab comes in handy).

The very first step should be setting up few variables - disk, pool, host name, and user name. This way we can use them going forward and avoid accidental mistakes. Just make sure to replace these values with ones appropriate for your system.

DISK=/dev/disk/by-id/^^ata_disk^^
POOL=^^ubuntu^^
HOST=^^server^^
USER=^^user^^

To start the fun we need debootstrap and zfsutils-linux package. Unlike desktop installation, ZFS pacakage is not installed by default.

apt install --yes debootstrap zfsutils-linux

General idea of my disk setup is to maximize amount of space available for pool with the minimum of supporting partitions. If you are planning to have multiple kernels, increasing boot partition size might be a good idea. Major change as compared to my previous guide is partition numbering. While having partition layout different than partition order had its advantages, a lot of partition editing tools would simply “correct” the partition order to match layout and thus cause issues down the road.

sgdisk --zap-all                        $DISK

sgdisk -n1:1M:+511M -t1:8300 -c1:Boot   $DISK
sgdisk -n1:0:+128M  -t2:EF00 -c2:EFI    $DISK
sgdisk -n3:0:0      -t3:8309 -c3:Ubuntu $DISK

sgdisk --print                          $DISK

Unless there is a major reason otherwise, I like to use disk encryption.

cryptsetup luksFormat -q --cipher aes-xts-plain64 --key-size 512 \
    --pbkdf pbkdf2 --hash sha256 $DISK-part3

Of course, you should also then open device. I like to use disk name as the name of mapped device, but really anything goes.

LUKSNAME=`basename $DISK`
cryptsetup luksOpen $DISK-part3 $LUKSNAME

Finally we’re ready to create system ZFS pool.

zpool create -o ashift=12 -O compression=lz4 -O normalization=formD \
    -O acltype=posixacl -O xattr=sa -O dnodesize=auto -O atime=off \
    -O canmount=off -O mountpoint=none -R /mnt/install $POOL /dev/mapper/$LUKSNAME
zfs create -o canmount=noauto -o mountpoint=/ $POOL/root
zfs mount $POOL/root

Assuming UEFI boot, two additional partitions are needed. One for EFI and one for booting. Unlike what you get with the official guide, here I don’t have ZFS pool for boot partition but a plain old ext4. I find potential fixup works better that way and there is a better boot compatibility. If you are thinking about mirroring, making it bigger and ZFS might be a good idea. For a single disk, ext4 will do.

yes | mkfs.ext4 $DISK-part1
mkdir /mnt/install/boot
mount $DISK-part1 /mnt/install/boot/

mkfs.msdos -F 32 -n EFI $DISK-part2
mkdir /mnt/install/boot/efi
mount $DISK-part2 /mnt/install/boot/efi

Bootstrapping Ubuntu on the newly created pool is next. As we’re dealing with server you can consider using --variant=minbase rather than the full Debian system. I personally don’t see much value in that as other packages get installed as dependencies anyhow. In any case, this will take a while.

debootstrap eoan /mnt/install/

zfs set devices=off $POOL

Our newly copied system is lacking a few files and we should make sure they exist before proceeding.

echo $HOST > /mnt/install/etc/hostname
sed "s/ubuntu-server/$HOST/" /etc/hosts > /mnt/install/etc/hosts
sed '/cdrom/d' /etc/apt/sources.list > /mnt/install/etc/apt/sources.list
cp /etc/netplan/*.yaml /mnt/install/etc/netplan/

Finally we’re ready to “chroot” into our new system.

mount --rbind /dev  /mnt/install/dev
mount --rbind /proc /mnt/install/proc
mount --rbind /sys  /mnt/install/sys
chroot /mnt/install \
    /usr/bin/env DISK=$DISK POOL=$POOL USER=$USER LUKSNAME=$LUKSNAME \
    bash --login

Let’s not forget to setup locale and time zone. If you opted for minbase you can either skip this step or manually install locales and tzdata packages.

locale-gen --purge "en_US.UTF-8"
update-locale LANG=en_US.UTF-8 LANGUAGE=en_US
dpkg-reconfigure --frontend noninteractive locales

dpkg-reconfigure tzdata

Now we’re ready to onboard the latest Linux image.

apt update
apt install --yes --no-install-recommends linux-image-generic linux-headers-generic

Followed by boot environment packages.

apt install --yes zfs-initramfs cryptsetup keyutils grub-efi-amd64-signed shim-signed

If there are multiple encrypted drives or partitions, keyscript really comes in handy to open them all with the same password. As it doesn’t have negative consequences, I just add it even for a single disk setup.

echo "$LUKSNAME UUID=$(blkid -s UUID -o value $DISK-part3) none \
    luks,discard,initramfs,keyscript=decrypt_keyctl" >> /etc/crypttab
cat /etc/crypttab

To mount EFI and boot partitions, we need to do some fstab setup too:

echo "PARTUUID=$(blkid -s PARTUUID -o value $DISK-part1) \
    /boot ext4 noatime,nofail,x-systemd.device-timeout=1 0 1" >> /etc/fstab
echo "PARTUUID=$(blkid -s PARTUUID -o value $DISK-part2) \
    /boot/efi vfat noatime,nofail,x-systemd.device-timeout=1 0 1" >> /etc/fstab
cat /etc/fstab

Now we get grub started and update our boot environment. Due to Ubuntu 19.10 having some kernel version kerfuffle, we need to manually create initramfs image. As before, boot cryptsetup discovery errors during mkinitramfs and update-initramfs as OK.

KERNEL=`ls /usr/lib/modules/ | cut -d/ -f1 | sed 's/linux-image-//'`
update-initramfs -u -k $KERNEL

Grub update is what makes EFI tick.

update-grub
grub-install --target=x86_64-efi --efi-directory=/boot/efi --bootloader-id=Ubuntu \
    --recheck --no-floppy

Since we’re dealing with computer that will most probably be used without screen, it makes sense to install OpenSSH Server.

apt install --yes openssh-server

I also prefer to allow remote root login. Yes, you can create a sudo user and have root unreachable but that’s just swapping one security issue for another. Root user secured with key is plenty safe.

sed -i '/^#PermitRootLogin/s/^.//' /etc/ssh/sshd_config
mkdir /root/.ssh
echo "^^<mykey>^^" >> /root/.ssh/authorized_keys
chmod 644 /root/.ssh/authorized_keys

If you’re willing to deal with passwords, you can allow them too by changing both PasswordAuthentication and PermitRootLogin parameter. I personally don’t do this.

sed -i '/^#PasswordAuthentication yes/s/^.//' /etc/ssh/sshd_config
sed -i '/^#PermitRootLogin/s/^.//' /etc/ssh/sshd_config
sed -i 's/^PermitRootLogin prohibit-password/PermitRootLogin yes/' /etc/ssh/sshd_config
passwd

Short package upgrade will not hurt.

apt dist-upgrade --yes

We can omit creation of the swap dataset but I personally find its good to have it just in case.

zfs create -V 4G -b $(getconf PAGESIZE) -o compression=off -o logbias=throughput \
    -o sync=always -o primarycache=metadata -o secondarycache=none $POOL/swap
mkswap -f /dev/zvol/$POOL/swap
echo "/dev/zvol/$POOL/swap none swap defaults 0 0" >> /etc/fstab
echo RESUME=none > /etc/initramfs-tools/conf.d/resume

If one is so inclined, /home directory can get a separate dataset too.

rmdir /home
zfs create -o mountpoint=/home $POOL/home

And now we create the user.

adduser $USER

The only remaining task before restart is to assign extra groups to user and make sure its home has correct owner.

usermod -a -G adm,cdrom,dip,plugdev,sudo $USER
chown -R $USER:$USER /home/$USER

Consider enabling firewall:

apt install --yes man iptables iptables-persistent

While you can go wild with firewall rules, I like to keep them simple to start with. All outgoing traffic is allowed while incoming traffic is limited to new SSH connections and responses to the already established ones.

sudo apt install --yes man iptables iptables-persistent
for IPTABLES_CMD in "iptables" "ip6tables"; do
    $IPTABLES_CMD -F
    $IPTABLES_CMD -X
    $IPTABLES_CMD -Z
    $IPTABLES_CMD -P INPUT DROP
    $IPTABLES_CMD -P FORWARD DROP
    $IPTABLES_CMD -P OUTPUT ACCEPT
    $IPTABLES_CMD -A INPUT -i lo -j ACCEPT
    $IPTABLES_CMD -A INPUT -m conntrack --ctstate ESTABLISHED,RELATED -j ACCEPT
    $IPTABLES_CMD -A INPUT -p tcp --dport 22 -j ACCEPT
done
iptables -A INPUT -p icmp -j ACCEPT
ip6tables -A INPUT -p ipv6-icmp -j ACCEPT
netfilter-persistent save

As install is ready, we can exit our chroot environment.

# exit

And cleanup our mount points.

umount /mnt/install/boot/efi
umount /mnt/install/boot
mount | grep -v zfs | tac | awk '/\/mnt/ {print $3}' | xargs -i{} umount -lf {}
zpool export -a

After the reboot you should be able to enjoy your installation.

reboot

[2020-06-12: Increased partition size to 511+128 MB (was 384+127 MB before)]