All things ZFS

Native ZFS Encryption Speed (Ubuntu 23.04)

There is a newer version of this post

Well, Ubuntu 23.04 is here and it’s time for the new round of ZFS encryption testing. New version, minor ZFS updates, and slightly confusing numbers at some points.

First, Ubuntu 23.04 brings us to ZFS 2.1.9 on kernel 6.2. It’s a minot change on ZFS version (up from 2.1.5 in Ubuntu 22.10) but kernel bump is more than what we had in a while (was kernel 5.19).

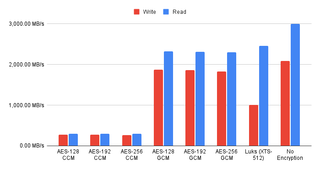
Good news is that almost nothing has changed as compared to 22.10. Numbers are close enough to what they were before that they might be a statistical error when it comes to either AES-GCM or AES-XTS (on LUKS). If that’s what you’re using (and you should), you can stop here.

Illustration

However, if you’re using AES-CCM, things are a bit confusing, at least on my test system. For writes, all is good. But when it comes to reads, gremlins seem to be hiding somewhere in the background.

Every few reads speed would simply start dropping. After a few slower measurements, it would come back where it was. I repeated it multiple times and it was always reads that started dropping while writes would stay stable.

While that might not be reason not to upgrade if you’re using AES-CCM, you might want to perform a few tests of your own. Mind you, you should be switching to AES-GCM anyhow.

As always, raw data I gathered during my tests is available.

ZFS Root Setup with Alpine Linux

Running Alpine Linux on ZFS is nothing new as there are multiple guides describing the same. However, I found official setups are either too complicated when it comes to the dataset setup or they simply don’t work without legacy boot. What I needed was a simplest way to bring up ZFS on UEFI systems.

First of all, why ZFS? Well, for me it’s mostly the matter of detecting issues. While my main server is reasonably well maintained, rest of my lab consists of retired computers I stopped using a long time ago. As such, it’s not rare that I have hardware faults and it happened more than once that disk errors went undetected. Hardware faults will still happen with ZFS but at least I will know about them immediately and without corrupting my backups too.

In this case, I will describe my way of bringing up the unencrypted ZFS setup with a separate ext4 boot partition. It requires EFI enabled BIOS with secure boot disabled as Alpine binaries are not signed.

Also, before we start, you’ll need Alpine Linux Extended ISO for ZFS installation to work properly. Don’t worry, the resulting installation will still be a minimal set of packages.

Once you boot from disk, you can proceed with the setup as you normally would but continue with [none] at the question about installation disk.

setup-alpine

Since no answer was given, we can proceed with manual steps next. First, we can set up a few variables. While I usually like to use /dev/disk/by-id for this purpose, Alpine doesn’t install eudev by default. In order to avoid depending on this, I just use good old /dev/sdX paths.

DISK=/dev/sda
POOL=Tank

Of course, we need some extra packages too. And while we’re at it, we might as well load ZFS drivers.

apk add zfs sgdisk e2fsprogs util-linux grub-efi
modprobe zfs

With this out of way, we can partition the disk out. In this example, I use three separate partitions. One for EFI, one for /boot, and lastly, one for ZFS.

sgdisk --zap-all             $DISK
sgdisk -n1:1M:+127M -t1:EF00 $DISK
sgdisk -n2:0:896M   -t2:8300 $DISK
sgdisk -n3:0:0      -t3:BF00 $DISK
sgdisk --print               $DISK
mdev -s

While having a separate dataset for different directories sometimes makes sense, I usually have rather small installations. Thus, putting everything into a single dataset actually makes sense. Most of the parameters are the usual suspects but do note I am using ashift 13 instead of the more common 12. My own testing has shown me that on SSD drives, this brings slightly better performance. If you are using this on spinning rust, you can use 12, but 13 will not hurt performance in any meaningful way, so might as well leave it as is.

zpool create -f -o ashift=13 -o autotrim=on \
    -O compression=lz4 -O normalization=formD \
    -O acltype=posixacl -O xattr=sa -O dnodesize=auto -O atime=off \
    -O canmount=noauto -O mountpoint=/ -R /mnt ${POOL} ${DISK}3

Next is the boot partition, and this one will be ext4. Yes, having ZFS here would be “purer,” but I will sacrifice that purity for the ease of troubleshooting when something goes wrong.

yes | mkfs.ext4 ${DISK}2
mkdir /mnt/boot
mount -t ext4 ${DISK}2 /mnt/boot/

The last partition to format is EFI, and that has to be FAT32 in order to be bootable.

mkfs.vfat -F 32 -n EFI -i 4d65646f ${DISK}1
mkdir /mnt/boot/efi
mount -t vfat ${DISK}1 /mnt/boot/efi

With all that out of the way, we can finally install Alpine onto our disk using the handy setup-disk script. You can ignore the failed to get canonical path error as we’re going to manually adjust things later.

BOOTLOADER=grub setup-disk -v /mnt

With the system installed, we can chroot into it and continue the rest of the steps from within.

mount --rbind /dev  /mnt/dev
mount --rbind /proc /mnt/proc
mount --rbind /sys  /mnt/sys
chroot /mnt /usr/bin/env DISK=$DISK POOL=$POOL ash --login

For grub, we need a small workaround first so it properly detects our pool.

sed -i "s|rpool=.*|rpool=$POOL|"  /etc/grub.d/10_linux

And then we can properly install the EFI bootloader.

apk add efibootmgr
mkdir -p /boot/efi/alpine/grub-bootdir/x86_64-efi/
grub-install --target=x86_64-efi \
  --boot-directory=/boot/efi/alpine/grub-bootdir/x86_64-efi/ \
  --efi-directory=/boot/efi \
  --bootloader-id=alpine
grub-mkconfig -o /boot/efi/alpine/grub-bootdir/x86_64-efi/grub/grub.cfg

And that’s it. We can now exit the chroot environment.

exit

Let’s unmount all our partitions.

umount -Rl /mnt
zpool export -a

And, after reboot, your system should come up with ZFS in place.

reboot

Native ZFS Encryption Speed (Ubuntu 22.10)

There is a newer version of this post.


Illustration

I guess it’s that time of year when I do ZFS encryption testing on the latest Ubuntu. Is ZFS speed better, worse, or the same?

Like the last time, I did testing on Framework laptop with i5-1135G7 processor and 64GB of RAM. The only change is that I am writing a bit more data during the test this time. Regardless, this is still mostly an exercise in relative numbers. Overall, the procedure is still basically the same as before.

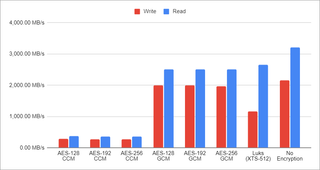
With all that out of way, you can probably just look at the 22.04 figures and be done. While there are some minor differences between 22.10 and 22.04, there is nothing big enough to change any recommendation here. Even ZFS version reflects this as we see only a tiny bump from zfs-2.1.2-1ubuntu2 to zfs-2.1.5-1ubuntu2.

ZFS GCM is still the fastest when it comes to writing and it wins over LUKS by a wide margin. It was a surprise when I saw it with 22.04 and it’s a surprise still. The surprise is not that ZFS is fast but why the heck is LUKS so slow. When it comes to reading speed, LUKS is still slightly faster but not by a wide margin.

With everything else the same, I would say ZFS GCM is a clear winner here with LUKS coming close second if you don’t mind slower write speed. I would expect both to be indistinguishable when it comes to real-world scenarios most of the time.

Using CCM encryption doesn’t make much sense at all. While encryption speed seems to benefit from disabling AES (part of which I suspect to be an artefact of my test environment), it’s just a smidgen faster than GCM. Considering that any upgrade in future is going to bring AES instruction set, I would say GCM is the way forward.

Of course, the elephant in the room is the fact the native ZFS encryption doesn’t actually cover all metadata. The only alternative that can help you with that is running ZFS on top of LUKS encryption. I honestly go back and forth between two with current preference being toward LUKS on laptop and the native ZFS encryption on servers where encrypted send/receive is a killer feature.

You can take a peek at the raw data and draw your own conclusions. As always, just keep in mind that these are just limited synthetic tests intended just to give you ballpark figure. Your mileage may vary.

Encrypted ZFS on Ubuntu 22.10

Ubuntu 22.10 in release notes brought one unpleasant news: “The option to install using zfs as a file system and encryption has been disabled due to a bug”. The official recommendation is to “simply” install Ubuntu 22.04 and upgrade from there. However, if you are willing to go over a lot of manual steps, that’s not necessary.

Those familiar with my previous installation guides will note two things. First, steps below will use LUKS encryption instead of the native ZFS option. I’ve been going back and forth on this one as I do like native ZFS encryption but in setups with hibernation enabled (and this one will be one of those), having both swap with LUKS and native ZFS would require user to type password twice. Not a great user experience.

Second, my personal preferences will “leak through”. This guide will clearly show dislike of snap system and use of way too big swap partition to facilitate hibernation under even the worst-case scenario. Your preferences might vary and thus you might want to adjust guide as necessary. The important part is disk and boot partition setup, everything else is just extra fluff.

Without further ado, let’s proceed with the install.

After booting into Ubuntu desktop installation (via “Try Ubuntu” option) we want to open a terminal. Since all further commands are going to need root credentials, we can start with that.

sudo -i

The very first step should be setting up a few variables - disk, hostname, and username. This way we can use them going forward and avoid accidental mistakes. Just make sure to replace these values with ones appropriate for your system. I like to use upper-case for ZFS pool as that’s what will appear as password prompt. It just looks nicer and ZFS doesn’t care either way.

DISK=/dev/disk/by-id/<diskid>
HOST=<hostname>
USER=<username>

For my setup I want 4 partitions. First two partitions will be unencrypted and in charge of booting. While I love encryption, I decided not to encrypt boot partition in order to make my life easier as you cannot integrate boot partition password prompt with the later data password prompt thus requiring you to type password twice. Both swap and ZFS partitions are fully encrypted.

Also, my swap size is way too excessive since I have 64 GB of RAM and I wanted to allow for hibernation under the worst of circumstances (i.e., when RAM is full). Hibernation usually works with much smaller partitions but I wanted to be sure and my disk was big enough to accommodate.

Lastly, while blkdiscard does nice job of removing old data from the disk, I would always recommend also using dd if=/dev/urandom of=$DISK bs=1M status=progress if your disk was not encrypted before.

blkdiscard -f $DISK
sgdisk --zap-all                      $DISK
sgdisk -n1:1M:+127M -t1:EF00 -c1:EFI  $DISK
sgdisk -n2:0:+896M  -t2:8300 -c2:Boot $DISK
sgdisk -n3:0:+65G   -t3:8200 -c3:Swap $DISK
sgdisk -n4:0:0      -t4:8309 -c4:ZFS  $DISK
sgdisk --print                        $DISK

Once partitions are created, we want to setup our LUKS encryption.

cryptsetup luksFormat -q --type luks2 \
    --cipher aes-xts-plain64 --key-size 512 \
    --pbkdf argon2i $DISK-part4
cryptsetup luksFormat -q --type luks2 \
    --cipher aes-xts-plain64 --key-size 512 \
    --pbkdf argon2i $DISK-part3

Since creating encrypted partition doesn’t mount them, we do need this as a separate step. Notice I use host name as the name of the main data partition.

cryptsetup luksOpen $DISK-part4 $HOST
cryptsetup luksOpen $DISK-part3 swap

Finally, we can setup our ZFS pool with an optional step of setting quota to roughly 80% of disk capacity. Adjust exact value as needed.

zpool create -o ashift=12 -o autotrim=on \
    -O compression=lz4 -O normalization=formD \
    -O acltype=posixacl -O xattr=sa -O dnodesize=auto -O atime=off \
    -O canmount=off -O mountpoint=none -R /mnt/install ${HOST^} /dev/mapper/$HOST
zfs set quota=1.5T ${HOST^}

I used to be fan of using just a main dataset for everything but these days I use more conventional “separate root dataset” approach.

zfs create -o canmount=noauto -o mountpoint=/ ${HOST^}/Root
zfs mount ${HOST^}/Root

And a separate home partition will not be forgotted.

zfs create -o canmount=noauto -o mountpoint=/home ${HOST^}/Home
zfs mount ${HOST^}/Home
zfs set canmount=on ${HOST^}/Home

With all datasets in place, we can finish setting the main dataset properties.

zfs set devices=off ${HOST^}

Now it’s time to format swap.

mkswap /dev/mapper/swap

And then boot partition.

yes | mkfs.ext4 $DISK-part2
mkdir /mnt/install/boot
mount $DISK-part2 /mnt/install/boot

And finally EFI partition.

mkfs.msdos -F 32 -n EFI -i 4d65646f $DISK-part1
mkdir /mnt/install/boot/efi
mount $DISK-part1 /mnt/install/boot/efi

At this time, I also like to disable IPv6 as I’ve noticed that on some misconfigured IPv6 networks it takes ages to download packages. This step is both temporary (i.e., IPv6 is disabled only during installation) and fully optional.

sudo sysctl -w net.ipv6.conf.all.disable_ipv6=1
sudo sysctl -w net.ipv6.conf.default.disable_ipv6=1
sudo sysctl -w net.ipv6.conf.lo.disable_ipv6=1

To start the fun we need debootstrap package. Starting this step, you must be connected to the Internet.

apt update && apt install --yes debootstrap

Bootstrapping Ubuntu on the newly created pool comes next. This will take a while.

debootstrap $(basename `ls -d /cdrom/dists/*/ | grep -v stable | head -1`) /mnt/install/

We can use our live system to update a few files on our new installation.

echo $HOST > /mnt/install/etc/hostname
sed "s/ubuntu/$HOST/" /etc/hosts > /mnt/install/etc/hosts
sed '/cdrom/d' /etc/apt/sources.list > /mnt/install/etc/apt/sources.list
cp /etc/netplan/*.yaml /mnt/install/etc/netplan/

If you are installing via WiFi, you might as well copy your wireless credentials. Don’t worry if this returns errors - that just means you are not using wireless.

mkdir -p /mnt/install/etc/NetworkManager/system-connections/
cp /etc/NetworkManager/system-connections/* /mnt/install/etc/NetworkManager/system-connections/

Atlast, we’re ready to “chroot” into our new system.

mount --rbind /dev  /mnt/install/dev
mount --rbind /proc /mnt/install/proc
mount --rbind /sys  /mnt/install/sys
chroot /mnt/install \
    /usr/bin/env DISK=$DISK USER=$USER \
    bash --login

With our newly installed system running, let’s not forget to setup locale and time zone.

locale-gen --purge "en_US.UTF-8"
update-locale LANG=en_US.UTF-8 LANGUAGE=en_US
dpkg-reconfigure --frontend noninteractive locales
dpkg-reconfigure tzdata

Now we’re ready to onboard the latest Linux image.

apt update
apt install --yes --no-install-recommends linux-image-generic linux-headers-generic

Followed by the boot environment packages.

apt install --yes zfs-initramfs cryptsetup keyutils grub-efi-amd64-signed shim-signed

Now it’s time to setup crypttab so our encrypted partitions are decrypted on boot.

echo "$HOST UUID=$(blkid -s UUID -o value $DISK-part4) none \
    luks,discard,initramfs,keyscript=decrypt_keyctl" >> /etc/crypttab
echo "swap UUID=$(blkid -s UUID -o value $DISK-part3) none \
    swap,luks,discard,initramfs,keyscript=decrypt_keyctl" >> /etc/crypttab
cat /etc/crypttab

To mount all those partitions, we need also some fstab entries. The last entry is not strictly needed. I just like to add it in order to hide our LUKS encrypted ZFS from file manager.

echo "PARTUUID=$(blkid -s PARTUUID -o value $DISK-part2) \
    /boot ext4 noatime,nofail,x-systemd.device-timeout=5s 0 1" >> /etc/fstab
echo "PARTUUID=$(blkid -s PARTUUID -o value $DISK-part1) \
    /boot/efi vfat noatime,nofail,x-systemd.device-timeout=5s 0 1" >> /etc/fstab
echo "UUID=$(blkid -s UUID -o value /dev/mapper/swap) \
    none swap defaults 0 0" >> /etc/fstab
echo "/dev/disk/by-uuid/$(blkid -s UUID -o value /dev/mapper/$HOST) \
    none auto nosuid,nodev,nofail 0 0" >> /etc/fstab
cat /etc/fstab

If hibernation is desired, a few settings need to be added.

sed -i 's/.*AllowSuspend=.*/AllowSuspend=yes/' \
    /etc/systemd/sleep.conf
sed -i 's/.*AllowHibernation=.*/AllowHibernation=yes/' \
    /etc/systemd/sleep.conf
sed -i 's/.*AllowSuspendThenHibernate=.*/AllowSuspendThenHibernate=yes/' \
    /etc/systemd/sleep.conf
sed -i 's/.*HibernateDelaySec=.*/HibernateDelaySec=13min/' \
    /etc/systemd/sleep.conf

Since we’re doing laptop setup, we can also setup lid switch. I like to set it as suspend-then-hibernate.

sed -i 's/.*HandleLidSwitch=.*/HandleLidSwitch=suspend-then-hibernate/' \
    /etc/systemd/logind.conf
sed -i 's/.*HandleLidSwitchExternalPower=.*/HandleLidSwitchExternalPower=suspend-then-hibernate/' \
    /etc/systemd/logind.conf

Lastly, I adjust swappiness a bit.

echo "vm.swappiness=10" >> /etc/sysctl.conf

And then, we can get grub going. Do note we also setup booting from swap (hibernation support) here too.

sed -i "s/^GRUB_CMDLINE_LINUX_DEFAULT.*/GRUB_CMDLINE_LINUX_DEFAULT=\"quiet splash \
    nvme.noacpi=1 \
    RESUME=UUID=$(blkid -s UUID -o value /dev/mapper/swap)\"/" \
    /etc/default/grub
update-grub
grub-install --target=x86_64-efi --efi-directory=/boot/efi --bootloader-id=Ubuntu \
    --recheck --no-floppy
update-initramfs -u -k all

Next step is to create boot environment.

KERNEL=`ls /usr/lib/modules/ | cut -d/ -f1 | sed 's/linux-image-//'`
update-initramfs -c -k $KERNEL

Finally, we can install our desktop environment.

apt install --yes ubuntu-desktop-minimal

Once installation is done, I like to remove snap and banish it from ever being installed.

apt remove --yes snapd
echo 'Package: snapd'    > /etc/apt/preferences.d/snapd
echo 'Pin: release *'   >> /etc/apt/preferences.d/snapd
echo 'Pin-Priority: -1' >> /etc/apt/preferences.d/snapd

Since Firefox is only available as snapd package, we can install it manually.

add-apt-repository --yes ppa:mozillateam/ppa
cat << 'EOF' | sed 's/^    //' | tee /etc/apt/preferences.d/mozillateamppa
    Package: firefox*
    Pin: release o=LP-PPA-mozillateam
    Pin-Priority: 501
EOF
apt update && apt install --yes firefox

While at it, I might as well get Chrome too.

cd /tmp
wget --inet4-only https://dl.google.com/linux/direct/google-chrome-stable_current_amd64.deb
apt install ./google-chrome-stable_current_amd64.deb

For Framework Laptop I use here, we need one more adjustment due to Dell audio needing a special care. Note that owners of Gen12 boards need a few more adjustments.

echo "options snd-hda-intel model=dell-headset-multi" >> /etc/modprobe.d/alsa-base.conf

Of course, we need to have a user too.

adduser --disabled-password --gecos '' $USER
usermod -a -G adm,cdrom,dialout,dip,lpadmin,plugdev,sudo,tty $USER
echo "$USER ALL=NOPASSWD:ALL" > /etc/sudoers.d/$USER
passwd $USER

I like to add some extra packages and do one final upgrade before calling it done.

add-apt-repository --yes universe
apt update && apt dist-upgrade --yes

It took a while but we can finally exit our debootstrap environment.

exit

Let’s clean all mounted partitions and get ZFS ready for next boot.

umount /mnt/install/boot/efi
umount /mnt/install/boot
mount | grep -v zfs | tac | awk '/\/mnt/ {print $3}' | xargs -i{} umount -lf {}
zpool export -a

With reboot, we should be done and our new system should boot with a password prompt.

reboot

Once we log into it, we need to adjust boot image and test hibernation. If you see your desktop after waking it up, all is good.

sudo update-initramfs -u -k all
sudo systemctl hibernate

If you get Failed to hibernate system via logind: Sleep verb "hibernate" not supported go into BIOS and disable secure boot (Enforce Secure Boot option). Unfortunately, secure boot and hibernation still don’t work together but there is some work in progress to make it happen in future. At this time, you need to select one or the other.


PS: If you already installed system with secure boot and hibernation is not working, run update-initramfs -c -k all and try again.

PPS: There are versions of this guide using the native ZFS encryption for other Ubuntu versions: 22.04, 21.10, and 20.04.

PPPS: For LUKS-based ZFS setup, check the following posts: 20.04, 19.10, 19.04, and 18.10.
Installing UEFI ZFS Root on Ubuntu 22.04

Before reading further you should know that Ubuntu has a ZFS setup option since 19.10. You should use it instead of the manual installation procedure unless you need something special. In my case that special something is the native ZFS encryption, UEFI boot, and custom partitioning I find more suitable for a single disk laptop.

After booting into Ubuntu desktop installation (via “Try Ubuntu” option) we want to open a terminal. Since all further commands are going to need root credentials, we can start with that.

sudo -i

The very first step should be setting up a few variables - disk, pool, host name, and user name. This way we can use them going forward and avoid accidental mistakes. Just make sure to replace these values with ones appropriate for your system. I like to use upper-case for ZFS pool as that’s what will appear as password prompt. It just looks nicer and ZFS doesn’t care either way.

DISK=/dev/disk/by-id/^^ata_disk^^
POOL=^^Ubuntu^^
HOST=^^desktop^^
USER=^^user^^

General idea of my disk setup is to maximize amount of space available for pool with the minimum of supporting partitions. If you are not planning to have multiple kernels, decreasing boot partition size might be a good idea (512 MB is ok). This time I decided to also add a small swap partition. While hosting swap on top of the pool itself is a perfectly valid scenario, I actually found it sometime causes issues. Separate partition seems to be slightly better.

blkdiscard -f $DISK

sgdisk --zap-all                      $DISK
sgdisk -n1:1M:+63M  -t1:EF00 -c1:EFI  $DISK
sgdisk -n2:0:+960M  -t2:8300 -c2:Boot $DISK
sgdisk -n3:0:+4096M -t3:8200 -c3:Swap $DISK
sgdisk -n4:0:0      -t4:BF00 -c4:Pool $DISK
sgdisk --print                        $DISK

Finally we’re ready to create system ZFS pool. Note that you need to encrypt it at the moment it’s created. And yes, I still like lz4 the best.

zpool create -o ashift=12 -o autotrim=on \
    -O compression=lz4 -O normalization=formD \
    -O acltype=posixacl -O xattr=sa -O dnodesize=auto -O atime=off \
    -O encryption=aes-256-gcm -O keylocation=prompt -O keyformat=passphrase \
    -O canmount=off -O mountpoint=none -R /mnt/install $POOL $DISK-part4

On top of the pool we can create a root dataset.

zfs create -o canmount=noauto -o mountpoint=/ $POOL/root
zfs mount $POOL/root

Over time I went back and forth whether to use a separate home dataset or not. In this iteration, a separate dataset it is. :)

zfs create -o canmount=noauto -o mountpoint=/home $POOL/home
zfs mount $POOL/home
zfs set canmount=on $POOL/home

Assuming we’re done with datasets, we need to do a last minute setting change.

zfs set devices=off $POOL

Assuming UEFI boot, two additional partitions are needed. One for EFI and one for booting. Unlike what you get with the official guide, here I don’t have ZFS pool for boot partition but a plain old ext4. I find potential fixup works better that way and there is a better boot compatibility. If you are thinking about mirroring, making it bigger and ZFS might be a good idea. For a single disk, ext4 will do.

# yes | mkfs.ext4 $DISK-part2
# mkdir /mnt/install/boot
# mount $DISK-part2 /mnt/install/boot/

# mkfs.msdos -F 32 -n EFI -i 4d65646f $DISK-part1
# mkdir /mnt/install/boot/efi
# mount $DISK-part1 /mnt/install/boot/efi

To start the fun we need debootstrap package. Starting this step, you must be connected to the Internet.

apt update && apt install --yes debootstrap

Bootstrapping Ubuntu on the newly created pool comes next. This will take a while.

debootstrap $(basename `ls -d /cdrom/dists/*/ | grep -v stable | head -1`) /mnt/install/

We can use our live system to update a few files on our new installation.

echo $HOST > /mnt/install/etc/hostname
sed "s/ubuntu/$HOST/" /etc/hosts > /mnt/install/etc/hosts
sed '/cdrom/d' /etc/apt/sources.list > /mnt/install/etc/apt/sources.list
cp /etc/netplan/*.yaml /mnt/install/etc/netplan/

If you are installing via WiFi, you might as well copy your wireless credentials. Don’t worry if this returns errors - that just means you are not using wireless.

mkdir -p /mnt/install/etc/NetworkManager/system-connections/
cp /etc/NetworkManager/system-connections/* /mnt/install/etc/NetworkManager/system-connections/

Finally we’re ready to “chroot” into our new system.

mount --rbind /dev  /mnt/install/dev
mount --rbind /proc /mnt/install/proc
mount --rbind /sys  /mnt/install/sys
chroot /mnt/install \
    /usr/bin/env DISK=$DISK USER=$USER \
    bash --login

Let’s not forget to setup locale and time zone.

locale-gen --purge "en\_US.UTF-8" # update-locale LANG=en\_US.UTF-8 LANGUAGE=en\_US # dpkg-reconfigure --frontend noninteractive locales

dpkg-reconfigure tzdata

Now we’re ready to onboard the latest Linux image.

apt update
apt install --yes --no-install-recommends linux-image-generic linux-headers-generic

Followed by boot environment packages.

apt install --yes zfs-initramfs cryptsetup keyutils grub-efi-amd64-signed shim-signed

Since data is encrypted, we might as well use random key to encrypt our swap.

echo "swap $DISK-part3 /dev/urandom \
    swap,cipher=aes-xts-plain64,size=256,plain" >> /etc/crypttab
cat /etc/crypttab

To mount EFI, boot, and swap partitions, we need to do some fstab setup.

echo "PARTUUID=$(blkid -s PARTUUID -o value $DISK-part2) \
    /boot ext4 noatime,nofail,x-systemd.device-timeout=5s 0 1" >> /etc/fstab
echo "PARTUUID=$(blkid -s PARTUUID -o value $DISK-part1) \
    /boot/efi vfat noatime,nofail,x-systemd.device-timeout=5s 0 1" >> /etc/fstab
echo "/dev/mapper/swap none swap defaults 0 0" >> /etc/fstab
cat /etc/fstab

We might as well activate the swap now.

/etc/init.d/cryptdisks restart && sleep 5
swapon -a

Now we get grub started and update our boot environment.

KERNEL=`ls /usr/lib/modules/ | cut -d/ -f1 | sed 's/linux-image-//'`
update-initramfs -u -k $KERNEL

Grub update is what makes EFI tick.

update-grub
grub-install --target=x86_64-efi --efi-directory=/boot/efi --bootloader-id=Ubuntu \
    --recheck --no-floppy

Finally we install out GUI environment. I personally like ubuntu-desktop-minimal but you can opt for ubuntu-desktop. In any case, it’ll take a considerable amount of time.

apt install --yes ubuntu-desktop-minimal

A short package upgrade will not hurt.

add-apt-repository universe
apt update && apt dist-upgrade --yes

If one is so inclined, /home directory can get a separate dataset too but I usually skip it these days. I just proceed to create the user, assign a few extra groups to it, and make sure its home has correct owner.

adduser --disabled-password --gecos '' $USER
usermod -a -G adm,cdrom,dip,lpadmin,plugdev,sudo $USER
echo "$USER ALL=NOPASSWD:ALL" > /etc/sudoers.d/$USER
passwd $USER

As install is ready, we can exit our chroot environment.

exit

And cleanup our mount points.

umount /mnt/install/boot/efi
umount /mnt/install/boot
mount | grep -v zfs | tac | awk '/\/mnt/ {print $3}' | xargs -i{} umount -lf {}
umount /mnt/install/home
umount /mnt/install
zpool export -a

After the reboot you should be able to enjoy your installation.

reboot

PS: There are versions of this guide using the native ZFS encryption for other Ubuntu versions: 21.10 and 20.04

PPS: For LUKS-based ZFS setup, check the following posts: 20.04, 19.10, 19.04, and 18.10.
Testing Native ZFS Encryption Speed (Ubuntu 22.04)

[2022-10-30: There is a newer version of this post]

Illustration

With the new Ubuntu LTS release, it came time to repeat my ZFS encryption testing. Is ZFS speed better, worse, or the same?

I won’t go into the test procedure much since I explained it back when I did it the first time. Outside of really minor differences in the exact disk size, procedure didn’t change. What did change is that I am not doing it on virtual machine anymore.

These tests I did on Framework laptop with i5-1135G7 processor and 32GB of RAM. It’s a bit more consistent setup than the virtual machine I used before. Due to this change, numbers are not really comparable to ones from previous tests but that should be fine - our main interest is in the relative numbers.

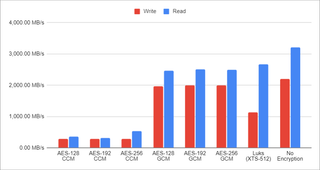
First of all, we can see that CCM encryption is not worth a dime if you have any AES-capable processor. Difference between CCM and any other encryption I tested is huge with CCM being 5-6 times slower. Only once I turned off the AES support in BIOS does its inclusion make even a minimal sense as this actually improves its performance. And no, it doesn’t suck less - it’s just that all other encryption methods suck more.

Assuming our machine has a processor made in the last 5 or so years, the native ZFS GCM encryption becomes the clear winner. Yes, 128-bit variant is a bit faster than 256-bit one (as expected) but difference is small enough that it probably wont matter. What will matter is that any GCM wins over LUKS. Yes, reads are slightly faster using standard XTS LUKS but writes are clearly favoring the native ZFS encryption.

Unless you really need the ultimate cryptographic opacity a LUKS encryption brings, a native ZFS encryption using GCM is still a way to go. And yes, even though GCM modes are performant, we still lose about 10-15% in writes and about 30% on reads when compared to no encryption at all. Mind you, as with all synthetic tests giving you the worst figures, the real performance loss is much lower.

Make what you want of it, but I’ll keep encrypting my drives. They’re plenty fast.


PS: You can take a peek at the raw data if you’re so inclined.

My ZFS Settings

In multiple posts so far I’ve created a ZFS pool using pretty much the same parameters. But I never bothered to explain why I chose them. Until now…

From my latest ZFS-related post, I have the following pool creation command:

zpool create -o ashift=12 -o autotrim=on \
    -O compression=lz4 -O normalization=formD \
    -O acltype=posixacl -O xattr=sa -O dnodesize=auto -O atime=off \
    -O encryption=aes-256-gcm -O keylocation=prompt -O keyformat=passphrase \
    -O canmount=off -O mountpoint=none $POOL $DISK

ashift=12

This setting controls the block size of your pool and should match whatever your (spinning) disk uses. Realistically, you’ll probably use 4K sectors thus 12 is a good starting value. Why the heck 12? Well, this is expressed as 2ⁿ and 2¹² is 4 KB. I like to force it because often ZFS might wrongly auto-detect value 9 (512 bytes) which shouldn’t be really used these days. This is not really ZFS’ fault but consequence of some disks being darn liars to preserve compatibility.

Even if you do have 512-byte disks today, any replacement down the road will be at least 4K. Since the only way to change this option is to recreate the pool one should think ahead and go with 4K immediately.

When it comes to SSD setups there might be some benefit in going even higher since SSD usually use 8K or even larger erase blocks. However, since SSDs are much more forgiving when it comes to the random access, most of time it’s simply not worth it because large block sizes will cause other issues (e.g., slack space).

autotrim=on

Support for trim is really important for SSD and completely irrelevant when it comes to the spinning rust. Since my NAS uses good-old hard drives, this setting really doesn’t apply. But I also use ZFS on my laptop and there it makes a huge difference. So I include it always just not to forget it by accident when it matters.

compression=lz4

While zstd seems to be a compression darling, I still prefer lz4 for my local datasets because it’s much easier on the CPU. There’s also an option to turn off compression completely, but I honestly cannot determine any speed improvement in a general case. Using compression is like receiving free space, so why not?

normalization=formD

As ZFS uses Unicode (UTF-8 more specifically), it has an interesting problem that two filenames might look the same but they might have two different expressions. Most known example might be Å which can be expressed either as Å or as combination of A and a separate ring mark. From the point of user, both these are the same. But they have a different binary expression (U+00C5 vs U0041 U+030A).

Setting normalization explicitly just ensures each file name is stored in its canonical Unicode representation and thus things that look the same are going to be the same. I personally like formD on a philosophical level but any normalization will do the same. Just don’t stick with default value of none.

acltype=posixacl

This option allows you to store extra access attributes not covered by a “standard” user/group/world affair. The most common need for these attributes is with SELinux. However, even if you’re not using SELinux, you should enable it as it doesn’t really impact anything if not used. And you might consider using SELinux in the future.

xattr=sa

This option will tell ZFS to store extra access attributes (see above) with the metadata. This is a huge performance boost if you use them. If you don’t use them it has no effect so you might as well future-proof your setup.

dnodesize=auto

Assuming you already save all these extra attributes, it’s obvious they cannot really fit nicely in one metadata node. Unless it’s a big one. Once set, this option (assuming feature@large_dnode=enabled) will allow larger than normal metadata at the cost of some compatibility. Assuming you have ZFS 0.8.4 or above, you really have nothing to worry about.

atime=off

Posix standard specifies that one should always update access time whenever file or directory is accessed. You went into your home directory - update. You opened a file without changing anything - update. These darn updates really stack up and there is really no general use case where you would need to know when the file was read. This flag will turn off these updates.

encryption=aes-256-gcm

I like my datasets encrypted. Ideally one would use full disk encryption but using ZFS native encryption is a close second with unique benefits at a cost of minor data leaks (essentially only ZFS dataset names). And GCM encryption is usually the fastest here.

keyformat=passphrase

Call me old-fashioned but I prefer a passphrase to a binary key. Reason is that I can enter passphrase more easily in a pinch.

keylocation=prompt

For my laptop I keep prompt as a key source so I can easily type it. For servers, I use file:// syntax here since I keep my passphrase on a TmpUsb USB drive. This allows me to reboot server without entering key every time but in the case it’s ever stolen my data is inaccessible.

canmount=off, mountpoint=none

As a rule, I try not to have top-level dataset mountable. I just use it to set defaults and data goes only in sub-datasets.

And that’s all the explanation I’m ready to offer.

Installing UEFI ZFS Root on Ubuntu 21.10

Before reading further you should know that Ubuntu has a ZFS setup option since 19.10. You should use it instead of the manual installation procedure unless you need something special. In my case that special something is the native ZFS encryption and custom partitioning I find more suitable for laptop.

After booting into Ubuntu desktop installation we want to get a root prompt. All further commands are going to need root credentials anyhow.

sudo -i

The very first step should be setting up a few variables - disk, pool, host name, and user name. This way we can use them going forward and avoid accidental mistakes. Just make sure to replace these values with ones appropriate for your system. I like to use upper-case for ZFS pool as that’s what will appear as password prompt. It just looks nicer and ZFS doesn’t care either way.

DISK=/dev/disk/by-id/^^ata_disk^^
POOL=^^Ubuntu^^
HOST=^^desktop^^
USER=^^user^^

General idea of my disk setup is to maximize amount of space available for pool with the minimum of supporting partitions. If you are not planning to have multiple kernels, decreasing boot partition size might be a good idea (512 MB is ok).

blkdiscard -f $DISK

sgdisk --zap-all                     $DISK

sgdisk -n1:1M:+63M -t1:EF00 -c1:EFI  $DISK
sgdisk -n2:0:+960M -t2:8300 -c2:Boot $DISK
sgdisk -n3:0:0     -t3:BF00 -c3:Root $DISK

sgdisk --print                       $DISK

Finally we’re ready to create system ZFS pool. Note that you need to encrypt it at the moment it’s created.

zpool create -o ashift=12 -o autotrim=on \
    -O compression=lz4 -O normalization=formD \
    -O acltype=posixacl -O xattr=sa -O dnodesize=auto -O atime=off \
    -O encryption=aes-256-gcm -O keylocation=prompt -O keyformat=passphrase \
    -O canmount=off -O mountpoint=none $POOL $DISK-part3

On top of this encrypted pool we could create our root set (as I did in previous guides) or just use default dataset itself. I found that actually works better for me. In either case, our new root file system will end up at /mnt/install.

zfs set canmount=noauto $POOL
zfs set mountpoint=/ $POOL

mkdir /mnt/install
mount -t zfs -o zfsutil $POOL /mnt/install

Assuming UEFI boot, two additional partitions are needed. One for EFI and one for booting. Unlike what you get with the official guide, here I don’t have ZFS pool for boot partition but a plain old ext4. I find potential fixup works better that way and there is a better boot compatibility. If you are thinking about mirroring, making it bigger and ZFS might be a good idea. For a single disk, ext4 will do.

yes | mkfs.ext4 $DISK-part2
mkdir /mnt/install/boot
mount $DISK-part2 /mnt/install/boot/

mkfs.msdos -F 32 -n EFI $DISK-part1
mkdir /mnt/install/boot/efi
mount $DISK-part1 /mnt/install/boot/efi

To start the fun we need debootstrap package.

apt install --yes debootstrap

Bootstrapping Ubuntu on the newly created pool is next. This will take a while.

debootstrap $(basename `ls -d /cdrom/dists/*/ | grep -v stable | head -1`) /mnt/install/

We can use our live system to update a few files on our new installation.

echo $HOST > /mnt/install/etc/hostname
sed "s/ubuntu/$HOST/" /etc/hosts > /mnt/install/etc/hosts
sed '/cdrom/d' /etc/apt/sources.list > /mnt/install/etc/apt/sources.list
cp /etc/netplan/*.yaml /mnt/install/etc/netplan/

If you are installing via WiFi, you might as well copy your wireless credentials. Don’t worry if this returns errors - that just means you are not using wireless.

mkdir -p /mnt/install/etc/NetworkManager/system-connections/
cp /etc/NetworkManager/system-connections/* /mnt/install/etc/NetworkManager/system-connections/

Finally we’re ready to “chroot” into our new system.

mount --rbind /dev  /mnt/install/dev
mount --rbind /proc /mnt/install/proc
mount --rbind /sys  /mnt/install/sys
chroot /mnt/install \
    /usr/bin/env DISK=$DISK POOL=$POOL USER=$USER \
    bash --login

Let’s not forget to setup locale and time zone.

locale-gen --purge "en_US.UTF-8"
update-locale LANG=en_US.UTF-8 LANGUAGE=en_US
dpkg-reconfigure --frontend noninteractive locales

dpkg-reconfigure tzdata

Now we’re ready to onboard the latest Linux image.

apt update
apt install --yes --no-install-recommends linux-image-generic linux-headers-generic

Followed by boot environment packages.

apt install --yes zfs-initramfs grub-efi-amd64-signed shim-signed tasksel

To mount boot and EFI partition, we need to do some fstab setup.

echo "PARTUUID=$(blkid -s PARTUUID -o value $DISK-part2) \
    /boot ext4 noatime,nofail,x-systemd.device-timeout=5s 0 1" >> /etc/fstab
echo "PARTUUID=$(blkid -s PARTUUID -o value $DISK-part1) \
    /boot/efi vfat noatime,nofail,x-systemd.device-timeout=5s 0 1" >> /etc/fstab
cat /etc/fstab

Now we get grub started and update our boot environment.

KERNEL=`ls /usr/lib/modules/ | cut -d/ -f1 | sed 's/linux-image-//'`
update-initramfs -u -k $KERNEL

Grub update is what makes EFI tick.

update-grub
grub-install --target=x86_64-efi --efi-directory=/boot/efi --bootloader-id=Ubuntu \
    --recheck --no-floppy

Finally we install out GUI environment. I personally like ubuntu-desktop-minimal but you can opt for ubuntu-desktop. In any case, it’ll take a considerable amount of time.

tasksel install ubuntu-desktop-minimal

Short package upgrade will not hurt.

apt dist-upgrade --yes

We can omit creation of the swap dataset but I personally find a small one handy.

zfs create -V 4G -b $(getconf PAGESIZE) -o compression=off -o logbias=throughput \
    -o sync=always -o primarycache=metadata -o secondarycache=none $POOL/Swap
mkswap -f /dev/zvol/$POOL/Swap
echo "/dev/zvol/$POOL/Swap none swap defaults 0 0" >> /etc/fstab
echo RESUME=none > /etc/initramfs-tools/conf.d/resume

If one is so inclined, /home directory can get a separate dataset too but I usually skip it these days. I just proceed to create the user, assign a few extra groups to it, and make sure its home has correct owner.

adduser --disabled-password --gecos '' $USER
usermod -a -G adm,cdrom,dip,lpadmin,plugdev,sudo $USER
passwd $USER

As install is ready, we can exit our chroot environment.

exit

And cleanup our mount points.

umount /mnt/install/boot/efi
umount /mnt/install/boot
mount | grep -v zfs | tac | awk '/\/mnt/ {print $3}' | xargs -i{} umount -lf {}
umount /mnt/install
zpool export -a

After the reboot you should be able to enjoy your installation.

reboot

PS: There are versions of this guide using the native ZFS encryption for other Ubuntu versions: 22.04 and 20.04

PPS: For LUKS-based ZFS setup, check the following posts: 20.04, 19.10, 19.04, and 18.10.
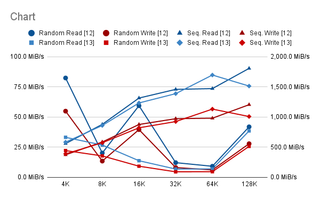
ZFS Pool on SSD

I am a creature of habit. Long time ago I found ZFS setup that works for me and didn’t change much since. But sometime I wonder if those settings still hold with SSDs in game. Most notably, are 4K blocks still the best?

Since I already “had” to update my desktop to Ubuntu 21.10, I used that opportunity to clear my disks and have it installed from scratch. And it would be a shame not to run some tests first on my XPG SX6000 Pro - SSD I use for pure data storage. After trimming this DRAM-less SSD, I tested the pool across multiple recordsize values and at ashift values of 12 (4K block) and 13 (8K block).

My goal was finding a good default settings for both bulk storage and virtual machines. Unfortunately, those are quite opposite requirements. Bulk storage benefits greatly from good sequential access while virtual machines love random IO more. Fortunately, with ZFS, one can accomplish both using two datasets with different recordsize values. But ashift value has to be the same.

Illustration

Due to erase block sizes getting larger and larger, I expected performance to be better with 8K “sectors” (ashift=13) than what I usually used (ashift=12). But I was surprised.

First of all, results were all over the place but it seems that ashift=12 is still a valid starting point. It might be due to my SSD having smaller than expected erase page but I doubt it. My thoughts go more toward SSDs being optimized for the 4K load. And the specific SSD I used to test with is DRAM-less thus allowing any such optimizations to be even more visible.

Optimizations are probably also the reason for 128K performing so well in the random IO scenarios. Yes, for sequential access you would expect it, but for random access it makes no sense how fast it is. No matter what’s happening, it’s definitely making recordsize=128K still the best general choice. Regardless, for VMs, I created a sub-dataset with much smaller 4K records (and compression off) just to lower write-amplification a bit.

The full test results are in Google Sheets. For testing I used fio’s fio-rand-RW.fio and fio-seq-RW.fio profiles.

Case-insensitive ZFS

Don’t.

Well, this was a short one. :)

From the very start of its existence, ZFS supported case-insensitive datasets. In theory, if you share disk with Windows machine, this is what you should use. But reality is a bit more complicated. It’s not that setting doesn’t work. It’s more a case of working too well.

Realistically you are going to be running ZFS on some *nix machine and access it from Windows, it’ll be via Samba. As *nix API generally expects case-sensitivity, Samba will dynamically convert what it shares from the case-sensitive world into the case-insensitive one. If file system is case-insensitive, Samba will get confused and you will suddenly have issues renaming files that differ only in case.

For example, you won’t be able to rename test.txt into Test.txt. Before doing rename Samba will if the new file already exists (step needed if underlying system is case-insensitive) in order to avoid overwriting unrelated file. This second check will fail on case-insensitive dataset as ZFS will report Test.txt exists. Because of this check (that would be necessary on case-sensitive file system) Samba will incorrectly think that destination already exists and not allow the rename. Yep, any rename differing only in case will fail.

Now, this could be fixable. If Samba would recognize the file system is case-insensitive, it could skip that check. But what if you have case-sensitive file system mounted within case-insensitive dataset? Or vice-versa? Should Samba check on every access or cache results? For something that doesn’t happen on *nix often, this would be either flaky implementation or a big performance hit.

Therefore, Samba assumes that file system is case-sensitive. In 99% of cases, this is true. Unless you want to chase ghosts, just give it what it wants.