Microsoft Windows and all that goes with it

Windows 7 on High DPI

For “ages”, monitors had resolution of 96 dpi. Every OS and application was designed with it in mind (usually only tested on that resolution). If you buy LCD screen these days, you will see that everything looks a lot smaller. In order to have fine grained picture, pixel density has gone way up. However, your OS still draws everything like it did for years and your eyes are going mad.

Solution is to change DPI to suit your comfort level (usually 125% (120 dpi) is enough). After restart (log off is enough for Windows 7), everything grows a little bit. Applications that are dpi-aware will scale properly and everything should look fine.

Illustration

Old applications that are not aware that 96 dpi is out of fashion, will not look so nice. Most common issues will be some controls that went outside of form bounds and text wrapping at weird places. It can happen that just one button you need is unreachable (notice on this picture, there is also cancel button way to the right - outside of window).

In order to solve this issue, Windows Vista will lie to those applications that everything is still in 96 dpi and then manually scale it (Aero is needed - DWM is culprit). Although this will solve problem with unaware applications, it will also make windows blurry (physics of stretching cannot be avoided). This may seem like a pretty good trade until you became aware that application that knew how to scale in Windows XP gets same blurry treatment (e.g. Visual Studio 2008). Windows Vista assumes that all old applications are DPI unaware and it requires application change to behave “just right” (as easiest solution, you can check ignore DPI on compatibility settings).

Reason behind Windows Vista recognizing all old applications as “problematic ones” is that there is new API in place to assure application is capable of scaling. Since that API hasn’t been there before Vista, applications will not call it. If they do not call it, Vista will think that they cannot scale. Solution is to get new version. Depending on application, that can pose a problem (e.g. there isn’t newer version of Visual Studio 2008 - it doesn’t scale even with service pack applied).

This behavior has changed with Windows 7. Microsoft recognized that most of applications know how to scale and even if they cannot, 25% increase (120 dpi is most common) will trim very little of content. Your application will, for all practical purposes, revert to XP high-DPI behavior.

If you decide to go higher than this (e.g. 150%), DWM will kick back in and scaling will take over. Although this will again make windows blurry (for Vista DPI non-aware applications), it will also make everything fit.

Since DPI settings higher than 120 dpi are not so common, I find this a worthy compromise.

Quick VHD Creation

There is tool out that will create your VHD file in seconds. It is called VHD tool and does that job quite nicely.

Security is little bit compromised by using it since it does not fill that file with zeroes but it merely allocates space (that’s where speed comes from). Because of that, data on your parent disk will be visible inside of virtualized environment.

I would tend to avoid it in production environment but for testing it surelly makes sence.

IE8

Internet Explorer 8 is out. I have mixed feelings about it. While I do like new version, I will not be able to use it for now. Microsoft decided that Windows 7 users need to wait.

If you are not irresponsible enough to use Windows 7 beta, you can download your copy here. Windows XP and above is supported.

Fingerprinting

Illustration

When I bought my new laptop (HP 6730b), there was one thing that made my eyes glow. It had fingerprint reader. Imagine all possibilities of using it as fancy tool to unlock your laptop by the power of finger. :)

Only problem is that it didn’t look cool. It looked like I am little bit disturbed. I pass my finger over sensor - it does not even see that finger exists. I pass it again - cannot read it properly. Again - oh, no, I am sliding my finger too fast. After a while, people around me went betting whether I will be able to logon within three swipes.

I installed Windows 7 and only device without driver is my fingerprint reader. As one can imagine, I didn’t miss it so much. But suddenly Windows notified me that there is solution for my problem - you guess it - I got a link to driver. It was not my usual driver - original was from HP - this one was directly from AuthenTec.

What have I lost compared to HP’s one? Only thing that seems relevant is connection to TPM which, in security sense, was nice thing to have. However, I cannot believe that there is still same hardware beneath it. Now I really use my fingerprint reader for logging on. Oh, what difference, can a driver make. Not only that, if you uninstall HP’s driver and put this one on Vista, same thing happens - it just starts working.

I can only conclude one thing. Works better without HP garbage.

When to Go X64

Illustration

Sometimes it is hard to tell wether to work in 32-bit or 64-bit world. Here are some hints.

Hyper-V

This one is easiest. To use Hyper-V you must use x64 windows. End of story.

Windows XP

This was first consumer choice of 64-bit operating system and as such it had some problems. You can argue that most (if not all) problems were caused by lousy drivers, but fact remains that there were problems. Later drivers fixed this situation, but I would not recommend this version to anyone.

Vista / Server 2008

Here situation depends mostly on memory. It is easy if you have more than 4 GB of memory (e.g. 6 GB). You must use 64-bit windows to use all that memory. There is choice of using 32-bit Windows Server with PAE which then enables usage of more memory, but I would not recommend it since performance cost for that memory is too high.

Here I must say that 64-bit drivers are really stable now. Device manufacturers really learned their lesson with Windows XP x64 and now everything works as it should. There can be some issues with finding proper and signed driver (driver signing is requirement) for older devices, but for newly bought devices everything just works.

When you have just 4 GB of memory there is slight dilemma. 32-bit windows will see less than 3.5 GB (even with /3GB switch). Rest of memory will be simply unavailable. However, in 64-bit world pointers are bigger (eight bytes instead of four) so all that additional memory is just used for larger pointers. Useful memory (used for data) is roughly the same.

Here I would go with 64-bit Windows (if all drivers are available). You will have no advantages now but if you add more memory to your computer, there is no need to reinstall anything. Also, from developer perspective, you can track those pointer bugs (e.g. .NET interop calls) more easily since most of them are there because someone decided to put pointer (64-bit value) in integer (which is 32-bit value even on 64-bit system).

When there is less than 4 GB, memory is just wasted if you go 64-bit.

Work Half-done

Illustration

I love VHD mounting feature in Windows 7. It makes playing with virtual machines much easier. And let us not forget installing Windows 7 inside it.

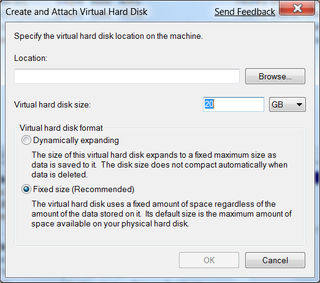
You just go onto More Actions and select Create VHD (although this was hardest part for me since I am adjusted to right-click mentality). After that there comes a nice dialog.

This dialog gives everything in simple terms. If you decide to create fixed disk (as you should), Disk Manager just blocks. No progress bar, no message - plain and simple nothing. As you can imagine creating 20 GB can take a while. Only signal that something is happening is light of your disk.

I find this a little disappointing. Another great feature tarnished by half-done user interface. :(

[2008-05-08: This is fixed in release candidate.]

Hyper-V Server 2008

Illustration

Virtualization is nice idea. You have one powerful PC and put multiple servers on it. One for file sharing (e.g. FreeNAS), one for your domain, one for testing - list just goes on. It is even suitable for home use.

However, there is one hidden cost there. You already need operating system to host your other virtual machines. If you are playing with VMware or VirtualBox, you can use linux as host. Although there is no cost associated here, you must know that now you have one more system to manage, patch… It is very hard to minimize surface area for attacks.

You could go on hypervisor path with VMware’s ESX server but there is question of drivers here if you have lot of components that are not of premium quality. If you want to play with Microsoft’s own Hyper-V, you will not have that problem since any imaginable piece of hardware has drivers for Windows. Cost is issue. For this one, you need Windows Server 2008 - that is not free OS.

Illustration

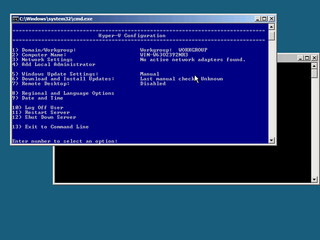
However, now there is Hyper-V Server 2008 to cover free virtualization market. It is based on Windows, but its not windows as we know it - there is only command line interface available. There is no possibility of any configuration on the machine it self. You need another machine with Windows Vista or Windows 2008 in order to manage it. I do not find this a big issue since if you need virtualization, there is great chance that you have more than one computer anyway.

There is option of managing everything with script files but that is not so nice solution as having MMC on another computer. Even if you choose graphical path there are some manual steps required for everything to work, or you can run a script that will enable all for you.

As you can see, there are some configuration issues to deal with but once you get it running, this one is great. If you have lot of Virtual Server / Virtual PC images, just make new machine and add existing disk (or use a import tool). Do not forget to uninstall old Virtual Server Additions and to install new Integrated Services in order to get best performances.

If you used other virtualization tools (VMware, VirtualBox…) there is no real need to switch. But if you used Microsoft’s virtualization before, give this one a try. It is free.

Quick VHD Install

Illustration

I already wrote about installing Windows 7 (and their Windows 2008 R2 cousin) into VHD (Virtual Disk) file, but there is a quicker way of doing it. You don’t even need to go through installation process.

On MSDN, script appeared that does conversion from .wim files to VHD. As you may know, .wim is extension of Windows Imaging Format that serves as installation image from Vista onward. This script just reads this file and using native Windows 7 VHD mounting (yes, you need to have Windows 7 for this) creates new virtual disk with Windows installed inside of it (only Windows 7 and above). This speeds things considerably since there is no booting inside installation, loading it’s drivers or even answering any questions (for that you need to use unattended answer file).

This tool has much more possibilities that described here (e.g. applying of patches) but I will go only into installing base system.

Creating virtual disk

In order to create bootable windows you can call script (in elevated prompt - administrator rights are required):

cscript.exe WIM2VHD.wsf /wim:X:\sources\install.wim /sku:ULTIMATE /vhd:"D:\Virtual Machines\Native\Windows7.vhd" /size:20480 /disktype:Fixed
...
INFO: Inspecting the WIM...
INFO: Creating a Fixed VHD. This can be a time consuming process...
INFO: Configuring and formatting the VHD...
INFO: Applying the WIM... [ 100% ] Applying progress
INFO: Making the VHD bootable with BCDBoot...
INFO: Unmounting the VHD...
Summary: Errors: 0, Warnings: 0, Successes: 1 INFO: Done.

Notice that here X: is Windows 7 installation disc (or Windows 2008 R2, works the same).

Only required parameters are /wim and /sku, but I wanted to include /vhd, /size and /disktype in order to make same .vhd file like in original post. Do be carefull since it overwrites without any questions.

If you are wondering how to find which /sku value you should use, you can check which ones are available with:

cscript.exe WIM2VHD.wsf /wim:X:\sources\install.wim
...
************************************************************
Error: 0: The supplied WIM does not contain a(n) "UNSPECIFIED" image.
Possible images are:
HOMEBASIC
HOMEPREMIUM
BUSINESS
ULTIMATE
************************************************************
...

Booting

In order to boot from this disk image, you need to work a little with bcdedit. I will not describe it here since it is same procedure as booting from any other VHD file. For booting inside of Hyper-V or Virtual PC, there is no need for any action other that attaching VHD to virtual machine.

Something else

Don’t forget to install Windows Automated Installation Kit. If you do forget, you will get rather unhelpful message (Error: 0: No filePath was specified. This file was marked as critical.) and script will refuse to do any work. This same message will appear if imagex.exe cannot be found (usually at C:\Program Files\Windows AIK\Tools\amd64 or C:\Program Files\Windows AIK\Tools\x86). Just put it in PATH environment variable and you will be fine.

Is it any good?

Whole process took around ten minutes. Installation step took only four minutes (rest was creation of fixed VHD) which is much faster than DVD based installation. It does leave you at Out of Box Experience (some five minutes more), but if you really need speed, you can prepare answer file and that step is gone.

If you need to install Windows 7 into VHD (not only on your native system but also for use with Hyper-V or Virtual PC) this is a way to go.

[2009-05-13: Updated with Windows 7 RC links]