My general destop choice is Kubuntu. I like Ubuntu package management and general compatibility and I love Plasma. I do have other distributions around my home, but my main setup sticks to Kubuntu. So, with the new version, came time to have a new setup instructions.
Honestly, installers these days are good and you will probably be happy with default installation unless you have special needs. In my case, I do have a few quirks the default installer doesn’t support to my liking:
- ZFS for system and data
- LUKS encryption for swap and ZFS
- No Snap
Since installed doesn’t do that, I do quite a few manual steps to make it works. Mind you, everything is set for copy/paste so they are not that troublesome or excessive as they look. In any case, here they are.
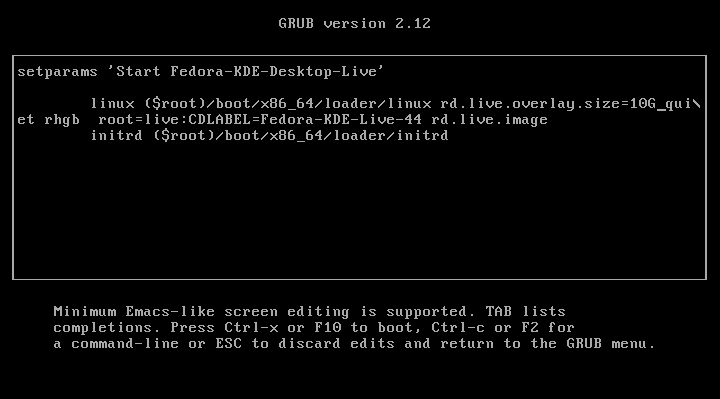
The very first thing to do is to boot into installation. Once in live desktop I usually setup networking and add a few packages so I can acccess it from the network.
sudo apt update ; sudo apt install openssh-server
passwd
If you want to execute these commands directly, you can freely skip those steps. If you do want to access the system over network, do not forget to disable sleep as it will happily interrupt your installation steps.
Once in terminal, we want to switch to the root user.
sudo -i
Then we add a few prerequisite packages. Most notably ZFS and something to partition disk with (in my case sgdisk).
apt update
apt install -y gdisk zfsutils-linux
Now, as promised, I like to set a few variables.
DISK1=/dev/disk/by-id/<disk>
HOST=<host>
USERNAME=<user>
Note I use absolute path to the disk. I found it least problematic when scripting.
With that sorted out, we’re onto setting up partitions. My partitions are:
- 127 MiB EFI partition
- 1920 MiB boot partition
- 32 GiB swap
- rest is ZFS on top of 4K aligned LUKS
Note this will destroy any data you might have, thus there is no way back after this.
blkdiscard -f $DISK1 2>/dev/null
sgdisk --zap-all $DISK1
sgdisk -n1:1M:+127M -t1:EF00 -c1:EFI $DISK1
sgdisk -n2:0:+1920M -t2:8300 -c2:Boot $DISK1
sgdisk -n3:0:+32G -t3:8200 -c3:Swap $DISK1
sgdisk -a 8 -I -n4:0:0 -t4:8309 -c4:LUKS $DISK1
sgdisk --print $DISK1
With partitions created, we can collect their IDs.
DISK1P1=`blkid -s PARTUUID -o value $DISK1-part1`
DISK1P2=`blkid -s PARTUUID -o value $DISK1-part2`
DISK1P3=`blkid -s PARTUUID -o value $DISK1-part3`
DISK1P4=`blkid -s PARTUUID -o value $DISK1-part4`
I’ve been going back and forth over the years on whether to use simpler partition names or UUIDs for the rest of setup. However, UUIDs are simply more fool-proof. For example, if you every clone your drive, it will just work. Partition names get too messy when you move disks around.
Now let’s setup LUKS encryption for ZFS.
cryptsetup luksFormat -q --type luks2 \
--sector-size 4096 \
--cipher aes-xts-plain64 --key-size 256 \
--pbkdf argon2i /dev/disk/by-partuuid/$DISK1P4
While your disk is encrypted, you still need to open it. I will assume you’re gonna use SSD, thus usage of perf-no_write_workqueue and perf-no_read_workqueue options.
cryptsetup luksOpen \
    --persistent --allow-discards \
    --perf-no_write_workqueue --perf-no_read_workqueue \
    /dev/disk/by-partuuid/$DISK1P4 $DISK1P4
With this we can create our pool.
zpool create \
-o ashift=12 -o autotrim=on \
-O compression=lz4 -O normalization=formD \
-O acltype=posixacl -O xattr=sa -O dnodesize=auto -O atime=off \
-O canmount=off -O mountpoint=none -R /mnt/install \
${HOST^} /dev/mapper/$DISK1P4
I also recommend setting up quota but that’s something you can do later depending on how big the disk is.
On top of ZFS pool we can now create our system dataset.
zfs create \
    -o devices=on \
    -o canmount=noauto -o mountpoint=/ \
    ${HOST^}/System
zfs mount ${HOST^}/System
And a separate home dataset.
zfs create \
    -o canmount=noauto -o mountpoint=/home \
    ${HOST^}/Home
zfs mount ${HOST^}/Home
zfs set canmount=on ${HOST^}/Home
Our boot partition wont be encrypted and that’s by design. It’s not ideal but recovering system with encrypted partition is such pain that I am willing to compromise.
yes | mkfs.ext4 /dev/disk/by-partuuid/$DISK1P2
mkdir /mnt/install/boot/
mount /dev/disk/by-partuuid/$DISK1P2 /mnt/install/boot/
Our EFI partition gets its FAT32 home too.
mkfs.msdos -F 32 -n EFI -i 4d65646f /dev/disk/by-partuuid/$DISK1P1
mkdir /mnt/install/boot/efi/
mount /dev/disk/by-partuuid/$DISK1P1 /mnt/install/boot/efi/
And lastly, our swap partition gets its own LUKS encrption. I strongly suggest the same password as for data partition as it will save you time typing.
cryptsetup luksFormat -q --type luks2 \
    --sector-size 4096 \
    --cipher aes-xts-plain64 --key-size 256 \
    --pbkdf argon2i /dev/disk/by-partuuid/$DISK1P3
Mind you, it too needs opening.
cryptsetup luksOpen \
    --persistent --allow-discards \
    --perf-no_write_workqueue --perf-no_read_workqueue \
    /dev/disk/by-partuuid/$DISK1P3 $DISK1P3
And formatting.
mkswap /dev/mapper/$DISK1P3
At this point I like to disable IPv6. I am not sure if it’s my network or a general issue, but IPv4-only network is MUCH faster in live USB environment. Mind you, this is just a temporary thing - installed system will support IPv6 just fine.
sysctl -w net.ipv6.conf.all.disable_ipv6=1
sysctl -w net.ipv6.conf.default.disable_ipv6=1
sysctl -w net.ipv6.conf.lo.disable_ipv6=1
Finally, we get to install at least minimum Resolute Racoon.
apt update
apt dist-upgrade --yes
apt install --yes debootstrap
debootstrap --components=main,restricted,universe,multiverse resolute /mnt/install/
To help it going, I like to set its hostname and copy over network details. The last step is optional but it helps you preserver wireless network password.
echo $HOST > /mnt/install/etc/hostname
sed "s/kubuntu/$HOST/" /etc/hosts > /mnt/install/etc/hosts
cp /etc/netplan/*.yaml /mnt/install/etc/netplan/
At this time we switch into our new 26.04 environment. Anything you do after this step permanently impacts your installation. For all practical purposes, it’s like you’re logged in your new setup. Because you are.
mount --rbind /dev  /mnt/install/dev
mount --rbind /proc /mnt/install/proc
mount --rbind /sys  /mnt/install/sys

chroot /mnt/install /usr/bin/env \
    DISK1P1=$DISK1P1 DISK1P2=$DISK1P2 DISK1P3=$DISK1P3 DISK1P4=$DISK1P4 \
    HOST=$HOST USERNAME=$USERNAME \
    bash --login
I like to setup my locale.
dpkg-reconfigure locales
And my timezone.
dpkg-reconfigure tzdata
With those out of way, it’s time to tell our system which partitions it will need to decrypt.
echo -n > /etc/crypttab
echo "$DISK1P3 PARTUUID=$DISK1P3 none luks,discard,initramfs,keyscript=decrypt_keyctl" >> /etc/crypttab
echo "$DISK1P4 PARTUUID=$DISK1P4 none luks,discard,initramfs,keyscript=decrypt_keyctl" >> /etc/crypttab
Then we need to tell it where to mount what.
echo -n > /etc/fstab
echo "PARTUUID=$DISK1P2    /boot     ext4 noatime,nofail,x-systemd.device-timeout=3s 0 1" >> /etc/fstab
echo "PARTUUID=$DISK1P1    /boot/efi vfat noatime,nofail,x-systemd.device-timeout=3s 0 1" >> /etc/fstab
echo "/dev/mapper/$DISK1P4 none      auto nofail,nosuid,nodev,noauto                 0 0" >> /etc/fstab
echo "/dev/mapper/$DISK1P3 none      swap sw,nofail                                  0 0" >> /etc/fstab
Our new kernel packages go next.
apt update
apt install --yes --no-install-recommends linux-image-generic linux-headers-generic
Followed by packages needed for making it boot.
apt install --yes zfs-initramfs cryptsetup keyutils plymouth-theme-spinner
update-initramfs -c -k all
To make EFI work, we need to install GRUB too. I modify its /etc/default/grub a bit to ensure it will resume from our swap. Note that you bootloader-id should stay ubuntu if you’re using secure boot.
apt install --yes grub-efi-amd64-signed shim-signed

sed -i "s/^GRUB_CMDLINE_LINUX_DEFAULT.*/GRUB_CMDLINE_LINUX_DEFAULT=\"quiet splash \
    RESUME=UUID=$(blkid -s UUID -o value /dev/mapper/$DISK1P3)\"/" \
    /etc/default/grub
sed -i 's/^GRUB_TIMEOUT=.*/GRUB_TIMEOUT=1/'   /etc/default/grub
echo "GRUB_DISABLE_MEMTEST=true" >> /etc/default/grub

update-grub
grub-install --target=x86_64-efi --efi-directory=/boot/efi \
    --bootloader-id=Ubuntu --recheck --no-floppy
With booting sorted, it’s time to setup desktop and I like to start by forbidding snap altogether. Yes, there is a certail level of madness in using Ubuntu without snap but that’s story for another time.
apt remove --yes snapd 2>/dev/null
echo 'Package: snapd'    > /etc/apt/preferences.d/snapd
echo 'Pin: release *'   >> /etc/apt/preferences.d/snapd
echo 'Pin-Priority: -1' >> /etc/apt/preferences.d/snapd
apt update
At last, we come to the desktop installation itself. I like to add a few tools here too.
apt install --yes kubuntu-desktop man-db lshw iw wget
Since disabling snap also disabled installation of Firefox, we need to readd it from PPA to have a browser installed once everything is done.
add-apt-repository --yes ppa:mozillateam/ppa
cat << 'EOF' | sed 's/^    //' | tee /etc/apt/preferences.d/mozillateamppa
    Package: firefox*
    Pin: release o=LP-PPA-mozillateam
    Pin-Priority: 501
EOF
apt update && apt install --yes firefox
With desktop installed, we’re literally on the final stretch of completing install. So, it’s a good time to setup our user.
adduser --disabled-password --gecos '' $USERNAME
usermod -a -G adm,cdrom,dialout,dip,lpadmin,plugdev,sudo,tty $USERNAME
echo "$USERNAME ALL=NOPASSWD:ALL" > /etc/sudoers.d/$USERNAME
passwd $USERNAME
Here I also like to setup my sleep options in order to enable hibernation.
sed -i 's/.*AllowSuspend=.*/AllowSuspend=yes/'                           /etc/systemd/sleep.conf
sed -i 's/.*AllowHibernation=.*/AllowHibernation=yes/'                   /etc/systemd/sleep.conf
sed -i 's/.*AllowSuspendThenHibernate=.*/AllowSuspendThenHibernate=yes/' /etc/systemd/sleep.conf
sed -i 's/.*HibernateMode=.*/HibernateMode=platform shutdown/'           /etc/systemd/sleep.conf
sed -i 's/.*HibernateDelaySec=.*/HibernateDelaySec=13min/'               /etc/systemd/sleep.conf
My preferred way of handling sleep on laptop is to suspend when closing the screen and hibernate on power key. If your preference differ, skip this step.
apt install -y pm-utils

sed -i 's/.*HandlePowerKey=.*/HandlePowerKey=hibernate/'                          /etc/systemd/logind.conf
sed -i 's/.*HandleLidSwitch=.*/HandleLidSwitch=suspend-then-hibernate/'           /etc/systemd/logind.conf
sed -i 's/.*HandleLidSwitchExternalPower=.*/HandleLidSwitchExternalPower=ignore/' /etc/systemd/logind.conf
sed -i 's/.*HoldoffTimeoutSec=.*/HoldoffTimeoutSec=13s/'                          /etc/systemd/logind.conf
Since we’re good with our new environment we can exit it.
exit
Now we can disable devices flag on the system dataset and ensure all data is written. That is followed by unmounting all partitions and exporting ZFS pool.
zfs set devices=off ${HOST^}/System
sync

umount /mnt/install/boot/efi
umount /mnt/install/boot
mount | grep -v zfs | tac | awk '/\/mnt/ {print $3}' | xargs -i{} umount -lf {}
zpool export -a
With cleanup done, we can finally reboot.
reboot
If everything went well, you now get to enjoy KDE Plasma.