Linux, Unix, and whatever they call that world these days

Webalizer With a Dash of Logrotate

Recently I decided to stop using Google Analytics for my website traffic analysis. Yes, it’s still probably the best analytics tool out there but I actually don’t care about details that much. The only thing I care about is trend - is site getting better or worse - and nothing much else. For that purpose, a simple Webalizer setup would do.

My Webalizer setup was actually as close to plain as it gets. The only trick up my sleeve was that I had a separate configuration file for each of my sites. Of course, since I use logrotate to split my Apache traffic logs, I also needed to add a bit of prerotate action into the /etc/logrotate.conf to ensure I don’t miss any entries.

My first try was this:

…
  prerotate
    for FILE in /srv/configs/**/webalizer.conf
    do
      /usr/bin/webalizer -c $FILE
    done
  endscript
…

And, while this did wonders from command line, it seemed to do absolutely nothing when executed by logrotate itself. Reason for its misbehavior was that logrotate (and crontab) uses sh as its shell and not bash.

To get around this, a Posix-compatible command is needed:

…
  prerotate
    find /srv/configs/ -name "webalizer.conf" -exec /usr/bin/webalizer -c {} \;
  endscript
…

This now executes just before my Apache log file gets rotated-out and Webalizer gets one last chance to catch-up with its stats.

Chrony NTP Server on CentOS 7.3

Illustration

I already wrote about setting pool NTP server using good old ntpd daemon. However, CentOS comes with another daemon installed by default - Chrony. Let me guide you through the setup of Chrony NTP server on CentOS 7.3 for the purpose of joining the pool.

While NTP server needs a good (single-core) CPU and fast network, it cares nothing about the RAM. That makes it ideal for even the smallest cloud instances. Both $5 Linode (1024 MB RAM) and $2.50 Vultr (512 MB RAM) will work wonderfully. Just don’t set your pool speed over 100 Mbps to avoid any extra bandwidth charges.

Immediately after CentOS has been installed, it’s best to update system to the latest and greatest:

yum -y upgrade

As Chrony is installed by default on CentOS, there are no new packages to install. However, the firewall still must allow for external requests:

firewall-cmd --permanent --add-service ntp
firewall-cmd --reload

Just installing NTP is no good if we don’t have any servers to synchronize with. To setup those, editing /etc/chrony.conf is needed. Depending which data center you select for the server, you will want to have 4 to 7 servers from the stratum one list physically close to your location while obeying any restrictions noted (especially if server is open access or not). For the virtual machine located in Miami, the following servers would work (do not forget to remove servers already in file):

server ntp-s1.cise.ufl.edu iburst
server time-a.bbnx.net iburst
server time-b.bbnx.net iburst
server time-a.timefreq.bldrdoc.gov iburst
server time-c.timefreq.bldrdoc.gov iburst
…

Of course, a server won’t be the server until we add the following line to /etc/chrony.conf so that external connections are accepted while control is limited to local machine only:

…
allow all
bindcmdaddress 127.0.0.1
bindcmdaddress ::1

Now finally, with all configured, we can restart our server:

systemctl restart chronyd

To verify the server is working, the first step is to see all sources the server synchronizes with. As soon as one of them has asterisk next to its name, all is good.

chronyc sources

A bit more realistic check will be actually requesting the time from remote computer:

ntpdate -q ^^<ip>^^

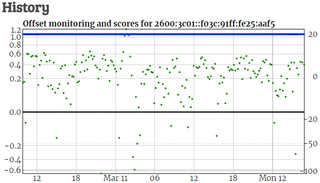
Once server works for a while, it can be added to the NTP.org pool. Since the server has both IPv4 and IPv6 address (I surely hope you added IPv6 ;)), it will be necessary to add it twice. At the start it will be only monitored but, as its score increases, soon you will start seeing traffic from all over the world.

PS: It would be wise to keep 1 Mpbs as defined speed until you see how much traffic you’re actually getting. Once the server has been handling requests at basic speed for a while you can think about increasing the number.
Reboot E-mail Via Google's SMTP

Setting up NTP server is easy. But actually monitoring that server is a bit more difficult. A bare minimum should be getting an e-mail after reboot. However, even that simple step requires a bit of setup.

First you need to install sendmail, its configuration compiler, and a few SASL authentication methods:

yum install -y sendmail sendmail-cf cyrus-sasl-plain cyrus-sasl-md5

Next step is preparing authentication database (do substitute e-mail and password):

mkdir -p -m 700 /etc/mail/authinfo
echo 'AuthInfo: "U:root" "I:^^relay@gmail.com^^" "P:^^password^^"' > /etc/mail/authinfo/mail
makemap hash /etc/mail/authinfo/mail &gt; /etc/mail/authinfo/mail

The last configuration step is adding the following lines into /etc/mail/sendmail.mc just ABOVE the first MAILER line:

…
define(`SMART_HOST',`[smtp.gmail.com]')dnl
define(`RELAY_MAILER_ARGS', `TCP $h 587')dnl
define(`ESMTP_MAILER_ARGS', `TCP $h 587')dnl
define(`confAUTH_OPTIONS', `A p')dnl
define(`confAUTH_MECHANISMS', `EXTERNAL GSSAPI DIGEST-MD5 CRAM-MD5 LOGIN PLAIN')dnl
define(`confCACERT', `/etc/pki/tls/certs/ca-bundle.trust.crt')dnl
TRUST_AUTH_MECH(`EXTERNAL DIGEST-MD5 CRAM-MD5 LOGIN PLAIN')dnl
FEATURE(`authinfo',`hash -o /etc/mail/authinfo/gmail.db')dnl
…

With configuration out of the way, we can proceed with “compiling” that new configuration and restarting the daemon:

make -C /etc/mail
systemctl start sendmail

Finally, we are ready to test e-mail via command line:

echo "Subject: Test via sendmail from `hostname`" | sendmail -v ^^youremail@example.com^^

Assuming everything works, the only remaining task is adding cron task (crontab -e):

@reboot  echo -e "Subject: `hostname` status\n\nHost rebooted at `date -R`." | /usr/sbin/sendmail -v ^^youremail@example.com^^

Now every reboot will result in a e-mail message.

Random Slacking

It all started as a joke.

As few of us started using Slack it seemed oddly appropriate that #random channel should have a freshly squeezed random number every day. But there were some complaints about the quality. The first issue arose when 42 was randomly selected a few days in a row and it all went down hill from there culminating in a whole weekend without a random number. Unforgivable!

To replace such flawed human being a simple script was needed. It was clear from the get-go that script would be written in Bash. Not only my favorite but also supported on my personal servers and extremely easy to schedule via crontab.

Albeit single digit number had a previous occurrence, single-person decision was made that two-digit numbers look the best and should be used going forward. Due to the previous issue with number 42, it was also decided such number cannot appear too often. After all, you don’t answer the question of life, the universe, and everything more than once in a blue moon.

Too keep things on a low key, it was necessary to avoid any Slack bot interface. No, the message should always appear to come from a user. After a while chat.postMessage call was discovered enabling just that. This did require a (legacy) token and came at a cost of future extensibility but it also allowed a lot of faking so it all worked out.

In any case, here is the final script:

#!/bin/bash

TOKEN="xoxp-111111111111-222222222222-333333333333-abcdefabcdefabcdefabcdefabcdef"
CHANNEL="random"
USERNAME="myuser"

TAGLINE_FILE="/srv/taglines.txt"

NUMBER=$(( RANDOM % 89 + 10)) #random number 10-99
if (( $NUMBER == 42 )) ; then NUMBER=$(( RANDOM % 89 + 10)) ; fi  #about 0.01% chance to get 42 second time

TAGLINE=`shuf -n 1 $TAGLINE_FILE | cut -d'*' -f1`

TEXT="Random number of the day is ${NUMBER}.\\n${TAGLINE}"

curl -X POST \
     -H "Authorization: Bearer $TOKEN" \
     -H 'Content-type: application/json; charset=utf-8' \
     --data "{\"channel\":\"$CHANNEL\",\"text\":\"$TEXT\",\"as_user\":\"true\",\"username\":\"$USERNAME\"}" \
     https://slack.com/api/chat.postMessage

PS: No, illusion is not full, as there will be hints this is sent via API and not by human being. However, hints are small enough that not many will note.

Configuring Google's SMTP Via Smtpmail on Linode CentOS

When you install Wordpress on Linode, one thing that’s not supported out of box is mail - php requires sendmail installed and running.

Configurations might differ depending on the exact use case, but for my Wordpress I wanted to use Google’s SNMP server. While guides are plentiful, most of information is a bit obsolete - whether it is in regards to package name or exact configuration. So I went my own way…

To get us going, we need to install a few packages related to sendmail functionality and allow the same in SELinux (if enforced):

yum install -y sendmail sendmail-cf cyrus-sasl-plain cyrus-sasl-md5
setsebool -P httpd_can_sendmail on

First thing to prepare is file containing our authentication details for Google’s server. I will assume here that login you usually use is relay@gmail.com and password is password. Of course, these must be substituted for correct values:

mkdir -p -m 700 /etc/mail/authinfo
echo 'AuthInfo: "U:root" "I:^^relay@gmail.com^^" "P:^^password^^"' &gt; /etc/mail/authinfo/gmail
makemap hash /etc/mail/authinfo/gmail &lt; /etc/mail/authinfo/gmail

To /etc/mail/sendmail.mc we need to add the following lines just ABOVE the first MAILER line.

…
define(`SMART_HOST',`[smtp.gmail.com]')dnl
define(`RELAY_MAILER_ARGS', `TCP $h 587')dnl
define(`ESMTP_MAILER_ARGS', `TCP $h 587')dnl
define(`confAUTH_OPTIONS', `A p')dnl
define(`confAUTH_MECHANISMS', `EXTERNAL GSSAPI DIGEST-MD5 CRAM-MD5 LOGIN PLAIN')dnl
define(`confCACERT', `/etc/pki/tls/certs/ca-bundle.trust.crt')dnl
TRUST_AUTH_MECH(`EXTERNAL DIGEST-MD5 CRAM-MD5 LOGIN PLAIN')dnl
FEATURE(`authinfo',`hash -o /etc/mail/authinfo/gmail.db')dnl
``…``

Once configuration has been updated, we can proceed with “compiling” that new configuration and starting the daemon for the first time.

make -C /etc/mail
systemctl start sendmail

The easiest test is sending an e-mail via command line:

echo "Subject: Test via sendmail" | sendmail -v ^^youremail@example.com^^

If there are issues, you can always check journal for startup errors:

journalctl -xe

The most common error is “available mechanisms do not fulfill requirements” and that signals Cyrus SASL plugins are not installed for MD5 and PLAIN methods. Make sure cyrus-sasl-plain and cyrus-sasl-md5 packages are installed.

Lastly, if sendmail does work but it is very slow, add your hostname (output of hostname command) to the end of localhost (IPv4 and IPv6) entries in /etc/hosts file.

Sorting \"Dot\" Files

As I got Cent OS 7.4 running, a bit strange thing happened. When I ran usual ll (alias to ls -lA), I got a slightly unexpected result:

ll
 drwxrwx--- 4 apache apache  4096 Dec 24 06:50 download
 -rw-rw---- 1 apache apache  5430 Dec 23 08:06 favicon.ico
 -rw-rw---- 1 apache apache 12300 Dec 26 02:25 .htaccess
 -rw-rw---- 1 apache apache   460 Dec 23 08:06 index.php
 -rw-rw---- 1 apache apache   117 Dec 23 20:39 robots.txt
 drwxrwx--- 2 apache apache  4096 Dec 26 01:44 .well-known
 drwxrwx--- 5 apache apache  4096 Dec 23 17:32 wordpress

Can you spot the issue?

Yep, Cent OS got a bit (too) smart so sorting ignores the starting dot and gets those files too in the alphabetic order. Those used to dot files on the top - though luck.

Well, it’s possible to “correct” this behavior using the slightly different alias in .bashrc:

alias ll='LC_COLLATE=C ls -lA'

This gives a (properly) sorted output:

ll
 -rw-rw---- 1 apache apache 12300 Dec 26 02:25 .htaccess
 drwxrwx--- 2 apache apache  4096 Dec 26 01:44 .well-known
 drwxrwx--- 4 apache apache  4096 Dec 24 06:50 download
 -rw-rw---- 1 apache apache  5430 Dec 23 08:06 favicon.ico
 -rw-rw---- 1 apache apache   460 Dec 23 08:06 index.php
 -rw-rw---- 1 apache apache   117 Dec 23 20:39 robots.txt
 drwxrwx--- 5 apache apache  4096 Dec 23 17:32 wordpress

Requiring Authentication For All But One File

As I planned move of my site to Linode, first I needed a place to test. It was easy enough to create test domain and fill it with migrated data but I didn’t want Google (or any other bot) to index it. The easiest way to do so was to require authentication. In Apache configuration that can be done using Directory directive:

<Directory "/var/www/html">
    AuthType Basic
    AuthUserFile "/var/www/.htpasswd"
    Require valid-user
</Directory>

However, this also means that my robots.txt with disallow statements was also forbidden. What I really wanted was to allow only access to robots.txt while forbidding everything else.

A bit of modification later, this is what I came up with:

<Directory "/var/www/html">
    AuthType Basic
    AuthUserFile "/var/www/.htpasswd"
    Require valid-user
    <Files "robots.txt">
        Allow from all
        Satisfy Any
    </Files>
</Directory>

Tailing Two Files

Illustration

As I got my web server running, it came to me to track Apache logs for potential issues. My idea was to have a base script that would, on a single screen, show both access and error logs in green/yellow/red pattern depending on HTTP status and error severity. And I didn’t want to see the whole log - I wanted to keep information at minimum - just enough to determine if things are going good or bad. If I see something suspicious, I can always check full logs.

Error log is easy enough but parsing access log in the common log format (aka NCSA) is annoyingly difficult due to its “interesting” choice of delimiters.

Just looks at this example line:

108.162.245.230 - - [26/Dec/2017:01:16:45 +0000] "GET /download/bimil231.exe HTTP/1.1" 200 1024176 "-" "Mozilla/5.0 (Windows NT 10.0; WOW64; Trident/7.0; rv:11.0) like Gecko"

First three entries are space separated - easy enough. Then comes date in probably the craziest format one could fine and enclosed in square brackets. Then we have request line in quotes, followed by a bit more space-separated values. And we finish with a few quoted values again. Command-line parsing was definitely not in mind of whoever “designed” this.

With Apache you can of course customize format for logging - but guess what? While you can make something that works better with command-line tools, you will lose a plethora of tools that already work with NCSA format - most notably Webalizer. It might be a bad choice for command line, but it’s the standard regardless.

And extreme flexibility of Linux tools also means you can do trickery to parse fields even when you deal with something as mangled as NCSA.

After a bit of trial and error, my final product was the script looking a bit like this:

#!/bin/bash

LOG_DIRECTORY="/var/www"

trap 'kill $(jobs -p)' EXIT

tail -Fn0 $LOG_DIRECTORY/apache_access.log | gawk '
  BEGIN { FPAT="([^ ]+)|(\"[^\"]+\")|(\\[[^\\]]+\\])" }
  {
    code=$6
    request=$5

    ansi="0"
    if (code==200 || code==206 || code==303 || code==304) {
      ansi="32;1"
    } else if (code==301 || code==302 || code==307) {
      ansi="33;1"
    } else if (code==400 || code==401 || code==403 || code==404 || code==500) {
      ansi="31;1"
    }
    printf "%c[%sm%s%c[0m\n", 27, ansi, code " " request, 27
  }
' &

tail -Fn0 $LOG_DIRECTORY/apache_error.log | gawk '
  BEGIN { FPAT="([^ ]+)|(\"[^\"]+\")|(\\[[^\\]]+\\])" }
  {
    level=$2
    text=$5 " " $6 " " $7 " " $8 " " $9 " " $10 " " $11 " " $12 " " $13 " " $14 " " $15 " " $16

    ansi="0"
    if (level~/info/) {
      ansi="32"
    } else if (level~/warn/ || level~/notice/) {
      ansi="33"
    } else if (level~/emerg/ || level~/alert/ || level~/crit/ || level~/error/) {
      ansi="31"
    }
    printf "%c[%sm%s%c[0m\n", 27, ansi, level " " text, 27
  }
' &

wait

Script tails both error and access logs, waiting for Ctrl+C. Upon exit, it will kill spawned jobs via trap.

For access log, gawk script will check status code and color entries accordingly. Green color is for 200 OK, 206 Partial Content, 303 See Other, and 304 Not Modified; yellow for 301 Moved Permanently, 302 Found, and 307 Temporary Redirect; red for 400 Bad Request, 401 Unauthorized, 403 Forbidden, and 404 Not Found. All other codes will remain default/gray. Only code and first request line will be printed.

For error log, gawk script will check only error level. Green color will be used for Info; yellow color is for Warn and Notice; red is for Emerg, Alert, Crit, and Error. All other (essentially debug and trace) will remain default/gray. Printout will consist just of error level and first 12 words.

This script will not only shorten quite long error and access log lines to their most essential parts, but coloring will enable one to see the most important issues at a glance - even when lines are flying around. Additionally, having them interleaved lends itself nicely to a single screen monitoring station.

[2018-02-09: If you are running this via SSH on remote server, don’t forget to use -t for proper cleanup after SSH connection fails.]

Creating ISO From the Command Line

Creating read-only archives is often beneficial. This is especially so when we are dealing with something standard across many system. And rarely you will find anything more standard than CD/DVD .iso files. You can mount it on both Windows 10 and Linux without any issues.

There are quite a few programs that will allow you to create .iso files but they are often overflowing with ads. Fortunately every Linux distribution comes with a small tool capable of the same without any extra annoyances. That tool is called [mkisofs](https://linux.die.net/man/8/mkisofs).

Basic syntax is easy:

mkisofs -input-charset -utf8 -udf -V "My Label" -o MyDVD.iso ~/MyData/

Setting input charset is essentially only needed to suppress warning. UTF-8 is default anyhow and in 99% cases exactly what you want.

Using UDF as output format enables a bit more flexible file and directory naming rules. Standard ISO 9660 format (even when using level 3) is so full of restrictions making it annoying at best- most notable being support for only uppercase file names. UDF allows Unicode file names up to 255 characters in length and has no limit to directory depth.

Lastly, DVD label is always a nice thing to have.

Solving \"Failed to Mount Windows Share\"

Illustration

Most of the time I access my home NAS via samba shares. For increased security and performance I force it to use SMB v3 protocol. And therein lies the issue.

Whenever I tried to access my NAS from Linux Mint machine using Caja browser, I would get the same error: “Failed to mount Windows share: Connection timed out.” And it wasn’t connectivity issues as everything would work if I dropped my NAS to SMB v2. And it wasn’t unsupported feature either as Linux supports SMB3 for a while now.

It was just a case of a bit unfortunate default configuration. Albeit man pages tell client max protocol is SMB3, something simply doesn’t click. However, if one manually specifies only SMB3 is to be used, everything starts magically working.

Configuring it is easy; in /etc/samba/smb.conf, within [global], one needs to add

client min protocol = SMB3
client max protocol = SMB3

Alternatively, this can also be done with the following one-liner:

sudo sed -i "/\\[global\\]/a client min protocol = SMB3\nclient max protocol = SMB3" /etc/samba/smb.conf

Once these settings are in, share is accessible.