Microsoft Windows and all that goes with it

Aurora

Illustration

There is yet another hole in Internet Explorer. Although usually Microsoft patches browser well before public availability of exploit, they were hit by zero-day exploit. I will not get too much into how serious this exploit is and which browser versions are exactly jeopardized, but I must comment on measures to solve it.

First measure that is recommended by Microsoft is disabling JavaScript. While this might sound like good advice five years ago, I think it is most idiotic recommendation today.

Probably every site worth seeing is using JavaScript for one purpose or another. Disabling JavaScript for most of sites means same level of usability as not visiting anything in the first place.

If this is main line of defense, maybe it is time for new browser…

Windows 7 and Intel Graphics 4

Illustration

My laptop was on repairs for a while. Since it came back, I decided to update Windows with newest bits. One of installations Windows Update offered was also new driver for graphic adapter. Nothing fancy - just standard Intel Series 4 Graphics chipset.

Few days ago I, as I changed screen brightness, screen went black. And not pure black. I could see image but very dimly. I saw it before. It looked as background light is gone. I already saw myself packing laptop back for second round of repairs.

I shut it down (with good old Alt+F4 repeated multiple times). When I started it once again everything seemed to be alright. I was puzzled and when it happened again after some time. Since broken back-light doesn’t fix itself too often, I decided to search my system for cause of error.

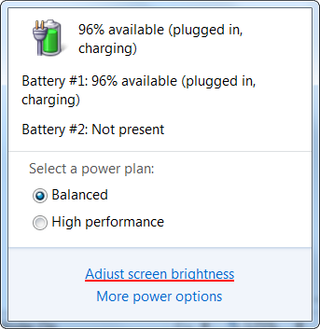
It ends up that whenever I bring screen brightness to lowest setting (either by key combination or selecting it on slider) it turns off backlight completely. And there is no obvious way to turn it back on. No matter how much you increase brightness after that nothing brings light back.

Well, almost nothing. In Windows 7 you can use Win+P key combination to call upon window that gives you choice of display you wish to use. It was enough to change display to “Duplicate” in order to restore brightness. Since that left screen in resolution that was not optimal one, another call to Win+P window and selecting “Computer only” was needed to restore everything where it was.

Since I often change screen brightness, this is my workaround to avoid reboot each time I go one notch too far. I tried to restore driver to older version but, for some reason, I cannot get driver rollback to work. Updating to latest Intel drivers didn’t help much (Microsoft delivered 8.15.10.1872, Intel had 8.15.10.1986) since same “feature” is present there.

I am not sure how wide-spread this error is since I could not find anything about it on Internet (or I didn’t search good enough). However, I do know that my particular combination of HP 6030b and Intel Graphics 4 Series is affected. Lately, with this laptop, I feel that driver gods are not on my side.

P.S. No, screen is not broken, I tried older Windows 7 installation (VHD boot) and problem cannot be reproduced there. Only installations (both VHD and normal boot) where I use Windows Update regularly are affected.

Core Configurator 2.0

Illustration

For those that use Windows Server Core installations there is new candy in store - Core Configurator 2.0.

Not only that this collection of scripts will help with quite a few of administration tasks, but it will do it with basic graphical interface.

Lovers of GUI, rejoice.

Installing Windows 7 From USB Drive - XP Version

Illustration

I already wrote about creating USB installation media for Windows 7. However, that procedure worked only on Windows Vista and above. I stumbled upon problems when I tried to apply same procedure on Windows XP.

In this walk-through I will have USB drive on letter W: and Windows 7 installation CD (either real one or just mounted iso) on drive F:.

For this to work, we need to first format USB as NTFS drive:

FORMAT W: /FS:ntfs /Q
 Insert new disk for drive W:
 and press ENTER when ready...
 The type of the file system is FAT32.
 The new file system is FAT32.
 QuickFormatting 7647M
 Initializing the File Allocation Table (FAT)...
 ...

CONVERT W: /fs:ntfs
 The type of the file system is FAT32.
 Volume Serial Number is 8CD3-E43F
 Windows is verifying files and folders...
 ...
 Converting file system
 Conversion complete

One thing that is problematic on XP is making USB bootable in first place. There is DISKPART tool available, but only for internal disks. External USB memory will just not be recognized there. In order to go around this, you will need MBRWizzard. That tool gives you DISKPART-like commands and it works on Windows XP.

First we need to see what do we have:

MBRWIZ /list
 MBRWiz - Version 2.0 **beta** for Windows XP/2K3/PE         April 30, 2006
   Copyright (c) 2002-2006 Roger Layton                    http://mbr.bigr.net
 Disk: 0   Size: 153G CHS: 19457 255 63
 Pos MBRndx Type/Name  Size Active Hide Start Sector   Sectors    DL Vol Label
 --- ------ ---------- ---- ------ ---- ------------ ------------ -- ----------
  0    0    07-NTFS    152G   No    No            63  312,576,642 C: <None>
 Disk: 1   Size: 153G CHS: 19457 255 63
 Pos MBRndx Type/Name  Size Active Hide Start Sector   Sectors    DL Vol Label
 --- ------ ---------- ---- ------ ---- ------------ ------------ -- ----------
  0    0    07-NTFS    152G   No    No            63  312,576,642 D: <None>
 Disk: 2   Size: 7.6G CHS: 974 255 63
 Pos MBRndx Type/Name  Size Active Hide Start Sector   Sectors    DL Vol Label
 --- ------ ---------- ---- ------ ---- ------------ ------------ -- ----------
  0    0    07-NTFS    7.6G    No   No         2,048   15,661,056 W: <None>

As you can see, USB is recognized as drive 2. Do remember this. In order to make first partition bootable, we need to activate it.

Command parameters are easy. Disk takes number of disk (2 in this case), part is partition number (always zero - Windows have problems with multiple partitions on USB drive). Active works as simple boolean operation: 1 to make partition active and 0 to deactivate it.

MBRWIZ /disk=2 /part=0 /active=1
 MBRWiz - Version 2.0 **beta** for Windows XP/2K3/PE         April 30, 2006``
   Copyright (c) 2002-2006 Roger Layton                    http://mbr.bigr.net``
 Are you sure you want to set the partition(s) Active? (Y/N): y``
 Partition successfully set to Active``

Once partition layout is done, copy operation can commence. Just copy everything from Windows 7 CD to your USB drive.

XCOPY F:\*.* /s /e /f W:\

After everything is copied, we just need to update boot code on USB drive. We can do this with BOOTSECT program located on your Windows 7 installation CD in boot folder.

F:
CD boot
BOOTSECT /nt60 W:
 Target volumes will be updated with BOOTMGR compatible bootcode.
 W: (\\?\Volume{2f3c3a5d-1913-11de-a3ee-003005c321bd})
    Successfully updated NTFS filesystem bootcode.
 Bootcode was successfully updated on all targeted volumes.

Now your installation is ready to go!

Unlike Windows 7 procedure, here we need NTFS formatted media. I tried to do same with FAT32 formatted media, but my laptop would not recognize it. Since Windows 7 do work from such media, there is probably just small adjustment needed but I decided not to bother with it.

Prepare for Repairs

Quite unfortunately, I needed to send my laptop (6730b) for servicing. This made me think about my both personal and business data. I needed something that would keep data private even in case of direct disk access.

Obvious choice would be BitLocker Drive Encryption. But this comes with great disadvantage. It is not possible to boot up laptop in order to check functioning of Windows.

Another choice would be NTFS encryption. It is applicable on files and folders and encryption key is connected to user. As long as you don’t give your password (or backup key), your data is safe.

Most of personal data I had were documents and pictures but I decided to encrypt everything under user account: documents, pictures, videos, settings… It proved to be easier to encrypt everything in Users folder that to hand pick each item.

Most of business data was already encrypted with one exception - SQL Server. In order to ensure compatibility with every edition, I didn’t use SQL Server’s own encryption (available only in Enterprise edition). NTFS encryption works without problems once you stop SQL service. Once encryption is done, you can restart it again.

During encryption (it took quite a while) Windows 7 reminded me to backup my encryption key. Procedure was quite easy (next, next, next…) and fast. In case of something happening to user account, that is only way of restoring access to data.

After whole encryption process was done, I shut my computer down and packed it in original box and sent it to manufacturer. Hopefully, I will get it back soon enough.

One Man's Bug, Another's Feature

My laptop gives me two possibilities of controlling sound. I can play it on laptop speakers and I can play it on headphones (with laptop speakers going mute as soon as I plug it in). I think that these are standard modes available on any laptop.

However, there was sound in my headphones even when I pressed mute button. I considered this a great feature! In normal muting scenario, laptop speakers would play as soon as I unplug headphones. In this scenario, I could have speakers muted and headphones working. I do lot of work during night and this feature ensured that, even if I unplug headphones by accident, no sound will be heard.

What I considered feature, someone considered a bug. I noticed new driver on Windows Update for my audio card and as soon as I installed it, my favorite feature was gone. Someone decided that this inconsistent behavior needs to be fixed.

Headphones are now also muted when mute button is pressed. I can use headphones in “standard” way of auto-muting laptop speakers when headphones are inserted, but that also means that, in case of unplugging, I have laptop speakers playing at full volume.

I could roll back to previous version of driver and this would work for a while. However, I will need to reinstall laptop sooner or later and at that point in time I will get newest drivers over Windows Update. And that will be sad day for me.

Hyper-V and Windows Server 2000

Illustration

I haven’t had this one in a while.

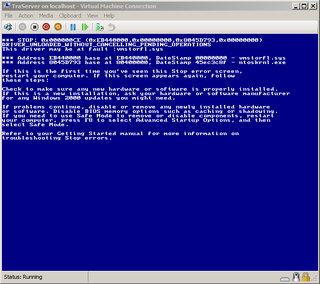
Once you install all updates available on Windows Update on your Windows Server 2000 under Hyper-V, this is what happens.

What have I done:

  • install Small Business Server 2000
  • start SBS setup to create domain and install SQL server component
  • install SQL Server 2000 Service pack 4
  • install SBS 2000 Service pack 1a
  • install Hyper-V Integration components
  • go to Windows Update and install all recommended updates (Express)
  • go to Windows Update and install all recommended updates (Express)

Crash happens after batch of 88 updates.

Installing Windows 7 From USB Drive

Illustration

Some time ago I wrote a post about installing Windows 7 from USB drive. Procedure wasn’t too complicated but it did require going into dark command line and playing with always risky DISKPART tool.

There is no need to do that any more since Microsoft released tool that will do that for you. You just need to download Windows 7 USB/DVD Download tool executable and run it. After short setup you are ready to go. In case of Windows XP, you will additionally need to install Image Master API (it will download and install itself - Internet connection is required).

Procedure is easy - just pickup .iso file, select destination (DVD or flash drive) and wait a little.

I could say that it would be nice to have that inside of Windows 7 itself, but that would be just nitpicking.

[2009-10-11: Tool is not available anymore. Microsoft pulled it from it’s site to check whether some GPL code was reused. From the looks of it, Microsoft did broke GPL license in this matter. Couldn’t company with that many developers find one competent enough to make this program or decent enough to keep original license?]

[2009-12-10: It took a while, but tool is available once again.]

Small Business Server 2000 in Hyper-V

Illustration

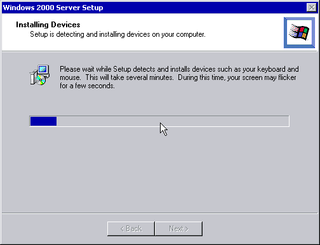
I was installing Small Business Server 2000 in Hyper-V Server 2008 R2 and I stumble upon small road-block. Once server came to “Installing Devices” part of installation, it just stayed there. No matter how long you wait, no progress will be made.

I tried with changing network adapters to legacy ones, removing network adapters, adding some memory, removing some memory… In short, I tried lot of things and it took me a while.

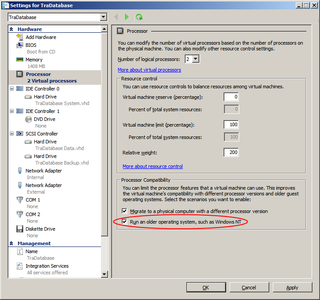
In order to emulate old hardware as much as possible, I decided to use “Run an older operating system, such as Windows NT”. It ends up that Small Business Server 2000 is quite allergic to that and once that was unchecked, everything went smoothly.

Illustration

While I know that Windows NT isn’t same operating system as Windows Server 2000, I figured that little bit of backward compatibility didn’t hurt anybody. However, in this particular case, it seems that same setting that makes Windows NT work properly is one that does quite the opposite for Windows 2000.

Additionally, since you cannot install Hyper-V integration services on original Small Business Server 2000, I decided to go with Legacy Network adapter instead of synthetic one. This may slow down things a little, but I figured that speed of new “virtual hardware” will make up for that.

Whole problem is that you need Service pack 4 to install synthetic network adapter. In order to install service pack, you need to install Small Business part of OS (otherwise it will get amnesia and forget that it is SBS). In order to install Small Business server, you need working network adapter (for domain). In order to have network adapter, you need to install service pack 4. You notice where this loop is going.

Legacy network adapter works perfectly and there is always an option to replace it with synthetic one if performance proves to be an issue.

P.S. Do notice that this might as well apply to Windows Server 2000 since they do share same code base.