Limiting Web Page Access To a Certificate
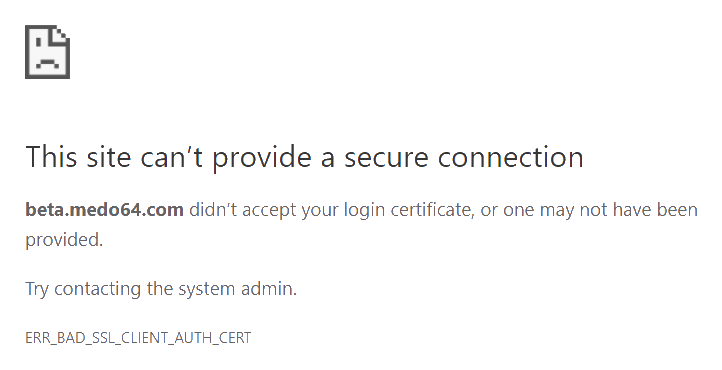
While my site is publicly accessible (as proved by the fact you’re reading this), I also have a few more private domains. Whether for stats or just testing, some areas are simply not meant for general public. My usual approach has been to simply turn on basic password authentication and call it a day.
But, as I serve as my own certificate authority, I started to wonder whether I can skip password altogether and rely on client-side TLS certificate.
The easiest approach is simply modifying virtual host section in httpd.conf to verify client certificate:
<VirtualHost *:443>
  …
  SSLVerifyClient require
  SSLVerifyDepth 1
  SSLCACertificateFile /srv/www/ca.crt
</VirtualHost>
However, this approach has downside of blocking every single file. If you are using Let’s Encrypt, congratulations, renewals are successfully blocked too. Since that is not really desired, a bit more complicated setup is needed.
Virtual host section remains almost the same, albeit with slight difference on where SSLVerifyClient is handled:
<VirtualHost *:443>
  …
  <Location "/">
    SSLVerifyClient require
  </Location>
  <Location "/.well-known/">
    SSLVerifyClient none
  </Location>
  SSLVerifyDepth 1
  SSLCACertificateFile /srv/www/ca.crt
</VirtualHost>
With these directives, your website is as private as you want it to be while still allowing Let’s Encrypt to work.
PS: To create a certificate, you can use my micro CA script. It supports both using centralized CA:
./microca.sh -s "CN=Something" -u client -q -x ^^MyCertificate^^Or self-signed certificate:
./microca.sh -s "CN=Something" -u client -q -x -p ^^MyCertificate^^PPS: Do not forget to load certificate into browser of your choice (or Windows Certificate Store).