Because some posts just refuse to be placed into a bucket

Replacing Glass on Casio Edifice EF-308D

Illustration

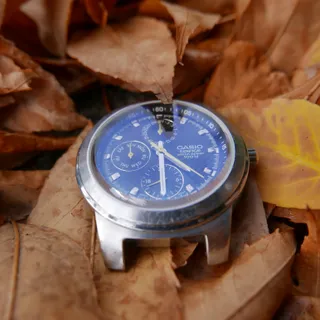
My beloved Casio Edifice has been on my wrist for years. And due to “gentleness” on my part, its mineral glass got scratched to the point of impacting readability. It was time for either a new watch or change of the glass. Guess which one I have chosen?

First task was the hardest - I had to find appropriately-sized replacement glass. Diameter was easy as you can measure it with calipers. Thickness was a bit more difficult. Someone doing it properly would disassemble the watch, remove crystal, and measure it. I just eyeballed it and decided that beveled 2.5 mm should fit just fine. And bevel did save me as its “unbeveled” height of 1.6 mm fits nicely in place of Casio’s 2 mm flat mineral glass.

For the new glass, I didn’t just want anything. I wanted to have sapphire as to minimize scratching in the future. And on that front I had choice between generic sapphire glass or a bit fancier AR coated ones. I went with blue AR coating as I felt it would bring a bit of pizzazz.

Once I received my glass, I was ready to begin with process. Instructions for it, of course, I found on YouTube. Disassembly went according to plan as soon as I took the bracelet off to ease handling. I used case opener to get the back off and then spent 10 minutes searching for a small hole to release the crown. With crown out the watch mechanism itself was trivial to remove.

All this was done while wearing finger cots (I find them much more comfortable than full gloves) and with occasional blow from dust blower. With quartz mechanism as one in this Casio, this might not be too important but I read too many horror stories about dust getting into gears so playing it safe seemed reasonable. To protect mechanism and avoid losing small parts I used a small plastic container.

Watch press was the most fidgety part of process because I had to find appropriately sized dies. Pains were worth it because glass did come out in a single piece despite the loud cracking noise.

As I have a good experience with silicon grease from my fountain pen hobby, I decided to get both case and the side of glass generously coated. Not sure whether my glass was better sized than one in video or due to silicone grease but glass was fitted on the first try. I found it so unbelievable that I had to check multiple times it’s really in and fitted straight. While grease probably did help with inserting it also meant I had to spend a few minutes cleaning the excess. Well worth if you ask me.

With glass mounted it was time to reassemble the watch. As expected, the same steps followed in reverse direction were all it took. In hindsight, I should have tested waterproofness before returning mechanism in but I simply forgot. In any case, my son has been wearing it while swimming in pool a few times already thus proving it’s reasonably waterproof. I wouldn’t bet on full 100 m rating though.

With sapphire replacement watch got a new lease on life and completely new look. Polishing the case would probably bring me a step further but I’ll save that for some later time. :)

Here is the list of all parts used in the course of swap. Note I didn’t actually buy all these things specifically for this project (e.g. Calipers, silicon grease, and figer cots I had from before) but I listed them anyhow.

PartPrice
Sapphire Crystal (CT003, AR coated, 31 mm x 2.5 mm)$ 30
Watch Press Set$ 16
Springbar Tool$ 5
Watch Case Back Opener$ 7
Silicone Grease$ 3
Finget Cots$ 2
Dust Blower$ 2
Plastic Storage Case$ 1
Calipers$ 27

PS: Albeit pronoun I is used all throughout this text, most of work was actually done by my son while I was providing paternal support in form of instructions and warnings. :)

Determining Windows 10 ISO Build

Illustration

Windows 10 releases are numerous. If you are using Microsoft Media Creation Tool to download ISOs, you know how hard is to track them. Fortunately, it is possible to get information about version from ISO file itself.

First order of business is mounting downloaded ISO file. It is as easy as double clicking on it.

Then find Setup.exe; right-click; Properties; and go to Details tab. There under product version you will find the build number - in my case it was 15063.

If you want to know more (e.g. which editions are present in .iso file) we need to open Administrator command prompt (or PowerShell) and run [dism](https://docs.microsoft.com/en-us/windows-hardware/manufacture/desktop/what-is-dism). I will assume, ISO is mounted as disk W: and that your download includes both 32-bit and 64-bit Windows. Adjust path to install.wim as needed.

dism /Get-WimInfo /WimFile:W:\x64\sources\install.esd
 Deployment Image Servicing and Management tool
 Version: 10.0.15063.0
 Details for image : W:\x64\sources\install.esd
 Index : 1
 Name : Windows 10 Pro
 Description : Windows 10 Pro
 Size : 15,305,539,033 bytes
 Index : 2
 Name : Windows 10 Home
 Description : Windows 10 Home
 Size : 15,127,824,725 bytes
 Index : 3
 Name : Windows 10 Home Single Language
 Description : Windows 10 Home Single Language
 Size : 15,129,601,869 bytes
 Index : 4
 Name : Windows 10 Education
 Description : Windows 10 Education
 Size : 15,125,050,322 bytes
 The operation completed successfully.

As you can see, this disk consists of four editions. Which one gets installed is determined based on your product key.

And you can go even further with investigation, if you give it index parameter:

dism /Get-WimInfo /WimFile:^^W:\x64\sources\install.esd^^ /index:^^1^^
 Deployment Image Servicing and Management tool
 Version: 10.0.15063.0
 Details for image : W:\x64\sources\install.esd
 Index : 1
 Name : Windows 10 Pro
 Description : Windows 10 Pro
 Size : 15,305,539,033 bytes
 WIM Bootable : No
 Architecture : x64
 Hal : 
 Version : 10.0.15063
 ServicePack Build : 0
 ServicePack Level : 0
 Edition : Professional
 Installation : Client
 ProductType : WinNT
 ProductSuite : Terminal Server
 System Root : WINDOWS
 Directories : 19668
 Files : 101896
 Created : 2017-03-18 - 19:40:43
 Modified : 2017-08-26 - 21:33:30
 Languages :
         en-US (Default)
 The operation completed successfully.

Seattle Code Camp 2017

Illustration

If all went as expected, my fourth visit to Seattle Code Camp is currently in progress and my second talk is winding down just about now. If you decided to see me talk among more than 70 talks in 11 parallel tracks - thank you!

If not, here is what you missed:

My first talk was about my experience with Microsoft’s project Centennial, a way to Windows Store for classic desktop applications. It was based on my experience with getting Bimil to Windows Store.

Second talk is a bit of copout as it is rerun of my talk from last year. And no, it is not completely the same. I added a bit more ranting. :)

Slides are available for download but they won’t be substitute for attending conference.

Amazon's Meow

Illustration

One day I was going over HTML elements on Amazon’s page and noticed one interesting comment. It was ASCII picture of a duck saying MEOW. Putting aside whether duck has capacity to produce that sound, I got curious why is that there? Is there a reason?

A bit of googling found me that MEOW is nothing new - it has been in code for at least 7 years now. However, duck seems to be appearing only since 2016. Despite all my searching I couldn’t really find what MEOW refers too nor why is duck now saying it.

My personal guess is that somebody was troubleshooting page loading and placed MEOW so it could automate it using grep command. Whether that troubleshooting happened in production (remember that Amazon wasn’t huge in 2007) or somebody accidentally pushed it live, we ended with the same result. I could bet Amazon developers noticed extra code quite quickly but nobody had heart to remove it. It was simply too funny. It became internal joke, an Easter egg.

Years later somebody working on that code portion saw it and though an update was in order. And how else would engineer express his love for fun other than in ASCII drawing?

PS: And it isn’t the first Easter egg coming from Amazon - who could forget “Thank You, David Risher” pun from 2007.

Seattle Code Camp 2017

Illustration

Seattle Code Camp organizers have finalized selection of this year talks and I am proud to say I got two sessions.

My first topic will be Crash Course In Foreign Language Support For ÜS Developer. If title looks familiar, it is actually a rerun of last year talk under, surprise-surprise, the same title. :) Of course, it won’t be exactly the same talk as session will be 15 minutes longer, and hopefully more polished.

My hope is that after this talk an average developer will understand different regional environments, how complicated stuff can get, what C# has to offer in regards to regionalization, where C# fails, and what are the most common mistakes.

Second session will be Path Over the Desktop Bridge, a suspenseful tale of desktop application visiting the Windows Store for the first time. I will talk about my experience, lessons learned, and how to talk with testers in 1000 characters or less. It will be wild ride of back and forth culminating in a happy ending. If this innuendo doesn’t peek your interest, I don’t know what will.

Seattle Code Camp will be held on Saturday, September 9th at Seattle University. You will be able to register for attendance soon.

[2017-08-10: Registration is now open.]

Cheap Cybersecurity Books

Those into cybersecurity, rejoice.

Humble has a new book bundle and, unlike their lately book offerings, this one is actually good and extremely cheap considering the books included. Frankly, it would be a good deal if only Applied Cryptography was included.

Yes, lowest tier is useless and middle tier essentially lives on Cryptography Engineering with Mitnik’s The Art of Deception adding a bit of flair.

But the most expensive $15 tier more than makes it up with Applied Cryptography, aged book that still somehow manages to stay current in the approach to security if not in all examples. And there is Secret and Lies proving that Schneier is getting all philosophical as he ages.

Based on my picks you can already see that they might have called this Schneier’s bundle and I would be equally interested. The only two books I wish were here are Applied Cryptography and The Twofish Encryption Algorithm (yes, I know how old it is).

If you have any interest in security do think about this bundle. Probably the cheapest (legal) way to get some real classic and a good read.

Watching Sector Count

[2021-03-01: If you have disk larger than 8 TB, a slightly different rules apply.]

Ever since I first dealt with RAID, I was taught and was witness to ugly fact that two disks marked with the same size might not be exactly the same. Even the same disk from the same manufacturer could have slight difference in number of sectors. And some manufacturers were notorious for this (yes, Sun/Oracle, I am looking at you.

It was common wisdom to always make RAID a bit smaller than your full drive size to accommodate for potential “shrinkage” in the future. And I was myself known to warn others. However, things change…

Believe it or not, these days all disks have completely standardized sector count. For 512b sector size, formula is:

97,696,368 + (1,953,504 * (CapacityInGB - 50))

For 4K sectors, formula is:

12,212,046 + (244,188 * (CapacityInGB - 50))

This is courtesy of LBA Count for Disk Drives Standard (LBA1-03) that is seemingly followed by all manufacturers. I couldn’t find a single drive not following this standard and I’ve tried.

What does this mean? It means, if you have drive that is manufacturer in last five years, you can forget about under-sizing your RAID. Any replacement drive you order will have exactly the same sector count as long as sector size is same.

PS: Find below table for disks with 4K sectors:

SizeLBA sector count
1 TB244,190,646
2 TB488,378,646
3 TB732,566,646
4 TB976,754,646
6 TB1,465,130,646
8 TB1,953,506,646

PPS: While these rules are valid for SSDs too, depending on their configuration (e.g., over-provisioning) exact sector count available to end-user might vary.

[2017-07-16: Added calculator]

GB
 

FRS Channel Expansion

If you are in USA and fan of walkie-talkie (aka FRS) radios, you can look forward to the additional 8 channels and higher allowed output power.

It used to be that FRS (Family Radio Service) had 14 channels shared with GMRS (General Mobile Radio Service) and GMRS had additional 8 to boost. With the new rules FRS and GMRS share all the 22 channels and their only difference remains allowed output power and bandwidth (25 vs 12.5 kHz). You can check RadioReference’s handy chart.

Additional notable change is how licencing is handled - gone are double purpose FRS/GMRS radios where the only difference was honesty of user. With the new rules FRS cannot be combined with GPRS in the same radio. Thus you won’t be able to boost power in FRS radios by just a change in settings. That will also make enforcing 12.5 kHz bandwidth more easier and it will make interfacing between FRS and GPRS much more annoying for inexperienced user.

While I am really pleased by expansion of FRS channels to what every radio on market already supported, I am sad that 12.5 kHz restriction remained when equivalent GMRS channels are 25 kHz. Why the hell not allow the same bandwidth?

In any case, these changes are mostly good and improvements are just codifying what people have been doing anyhow. Only if they could drop GMRS licence altogether… :)

Shimming Lumix Battery

Illustration

Due to various first-world problems, my wife and I ended up with two different Panasonic cameras. I use quite interesting LX100 while she strongly prefers FZ300 and zoom it brings.

FZ300 uses lithium-ion DMW-BLC12 battery (7.2 V, 1200 mAh, 36.0 x 48.0 x 16.8 mm) and comes with DE-A79 battery charger. My LX100 is a bit smaller and uses DMW-BLG10 battery (7.2 V, 1025 mAh, 37.0 x 42.0 x 14.1 mm) coming with a smaller DE-A99 charger. As you can see from measurement, it is not the same battery. And no, neither charger is designed to be universal.

However, pinout and voltage is the same on both and you can sort of get smaller LX100 battery into FZ300 charger. Unfortunately, as battery is shorter, it doesn’t stay in nor it charges. Only if I could find common house-hold item that could bridge that 6 millimeter gap in length…

Well, it ends up that 4.5 mm of USB connector is just enough for flexible pins on charger to make contact with battery. And my old SanDisk USB drive fits just right.

CR2032 With Wire

Booting my NUC I noted the following message:

The following are warnings that were detected during this boot.
These can be viewed in setup on the Event Log Page.
WARNING : CMOS Time Not Set

Oldsters keeping their machine longer than a few years are probably already yelling CR2032. And guess what - I had those ready to go. After opening NUC (darn IR window is really annoying to get out) I got into trouble as battery wasn’t in the holder. Nope, it was on the wire.

While you can hack the solution by simply soldering wires to the battery, I would recommend thinking twice about it. I have done it multiple times and it is not only annoying to solder onto whatever alloy battery is made of (no, it is not pure aluminium) but heating the lithum batteries significantly decreases their life.

As I didn’t know the type of connector of the top of my head I went over to Intel’s support pages and of course they had an article ready. It went even so far to actually specify connector as Molex 51020-0200. I couldn’t actually find such Molex connector but I’ve found 51021-0200 looking exactly the same. I guess not even Intel is immune to typos.

Armed with knowledge of connector, I went on Amazon hunt and found a few of them. Of course, I went with cheapest which at $5 is not really cheap at all. I guess you pay premium for that sweet cable.

Moments before plugging it in I noticed something disturbing. Black and red wires were swapped on my replacement battery as compared to the one I pulled out. I am not sure which one is more standard but Intel and Dell like to play on opposite side of spectrum. Plugging Dell battery into NUC would almost surely damage it as CMOS battery circuits are rarely protected against reverse polarity. It was a time for surgery.

Using small blade (scalpel actually) I gently lifted plastic holding each terminal in the housing and pulled them out. Done gently enough this enables reinsertion of the terminals into the housing with the black wire at position #1 - the same as used in NUC.

This whole battery swap took way longer than it should have but at least my BIOS complains no more. :)

PS: Since computer was plugged in at all times, I find it really strange to have battery fail on me after only three years. I have way older machines with their original battery still working…