Setting up [Mikrotik](https://mikrotik.com) devices

Adding WinBox to Ubuntu Applications Menu

Illustration

If you need to run Mikrotik’s WinBox under Ubuntu, solution is wine and 64-bit WinBox download. It works, as far as I can tell, flawlessly. However, I found dropping to command line every time I want to run it, a bit annoying.

Adding WinBox to activities is a two step process. The first step being creation of winbox.desktop file. In its simplest form it can look something like this

[Desktop Entry]
Type=Application
Name=WinBox
Exec=wine ^^/home/user/Apps/winbox64.exe^^

Then, to get application officially registered, we just need to let system know about it:

sudo desktop-file-install winbox.desktop

And this is all it takes for WinBox to find it’s home among other applications.

Attacking WPA2 PSK And Mikrotik Fix

Illustration

With everybody awaiting WPA3, it’s easy to miss improved WPA2 attacks. Up until recently cracking the WPA2 with pre-shared key required online attack. Well, not anymore.

This new attack doesn’t even require waiting for 4-way handshake - essentially all you need is a few minutes of passive traffic, minimal amount of luck, and a bit of alone time to crack the key - offline. If you are willing to go active capture time goes down to a second and no luck is involved. The only real challenge is offline cracking - and there is no time pressure here.

Without going into too many details, issue is in optional PMKID field that does come in handy for roaming support. Unfortunately, for most routers, PMKID gets sent even if roaming option is off.

There are two “fixes” for this. The obvious one is to increase complexity of your pre-shared key while avoiding ones present in the precalculated SHA-1 tables. We are still talking about brute forcing SHA-1 hash - a non-trivial task if you have long and random password.

Second approach is to disable PMKID field and that would require you to upgrade router’s firmware. Fortunately for me, Mikrotik already has a fix available and thus avoiding it as easy as selecting to Disable PMKID.

Mind you, that’s not absolute protection as weak passwords are still vulnerable no matter how you cut it. But this does prevent offline attack.

Wireless X-Box 360

My only console - X-Box 360 - is a bit aged by any standard. I don’t find that too bothersome except in one aspect - network connection. Being aged means it has only wired ethernet. Considering I “bought it” for actual cost of $0, paying $50 for wireless adapter would be a bit of a premium.

Fortunately, I had Mikrotik mAP Lite lying around. It’s a small device with 2.4 GHz and a single 100 Mbps RJ-45 Ethernet connector. While not obviously designed to be a wireless client, its powerful software does allow for this.

The very first step is not only resetting Mikrotik mAP lite configuration but actually deleting it fully. Either using System, Reset Configuration, and selecting No Default Configuration or going via terminal is equally good:

/system
reset-configuration no-defaults=yes

Starting with the blank slate would be problematic for many devices, but not Mikrotik as one can always use WinBox and its neighbor search option to connect using MAC address.

On the empty device, the first step is creating the security profile and connecting to the wireless via the bridge. In my case I used WPA2 and with n-only wireless. While default of b/g/n (2.4ghz-b/g/n) does offer a bit more flexibility when it comes to compatibility with other devices, using n-only does help with network’s speed (e.g. beacons are always transmitted at the slowest speed standard allows). Of course, you will also need to know the wireless SSID.

In the Mikrotik’s language these steps can be expressed with the following commands:

/interface wireless security-profiles
add name=security-profile authentication-types=wpa2-psk mode=dynamic-keys \
    wpa2-pre-shared-key=^^KEY^^

/interface wireless
set [ find default-name=wlan1 ] disabled=no band=^^2ghz-onlyn^^ frequency=auto \
    mode=station-pseudobridge security-profile=security-profile ssid=^^SSID^^

The only thing remaining is creating the bridge and putting all devices into it.

/interface bridge
add name=local-bridge

/interface bridge port
add bridge=local-bridge interface=wlan1
add bridge=local-bridge interface=ether1

Connecting Mikrotik’s mAP to X-Box via RJ45 and USB cable (for power) will now dutifully transfer all the packets via the wireless interface.

Setting IPv6 on Mikrotik

If your ISP offers IPv6 and you have Mikrotik router, it would be shame not to make use of it. My setup assumes you get /64 prefix from your ISP (Comcast in my case) via DHCPv6. Also assumed is empty IPv6 configuration.

First I like to disable default neighbor discovery interface. Blasting IPv6 router advertisements on all intefaces is not necessarily a good idea:

/ipv6 nd
set [ find default=yes ] disabled=yes

Next step is to setup DHCP client. Withing a few seconds, you should see the prefix being allocated:

/ipv6 dhcp-client
add add-default-route=yes interface=ether1 pool-name=^^general-pool6^^ request=prefix
:delay 5s
print
 Flags: D - dynamic, X - disabled, I - invalid
  #    INTERFACE             STATUS        REQUEST             PREFIX
  0    ether1                bound         prefix              ^^2601:600:9780:ee2c::/64^^, 3d14h41m41s

At this time I love to allocate address ending with ::1 to the router itself:

/ipv6 address
add address=::1 from-pool=^^general-pool6^^ interface=^^bridge1^^ advertise=yes

Now it should be possible to ping its address from external computer (in this example address would be 2601:600:9780:ee2c::1). If this doesn’t work, do check if you have link-local addresses. If none are present, reboot the router and they will be regenerated.

With router reachable, it is time to delegate IPv6 prefix to internal machines too. For this purpose, setup RA (router announcement) over the bridge. While default interval settings are just fine, I like to make them a bit shorter (20-60 seconds):

/ipv6 nd
add interface=^^bridge1^^ ra-interval=20s-60s

And that’s all. Now your computers behind the router will have direct IPv6 route to the Internet. Do not forget to setup both router firewall and firewall of individual devices. There is no NAT to save your butt here.

PS: Here is the basic IPv6 firewall allowing all connections out while allowing only established back in:

/ipv6 firewall filter
add chain=input action=drop connection-state=invalid comment="Drop (invalid)"
add chain=input action=accept connection-state=established,related comment="Accept (established, related)"
add chain=input action=accept in-interface=ether1 protocol=udp src-port=547 limit=10,20:packet comment="Accept DHCP (10/sec)"
add chain=input action=drop in-interface=ether1 protocol=udp src-port=547 comment="Drop DHCP (>10/sec)"
add chain=input action=accept in-interface=ether1 protocol=icmpv6 limit=10,20:packet comment="Accept external ICMP (10/sec)"
add chain=input action=drop in-interface=ether1 protocol=icmpv6 comment="Drop external ICMP (>10/sec)"
add chain=input action=accept in-interface=!ether1 protocol=icmpv6 comment="Accept internal ICMP"
add chain=input action=drop in-interface=ether1 comment="Drop external"
add chain=input action=reject comment="Reject everything else"
add chain=output action=accept comment="Accept all"
add chain=forward action=drop connection-state=invalid comment="Drop (invalid)"
add chain=forward action=accept connection-state=established,related comment="Accept (established, related)"
add chain=forward action=accept in-interface=ether1 protocol=icmpv6 limit=20,50:packet comment="Accept external ICMP (20/sec)"
add chain=forward action=drop in-interface=ether1 protocol=icmpv6 comment="Drop external ICMP (>20/sec)"
add chain=forward action=accept in-interface=!ether1 comment="Accept internal"
add chain=forward action=accept out-interface=ether1 comment="Accept outgoing"
add chain=forward action=drop in-interface=ether1 comment="Drop external"
add chain=forward action=reject comment="Reject everything else"

Configuring Classless Static Route Option

If you want to push routes to your client, the easiest way to do so would be adding a classless static route (DHCP option 121) as defined in RFC 3442. Every router has their way of setting these but usually they have one thing in common - you must do so manually. And yes, if you make a single mistake, your Internet connectivity will be lost.

Issue of easy entry has bothered me for long enough to actually do something about it. Below find classless static route option calculator. Just enter routes you want and you will get their hexadecimal representations.

NetworkGateway
Default
DHCP option 121:
OpenSense/Ubiquiti notation:
Mikrotik code:

[2019-12-13: Updated script to have default route first (workaround for Ubuntu 19.10 Server).] [2020-12-26: Added OpenSense/Ubiquiti notation.] [2022-07-22: Fixed to allow for /32 network.]

Adding Domain Search Option to Mikrotik DHCP

Illustration

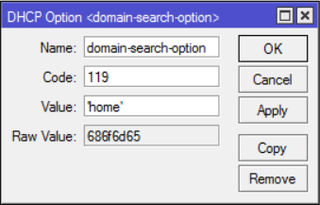
I already wrote about using Mikrotik’s DNS to resolve a short name lookup in Windows. And there I noted that domain-name DHCP option seemingly has no effect on Linux. Well, let me introduce you to domain search option.

Most of the Linux/Unix based operating systems, whether it is Linux, FreeBSD, or MacOS support arguably a more proper way to define which domain we are referring to when using a single word host name.

To define suffix for domain search, just add option 119:

/ip dhcp-server option
add name="domain-search-option" code=119 value="'^^example^^'"

And of course add this option to DHCP network:

/ip dhcp-server network
set 1 dhcp-option=domain-search-option

PS: And no, you cannot use this instead of domain-name. Windows clients only support domain-name while Linux/Mac only supports domain-search option.

Using Mikrotik DHCP to Disable NetBIOS Over TCP/IP

If your network is a bit too chatty and you decide to go without NetBIOS, that is easy to do if you have Windows Server. A click or two will get you there. Fortunately, if you have your DHCP server on Mikrotik, it is not much more difficult.

First we need to create Microsoft Disable NetBIOS Option itself:

/ip dhcp-server option
add code=43 name=microsoft-disable-netbios-option value=0x010400000002

And then we simply assign it to given DHCP network:

/ip dhcp-server network
set 1 dhcp-option=microsoft-disable-netbios-option

To verify, simply use ipconfig on windows computer:

ipconfig /all
 …
   NetBIOS over Tcpip. . . . . . . . : Disabled

PS: Do note that really old client computers (e.g. Windows 2000) will have issues with network browsing.

Whitelisting on CAPsMAN

I love Mikrotik’s CAPsMAN. A beautiful way to control and automatically provision wireless interfaces over multiple Mikrotik routers.

It is not perfect - one of the more annoying absences is the default channel list (albeit you can create your own channels) and lack of the whitelisting for the AP clients. Unlike with the standard Mikrotik interface, you cannot simply make configuration where registrations would be disabled by default.

However, there is one nice trick you can do. Under CAPsMANConfigurations adjust VLAN Mode to use tags and set VLAN ID to some unused number (my favorite is 4094). This will cause all wireless traffic using that configuration to be tagged with otherwise unconfigured number. In effect we are blackholing all the traffic with that VLAN ID.

Now under CAPsMANAccess List you can add any allowed client with VLAN Mode set to “no tag” (or, if you are using VLANs, to a configured VLAN ID). This will override setting from the configuration and thus only devices explicitly listed will have their packets processed.

I admit, it is not as flexible as rejecting registration but absence of any communication is usually a good signal that one needs to move to another network.

PS: Whitelisting AP clients doesn’t necessarily improve your security. Do not rely on it as a security feature.

Creating Mikrotik's VPN Certificates With OpenSSL

What would be use of having your own certificate authority if one couldn’t use it to create Mikrotik-compatible OpenVPN or SSTP certificates?

Since we are our own CA we always start with creation of certificate signing request. For server certificate just take care CN matches whatever external domain you will be using to access your router (important for SSTP). All other values fill (or leave blank/default) at will:

openssl req -new -key server.key -sha256 -out server.csr
 Country Name (2 letter code) [AU]: .
 State or Province Name (full name) [Some-State]: .
 Locality Name (eg, city) []: .
 Organization Name (eg, company) [Internet Widgits Pty Ltd]: .
 Organizational Unit Name (eg, section) []: .
 Common Name (e.g. server FQDN or YOUR name []: *.example.com
 Email Address []:`` ^^.^^

Well, now we can use this request against a CA to get ourselves a sweet signature. For my case, I have a ghetto CA setup so all signing will be done in a single albeit a bit long line. Notice I manually specify the key usage - important for OpenVPN:

openssl x509 -req -CA ca.cer -CAkey ca.key -set_serial 0x$(openssl rand -hex 16) -days 3650 -extfile <(echo -e "keyUsage=digitalSignature,keyEncipherment\nextendedKeyUsage=serverAuth") -in server.csr -out server.cer

A few password prompts later and we have ourselves a signed server certificate.

Now we need to repeat these steps with a slight modification if a client certificate is needed too. Essentially the only difference is in key usage and common name:

openssl req -new -key client.key -sha256 -out client.csr
 Country Name (2 letter code) [AU]: .
 State or Province Name (full name) [Some-State]: .
 Locality Name (eg, city) []: .
 Organization Name (eg, company) [Internet Widgits Pty Ltd]: .
 Organizational Unit Name (eg, section) []: .
 Common Name (e.g. server FQDN or YOUR name []: client.example.com
 Email Address []: .
openssl x509 -req -CA ca.cer -CAkey ca.key -set_serial 0x$(openssl rand -hex 16) -days 3650 -extfile <(echo -e "extendedKeyUsage=clientAuth") -in client.csr -out client.cer

Once done and copied to router, on Mikrotik we only need to import CA, server and client certificate along with server’s private key:

/certificate import
 passphrase: ***********************************
      certificates-imported: 3
      private-keys-imported: 1
             files-imported: 3
        decryption-failures: 0
   keys-with-no-certificate: 0

Once imported we only need to adjust VPN server setup in PPP menu on Mikrotik and configure our clients as discussed in previous posts (OpenVPN/SSTP).

Mikrotik Configuration Backup

For start, I will assume that SSH user with appropriate rights is already configured as described in one previous blog post. From there getting Mikrotik’s configuration is easy:

ssh backup@192.168.88.1 "/export"

However, there are a few things wrong with it. First of all, all lines end with CRLF instead of more conventional LF (at least in the world of Linux/Unix). Fortunately this is easily fixed:

ssh backup@192.168.88.1 "/export" | tr -d '\r'

Next you will notice that exported config has a line continuation character (\) on its longer lines. While this is nice for viewing config, if we are to automatically process result with diff it is better to have each configuration line on its own. Getting Mikrotik to stop wrapping lines under all terminals is pretty much impossible, even using the +t4200w trick. However, sed can do wonders with enough cryptic code:

ssh backup@192.168.88.1 "/export" \
  | tr -d '\r' \
  | awk '{sub(/^ +/, "", $0); if (sub(/\\$/,"")) printf "%s", $0; else print $0}'

And finally, you might notice there is a time on top of the exported script. This, usually a handy information, will cause any automatic diff to always find a difference. So, removing it is in order:

ssh backup@192.168.88.1 "/export" \
  | tr -d '\r' \
  | awk '{sub(/^ +/, "", $0); if (sub(/\\$/,"")) printf "%s", $0; else print $0}' \
  | sed "s/^#.* by RouterOS/# RouterOS/"

With this we have a nice, repeatable, and diff-friendly configuration exported.

PS: If you are wondering why I am not using dos2unix, it is because I wanted code to run on NAS4Free that has quite restricted command line.