Setting Up Private Internet Access on CentOS 6.4
I am a big fan of Private Internet Access. It gives you anonymous and secure connection to Internet. I personally value my privacy and thus I find such VPN service very valuable.
Under Windows and huge variety of alternate platforms (Android, iOS, Ubuntu, …) installation is very simple and it hardly ever fails. But some platforms don’t come with instructions. Unfortunately one of them is CentOS. Fortunately, setting it all up is not that hard.
First we can do the easy stuff. Download PIA’s OpenVPN configuration files and extract it to directory of your choice. I kept them in /home/MyUserName/pia.
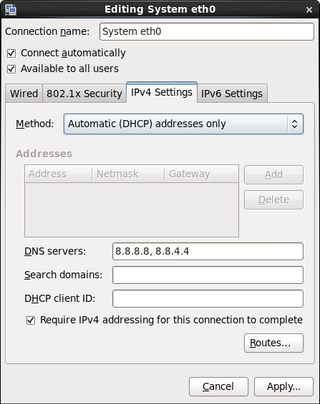
Next easy step is setting up DNS resolving. For that we go to System, Preferences, Network Connections. Just click edit on connection you are using and go to IPv4 Settings tab. Change Method to Automatic (DHCP addresses only). Under DNS servers enter 209.222.18.222 209.222.18.218 (Private Internet Access DNS).
All other commands are to be executed in terminal and most of them require root privileges. It might be best if you just become root for a while:
su - rootCentOS repositories are not known for their extensive software collection. But we can always add a repository of our choice:
wget http://dl.fedoraproject.org/pub/epel/6/i386/epel-release-6-8.noarch.rpm
rpm -Uvh epel-release-6-8.noarch.rpm
This repository has OpenVPN package that we need:
yum install openvpnNext step is getting configuration in place (replace username and password with yours):
cp /home/MyUserName/pia/ca.crt /etc/openvpn/ca.crt
cp /home/MyUserName/pia/US\ Midwest.ovpn /etc/openvpn/client.conf
echo "auth-user-pass /etc/openvpn/login.pia" >> /etc/openvpn/client.conf
echo "username" > /etc/openvpn/login.pia
echo "password" >> /etc/openvpn/login.pia
Now we can test our connection (after we restart network in order to activate DNS changes):
service network restart
openvpn --config /etc/openvpn/client.conf
Assuming that this last step ended with Initialization Sequence Completed, we just need to verify whether this connection is actually used. I found whatismyipaddress.com quite helpful here. If you see some mid-west town on map, you are golden (assuming that you don’t actually live in US mid-west).
Now you can stop test connection via Ctrl+C in order to properly start it. In addition, you can specify it should start on each system startup:
service openvpn start
chkconfig openvpn on
And that is all.
