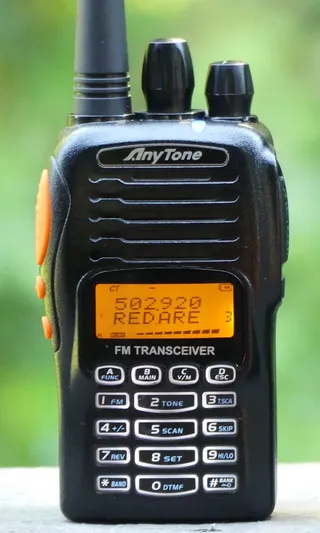
After my Baofeng UV-82HP got banged a bit, I needed a new radio. By pure accident I’ve stumbled upon wouxun.us pages with a wide selection of Anytone radios. Loving airports and all related, I’ve got tickled by built-in AM band immediately. So I decided to go for dual-band Anytone AT-3318UV-D.
First thing I’ve noticed is that radio is much smaller than Baofeng even though it comes in bigger box. Contents are pretty much same: radio, antenna, battery, belt clip, charger, and DC adapter. Anytone additionally has lanyard while Baofeng goes an extra mile and includes a headset.
Anytone looks a bit sturdier than Baofeng, probably due to a smaller build, but I find them comparable as neither is really meant for rough handling. Battery and clip mounting are done much better on Baofeng where I found battery was impossible to remove by accident. Anytone doesn’t instill the same confidence. Further they’ve decided to mount clip on the battery instead of phone body. I find this rather weird and annoying, especially in light of having multiple batteries - each having its own clip ensures you cannot store them easily.
Chargers look equally flimsy and both have possibility to charge battery without the phone. Annoyingly Baofeng uses 10 V as input voltage and thus makes it hard to find a replacement adapter. It did work with 9 V for me but your mileage might vary. Anytone uses pretty much standard 12 V for its chargers and thus earns mega points from me.
Keypad on both uses standard 3x4 numerical layout with additional top row being used for various functions. Main Anytone advantage is having back-lit keys. If you often work in low-light situations this is awesome. On other hand its center number column is wider than ones on side, just showing it is impossible to have a standard keypad without designers screwing around at least a bit.
Baofeng has a dual PTT key, FM radio, and flashlight control on side while Anytone has a single PTT and two programmable buttons with limited function selection. I like having one of them dedicated to momentary squelch off and I prefer leaving the other one unassigned. While I was tempted to assign it as PTT for secondary channel, I rarely used that functionality on Baofeng and what I really missed was a key that does nothing except turning on the display backlight. If you leave it unassigned that is exactly what you get.
Top on Baofeng has power/volume knob and flashlight along with a handy lights showing which channel you are receiving signal from. Anytone has the same power/volume know and additionally brings another knob for rotary channel selection - that works beautifully. It is a bit strange decision to have only single receive LED (in two colors) when you can really simultaneously receive signal from two bands but I so rarely use this (or even see it in daylight) that I don’t really care. Although flashlight wasn’t really strong with Baofeng it did come in handy couple of times. No such thing on Anytone.
Specification-wise, advantage in power should go to Baofeng as it has stronger 8 W radio. However, Anytone pretty much held its own on both receive and transmit side. All repetitors I’ve used with one I could listen to with other and I had similar experience on transmit side. As my Baofeng was already damaged at the time, I cannot draw any finite conclusions but difference in performance is small if there is any.
Both support dual-band operation (136-174 MHz, 400-520 MHz) with Anytone having dual-transceiver instead of the more common dual-watch. Regardless, most of the time both worked equally good for me but for the Anytone allowing scanning and holding a conversation at the same time. It definitely offers a greater flexibility especially combined with MUCH faster scanning Anytone offers. Cherry on the top is possibility to scan CTCSS/DCS tones too - a function I haven’t noticed present on Baofeng. Although with Baofeng’s complicated menu system one can never know where everything is.
Speaking of the menu system, Anytone is a first Chinese radio I’ve used that actually has interface meant for humans. Options reachable directly from keypad are reasonably well selected and menu is good enough that you probably won’t need instructions even if you try to program all channels by hand. Setting up channel purely from handset is something that is impossible to do on Baofeng. Yes, option is technically there but it is really painful to use. Only Baofeng advantage here is allowing for seven characters in channel name instead of Anyone’s six.
Saving grace for Baofeng is Chirp. It is an open-source solution allowing for reasonably comfortable memory programming of multiple devices, including pretty much all Baofeng models. Anytone has its own solution that works badly to say the least. Yes, technically all settings are there but it is hard to say anything good about the interface not allowing for Copy/Paste. Anytone needs Chirp support and it needs it soon.
Both Anytone and Baofeng support FM broadcast band (65-108 MHz) but Anytone actually comes on top courtesy of allowing you to save channels in memory. How this is not supported on Baofeng is beyond me. Anytone additionally offers receive on AM aircraft band (118-136 MHz) strangely hidden behind the FM key. If you are next to a big airport, this one is a gem. Yes, I know you can listen to tower control online, but it is not the same.
Anytone goes even further with support for both shortwave (2.3-30 MHz) and longwave (520-1710 kHz) AM band. This is of limited use as not only antenna it comes with is completely unsuitable but these bands rarely have anything of interest. Yes, one might argue that Anytone’s definition of longwave actually also contains frequencies most commonly known as mediumwave where commercial AM stations live, but it will be a sad day when you actually go hunting for those.
This comparison might not be completely fair as Baofeng UV-82HP is only $60 while Anytone is about three time as much so I struggle to unconditionally recommend it. I find Anytone is the better radio by far but Baofeng will bring you 90% of the way. Best example is Anytone supporting proper narrow band FM. Yes, if other side is transmitting such signal you can often hear the difference as compared to Baofeng. But, guess what, most of the time everybody just uses 25 kHz FM anyhow.
On the other hand, Anytone is much more enjoyable to use as compared to Baofeng. I find it infinitely better when I am away from computer and I cannot get frequencies of repeaters in the area in advance. Not only you can quickly scan around to see which frequencies are in use but you can scan for CTCSS code they use and join the chat. And let’s not forget backlit keys and the awesome aircraft AM band.
PS: Do notice that author of this article is beginner ham at best. I find both devices are appropriate for such - these are not fancy radios nor you should expect wonders for this price.