Limiting Bandwidth on MAP Lite
As I wanted to have a separate wireless network for few of my IoT experiments and taking into consideration how secure IoT devices are (hint: not secure at all), I decided to go with a mini access point. Securing IoT gets much easier with a separate physical device.
Device had to be 2.4 GHz AP, allow for remote management, and cheap. One beautiful device matching all criteria was MikroTik mAP lite. Mikrotik devices are usually more of an European thing and, compared to other wireless devices, a bit harder to obtain in States. For example, I bought mine from ICD Group because Amazon didn’t carry any.
I haven’t used MikroTik for a while now but I remembered its WinBox interface fast enough. And I remembered how it saves its settings immediately thus punishing you for any error. It is definitely not the most friendly user interface nor I can call it excellent for beginners. But it is powerful enough to be worth learning.
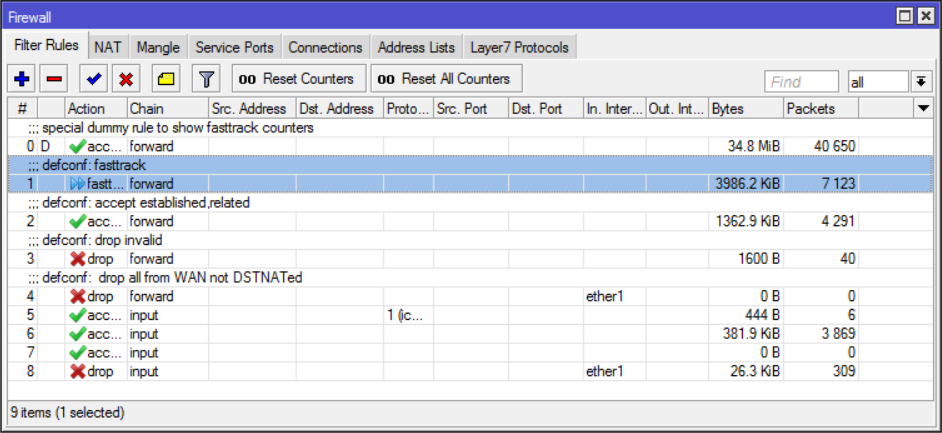
Anyhow, with basic configuration done I wanted to limit upstream bandwidth toward my main router. From Queues menu I just added new queue, set Target to “ether1”, and assigned Max limit for both upload (256 kbit/s) and download (64 kbit/s). Short speed test later and I was confused. Speed wasn’t being restricted at all. And traffic figures were unreasonably low. Something weird was going on.
A bit of troubleshooting and I found the culprit. Once I changed in IP->Firewall the defcon entry from “fasttrack connection” to “accept”, my queue started limiting as it should.