Black Screen on Boot After Enabling ReFS

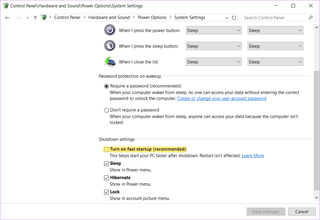
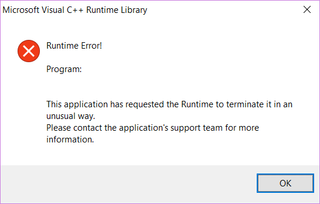
After playing with ReFS a bit, time came for Windows update restart. After initial second or so of booting screen blanked and stayed that way. I waited and waited but there was neither screen nor disk activity. And same thing happened every time I rebooted.

And it got frozen at the worst spot. I have a dual boot and freeze happen to be just before OS selection screen. With one error both installations were dead. And since I used BitLocker on both I wasn’t really in the mood for recovery.

Fortunately, after turning off system few times during boot, I got into Automatic Repair prompt. I entered BitLocker key for my main OS and proceeded with Advanced Options. There I just selected Continue (Exit and continue to Windows 8.1). While this should have technically been exactly the same boot, it was different enough that it actually worked. And then, as soon as system booted up, I removed ReFS capability (this registry file) and rebooted again. All came back successfully.

PS: Even when ReFS functionality is “turned off” you can still use existing ReFS disks. You just cannot format new ones.

VHD Attach 4.00

Illustration

After a really long hiatus, there is an update for VHD Attach.

First change that everybody will notice are new icons. Due to their monochrome nature it will probably be a love-hate relationship but they do come in multiple sizes as a saving grace. While VHD Attach has supported high-DPI scaling for a while now, it always did that with the cost of blurry toolbar icons. With all sizes I have these icons in, blurriness won’t be a problem for a while.

Another big news is improved support for VHD on ReFS formatted drives. Main driver here was issue that Microsoft API does not support virtual disk file with ReFS integrity streams and there is no practical way around it. However, you can use API to remove integrity stream on per-file basis. When VHD Attach opens virtual disk it will offer to automatically remove integrity stream and allow you to attach it. Yes, you could have done this yourself but this is a time saver.

Other changes include few bugfixes that will help GUI not to crash as much. Quite a few of them are long overdue.

As usual you can upgrade from within application itself or grab a setup from these pages.

Enjoy.

[2015-04-09: Of course, there was a bug in high-DPI code. Version 4.01 is out.]

Using C# to Remove ReFS Integrity Stream

Illustration

As I moved my data drive to ReFS, I was faced with a problem of removing integrity stream for virtual disks. For performance reasons Microsoft doesn’t work with ReFS integrity streams and thus I had to disable it for all VHD files I had.

Since I use my own VHD Attach to attach disks, I also wanted to integrate removal of integrity stream upon opening the disk. And that meant C# solution was strongly preferred. As functionality is rather new, Windows API was the only way.

First course of action is, of course, to open the file. Only important thing is to have have both read and write access:

var handle = NativeMethods.CreateFile(
    fileName,
    NativeMethods.GENERIC_READ | NativeMethods.GENERIC_WRITE,
    FileShare.None,
    IntPtr.Zero,
    FileMode.Open,
    0,
    IntPtr.Zero);

Once we have a handle, we can can use DeviceIoControl to set checksum type to none.

var newInfo = new NativeMethods.FSCTL_SET_INTEGRITY_INFORMATION_BUFFER() {
    ChecksumAlgorithm = NativeMethods.CHECKSUM_TYPE_NONE
};
var newInfoSizeReturn = 0;

NativeMethods.DeviceIoControl(
    handle,
    NativeMethods.FSCTL_SET_INTEGRITY_INFORMATION,
    ref newInfo,
    Marshal.SizeOf(newInfo),
    IntPtr.Zero,
    0,
    out newInfoSizeReturn,
    IntPtr.Zero
);

Those two simple commands are all that takes. Sample (with actual API definitions) is available for download.

And rant for the end - it was annoyingly hard to find resources for this. Yes, some resources do exist (albeit without examples) but to find them you need to know what you are searching for. Since I knew Set-FileIntegrity PowerShell cmdlet does it somehow, I used Process Monitor tool to capture what exactly was happening. There I got a hint toward DeviceIoControl function and things got a bit easier. To keep it a bit interesting, documentation also lies that “The integrity status can only be changed for empty files.” Only confidence in Process Monitor’s capture kept me going in that direction.

Maybe it is me getting older but I have a feeling Windows API documentation is getting worse and worse. I hated Windows 7 documentation for virtual disk support and I thought that was the lowest quality Microsoft can do. But not much seems improved with newer versions. Gone are the times when new feature would get an example or two and more than a blog post as a design document.

I believe ReFS should deserve more.

ReFS on Windows 8.1

Illustration

I am a big fan of ZFS and I run it on my main file server. It is mature, stable and its syncing feature is a thing of beauty. Regardless, I decided that a new file server for my kids would use Windows 8.1 (yes, I know that is not a server OS). And I figured it is about a time I tried ReFS - a Windows ZFS alternative.

Feature-wise ReFS is definitely an improvement over NTFS. For one it finally includes checksum. It is mandatory on metadata with an option to enable it for user data (integrity streams feature). It is not as fool-proof as SHA-256 ZFS uses, but it is good enough for error detection. And (almost) all volume fixing is done online - no more reboots to CHKDSK. But you cannot use it as boot drive.

Compared to ZFS there are also quite a few things missing. There are no datasets, there is no parity (without Storage Spaces), there is no compression, and there is no sync (I’ll miss that the most). Main improvement (in my opinion) lies in self-management for all things ZFS requires you to micro-manage. Dcrub is self scheduled, memory is handled dynamically, caching just works… While ZFS can be optimized to a specific load a bit better (especially with SSD cache) I didn’t find myself depending on these features that much - especially when setting up client system.

While Windows 8.1 does support ReFS, you cannot just format drive with it - that would be to easy. First you need to create DWORD registry entry AllowRefsFormatOverNonmirrorVolume under HKEY_LOCAL_MACHINE\SYSTEM\CurrentControlSet\Control\MiniNT and give it value of 1. Or you can import this pre-prepared registry file to do it for you.

Now Explorer will let you format drive but it will do so without integrity streams. Without Storage Spaces, you might not benefit fully as it will only detect corruption without repairing it so that might be as good default as any. As I am a huge believer in copy-on-write, I decided to go to command line and get it enabled:

FORMAT E: /FS:ReFS /Q /I:enable

As format completes don’t forget to remove registry entry you created as it can prevent System Restore working properly and dual boot might act a bit funny. Again, you can go into Registry Editor and delete it manually or you can just import this registry file. ReFS will still work just fine - you just won’t be able to format new drives.

Mostly everything works as expected. Besides the peace of mind I get from having my data checksummed I didn’t notice much difference. Things work as they did before. Depending on the exact data set it might have been a bit faster but it is hard to tell considering it was a fresh drive. Good news is that it is not slower.

Some programs might complain, most notably Google Drive - mind you not because ReFS is not working nor because Google Drive uses something special - it is just because its programmers are lazy hardcoding bunch.

Of course it would help if Microsoft’s own Hyper-V would work properly with integrity streams. While not as annoying as with Google Drive, Hyper-V virtual disks on ReFS do need a special attention. Yes, there might be valid performance reasons but warning message would do same as completely preventing virtual machine from starting. Fortunately fixing is as easy as disabling integrity on a single file:

Set-FileIntegrity -FileName E:\My.vhdx -Enable $False

I find ReFS really refreshing and promising file system. I can only hope that, with time, Microsoft will get this feature properly supported in its client OS. Who knows, maybe I get to install Windows 10 on ReFS boot drive. :)

Date in a MPLAB Hex File Name

Illustration

Every compilation in MPLAB results in the same file - Source.production.hex (yes, assuming you are not doing debug build). This is perfectly fine if we want to program it immediately. However, what if we need to store files somewhere else and, god forbid, under different name?

Answer is simple enough. Under Project Properties, Building there is a post build step option. Enable it and get code for copy in. In my case, I wanted to have hex file copied to Binaries directory:

${MKDIR} "Binaries" && ${CP} ${ImagePath} "Binaries/Whatever.${OUTPUT_SUFFIX}"

But simple copy is not necessarily enough. It would be great if we could include date in the file name. And there problems start - there is pretty much no documentation for build commands at all. Only way to figure things out is to see how they are setup by the platform itself in nbproject/Makefile-default.mk and nbproject/Makefile-local-default.mk. To cut a long story short, there is a way to get output from external command. Just wrap any command in completely unexpected $(shell ) pseudo-variable.

In order to get actual date I prefer using code>gdate (comes with MPLAB installation). Using it our line becomes:

${MKDIR} "Binaries" && ${CP} ${ImagePath} "Binaries/Whatever.$(shell gdate +%Y%m%d).${OUTPUT_SUFFIX}"

Finally after build we will have both our usual Source.production.hex and also a copy of it under Whatever.20150128.hex.