Creating hardware projects usually involves a lot of time spent creating PCB design and then even more deciding which prototype service to use. When PCBWay approached me to consider their service, all I could say is heck yeah. :)
The first thing you’ll experience ordering boards from them is a page full of options. While you can select a few simplified “deals” from main page, they will all bring you to this page for customization. And you can customize a bunch. It’s like a prototype service on steroids.
You can select number of layers (up to 14), material (including flex construction), board thickness (0.4 to 2.4 mm), copper thickness (1 to 4 oz), and surface finish (including hard gold - great for edge connectors). Yes, not all combinations are supported at the same time - for example you cannot have 14-layer aluminum board) - but there is enough choices to make you happy and/or crazy.
You can also select track/spacing (up to 4/4 mil) and hole size specification (0.2 mm) with or without plugged vias (great for BGA work). If you click on special option you can further select castellations, edge plating, impedance control, blind vias, the list goes on and on. If you need it, chances are you can order it. A more “standard” customization of solder mask and silkscreen color almost goes unnoticed.
All these options do come at price. Not only the cost of board can go into hundreds of dollars but it also makes the whole process way more complicated than what you’ll need 99% of time. Clicking on various options can get you so sidelined that you’ll forget about the most basic stuff.
For example, I managed to order all my boards without ENIG finish (immersion gold) just because I somehow missed that option. I would kill for a few simple templates with the most logical options preselected (e.g. ENIG for surface-mount soldering) and with only limited customization allowed (e.g. solder mask and silkscreen color). Yes, there are “specials” available but they still end at the same overly-complicated page.
Upload process is rather pain-less and even supports my favorite RAR format. I used the exactly same files I usually use with OSH Park and PCB:NG service without any issue. Unfortunately, there is no gerber preview here so you might be up for a surprise if something goes wrong.
As one has to define size for board during upload, I intentionally selected a smaller size for one of them. Person doing verification caught it and corrected both board size and the price. This gives me hope that any gerber errors might be caught too but note that such manual review will probably happen a few hours after the upload. This means delay for any issue not easily correctable. I would consider first uploading gerbers to OSH Park and using their awesome preview to perform a sanity check.
Combined with overly extensive customizations, lack of preview makes service much harder for hobbyist (such as myself) to use and I believe even professionals don’t care/need about most of these options on a regular basis. Even when such extensive customization is needed, I doubt one would prefer to go from scratch each and every time.
It takes a few (five in my case) days for boards to get produced but then comes the longest part - shipping. As PCBWay is in China, this means that any cheap shipping will take a while. The cheapest option actually took 2 weeks to arrive, making it slightly slower than US-based competitors. Of course, this assumes you are in States. For international customers timeline might not differ as much. Moreover, there is option for courier shipping but at a significant premium.
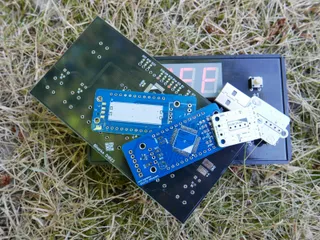
Once boards arrived, I found a few things in common to all - most noticeably v-groove routing for external edge. It makes board much cleaner and without any sharp edges to deal with. Boards themselves come either vacuum packed or in a baggie for the small sizes. While vacuum packing might be a bit annoying to open, it does protect the boards quite well in transport.
I immediately hated the addition of order number to the silk screen. While it seems engineer took care to place it underneath big components where it wouldn’t be visible, it’s kinda lottery if you need a really clean look (e.g. customer facing panel). If you note where their number can and cannot go on the silk screen in the comment field, I am reasonably sure they will cautious. However, such instructions are an extra step you need to remember and there is still some risk the number will be written right where you don’t want it.
Testing consisted, as usually, of hand-soldering the boards using Hakko D-888 soldering iron. As I use lead-free solder, the temperature was set to (rather low) 350 °C most of the time. All fine-pitch soldering was done by flooding all pins with solder and then wicking the extra away.
First board I got to solder was TmpUsb. It’s a small board with all SMD components and white solder mask did look awesome initially. As I went soldering, I noticed a residue forming whenever I touched the solder mask. Not only this sticky residue was ugly to see but it also stuck to the tip. As this was actually my first board with white solder mask, I am not sure if this is something common for that color or PCBWay uses a formula that’s not particularly heat resistant. In any case, not ideal for soldering iron work.
Second board was for Binarko. Not only this board has a fine-pitch component (0.2 mm TQFP-48) alongside quite a few 0603 passives but it’s intended to be press-fit mounted into the case. The good news is that fit is as close to perfect as it gets. Use of v-groove also means there are no breakout tabs to get rid of resulting in much cleaner look. Since I forgot the HASL coating, getting microcontroller aligned was a bit of challenge. Interestingly, the black solder mask handled high temperature much better than it’s white counterpart making much less mess.
Fine-pitched PIC meant I had to use solder wick a lot and that has shown another issue - it’s really easy to lift a trace. When it happened the first time I played around a bit and noted this seems to be related to the temperature. While I didn’t seem to have issues dragging 300 °C tip, at 350 °C dragging soldering tip was much more destructive.
The final board was of UsbAmps. With 0.25 mm pitch TQFP-44 package, it was a bit easier to solder. It’s green solder mask did its work well and I haven’t noticed any heat-related residue. However, sensitivity of traces to heat/dragging remained.
To conclude: If you are still using lead solder or you do reflow soldering, there are no major downfalls considering this service. While it might not be as cheap as OSH Park or PCB:NG for smaller boards (especially considering shipping is not free), it does get better with larger sizes. If board color or a bit more involved customization is necessary (think filled or buried vias), suddenly this service makes real sense. Yes, you are paying a bit (sometime quite a bit) extra but you do get something not commonly found in prototype market.
Default selection of lead HASL finish and paying extra for lead-free or ENIG is a bit of nuisance for me as I prefer poisoning my self with more fancy stuff but it’s probably not a problem for many considering the love hobbyist market still shows toward the good old 60/40.
There is quite restrictive service offered by OSH Park and PCB:NG where selection of anything other than 2 or 4 layer process is simply not possible but you get your board quickly and at a reasonable price. On the other hand there is almost infinite possibility of customization PCBWay embraces but not without the cost.
Now, only if they would stop adding their numbers to boards…
PS: I was given boards for free by PCBWay. I don’t believe that affected my review, but I believe it’s fair to disclose. :)
[2018-08-16: It seems that PCBWay decided to add extra $3 charge if you use PayPal and you will only see it on the last page. Not nice… :(]
[2019-11-24: At this time PCBWay asks you to pay extra $3 if you want your boards without their custom number. Essentially you are paying for them not to deface your board. Nickel and diming…]