After running my own homebrew solution involving ffmpeg and curl scriptery for a while, I decided it’s time to give up on that and go with a proper multi-camera viewing solution.
I had narrowed my desired setup to a few usual suspects: ZoneMinder, Shinobi, BlueIris, and one that I hadn’t heard about before: Xeoma.
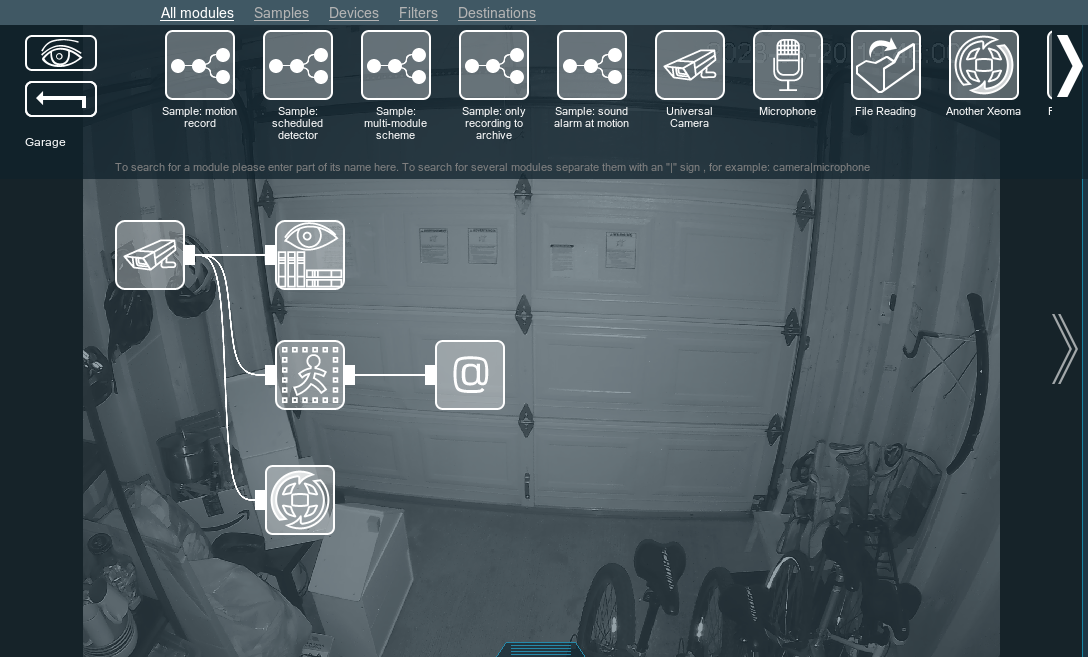
I wanted something that would record (and archive) 2 cameras on my local network, could run in Kubernetes, and would allow for a mobile application some time down the road.
BlueIris was an immediate no-go for me as it’s Windows-only software. There’s a docker version of it but it messes with Wine. And one does not simply mess with Wine.
I did consider ZoneMinder and Shinobi, but both had setups that were way too complex for my mini Kubernetes (Alpine K3s). Mind you, there were guides out there but none of them started without a lot of troubleshooting. And even when I got them running, I had a bunch of issues still lingering. I will probably revisit ZoneMinder at one point in the future, but I didn’t have enough time to properly mess with it.
That left Xeoma. While not a free application, I found it cheap enough for my use case. Most importantly, while updates were not necessarily free, all licenses were perpetual. There’s no monthly fee unless you want to use their cloud.
Xeoma’s instructions were okay, but not specific for Kubernetes. However, if one figures out how to install stuff in docker, it’s trivial to get it running in Kubernetes. Here is my .yaml file:
---
apiVersion: apps/v1
kind: Deployment

metadata:
  namespace: default
  name: xeoma
  labels:
    app: xeoma

spec:
  replicas: 1
  strategy:
    type: Recreate
  selector:
    matchLabels:
      app: xeoma
  template:
    metadata:
      labels:
        app: xeoma
    spec:
      containers:
      - name: xeoma
        image: coppit/xeoma:latest
        env:
        - name: VERSION
          value: "latest"
        - name: PASSWORD
          value: "changeme"
        volumeMounts:
          - name: config-volume
            mountPath: /config
          - name: archive-volume
            mountPath: /archive
      volumes:
        - name: config-volume
          hostPath:
            path: /srv/xeoma/config/
            type: Directory
        - name: archive-volume
          hostPath:
            path: /srv/xeoma/archive
            type: Directory

---
apiVersion: v1
kind: Service

metadata:
  namespace: default
  name: xeoma
  labels:
    app: xeoma

spec:
  type: LoadBalancer
  selector:
    app: xeoma
  ports:
  - name: server
    protocol: TCP
    port: 8090
    targetPort: 8090
  - name: web
    protocol: TCP
    port: 10090
    targetPort: 10090
And yes, this might not be the best setup - especially using directory volume mounts - but I find it very useful in my home lab. For example, the backup becomes just a trivial rsync affair.
With Kubernetes running, my next task was to select a license level. While there is a great licensing overview page, it still took me probably more than half an hour to finally select a version.
Free and Starter were immediately discounted due to their archive retention only going up to 5 days, and I wanted much more. The limit of 3 modules is not hugely problematic for my case, but later I found that might be a bit too low (due to how chaining works) even for me. I likewise removed Pro from consideration as it was way more expensive and it actually didn’t offer anything that I needed for my monitoring setup.
So my decision was between Lite and Standard. As I only needed 2 cameras at this time, Lite made a bit more sense. Out of things I was interested in, you do lose user profiles (i.e., everybody logs in as the same user) and the module for issue detection (e.g., camera offline) is strangely missing. But those weren’t deal breakers.
Do note that Lite also doesn’t offer upgrades to the software. The version you have is the version you’re stuck with. For a professional setup, I would definitely go with Standard, but again, for my home use case, I don’t need updates all the time.
So, I got the key, plugged it into the software, played a bit, decided to restart the server, and… my license was gone. One thing I couldn’t notice in trial mode was that the license was connected to the MAC address of the pod the software was running on. And the pod will get a new MAC address each time you restart it.
I tried quite a few tricks to make the MAC address stick: manually setting the address in /etc/network/interfaces, messing with ifconfig, docker-in-docker sidecar… No matter what I did, I couldn’t get the licensing to work in combination with Kubernetes.
And therein lies the danger of any licensing. If you are too strict, especially in a virtual world, real users get impacted while crackers are probably just fine…
In their defense, you can also get demo licenses. After I figured out what the issue was, having 10 demo licenses to mess with allowed me to play with the system a bit more than what I would be able to do with my perpetual license. Regardless, I was defeated - Kubernetes was not to be. I strongly recommend you to obtain Demo licenses if you have any unusual setup.
Regardless of the failed Kubernetes setup, I also had a good old docker on the same machine. With a few extra line items, that one worked wonderfully. My final setup for docker was the following command:
docker run --name=xeoma \
  -d \
  -p 8090:8090 \
  -p 10090:10090 \
  -v /srv/xeoma/config:/config \
  -v /srv/xeoma/archive:/archive \
  -e VERSION=https://felenasoft.com/xeoma/downloads/2023-08-10/linux/xeoma_linux64.tgz \
  -e PASSWORD=admin \
  --hostname=xeoma \
  --mac-address 08:ae:ef:44:26:57 \
  --restart on-failure \
  coppit/xeoma
Here, -d ensures that the container is “daemonized” and, as such, goes into the background.
Port 8090 as output is mandatory for setup, while the web interface running on 10090 can be removed if one doesn’t plan to use it. I decided to allow both.
The directory setup is equivalent to what I planned to use with Kubernetes. I simply expose both the /config and /archive directories.
Passing the URL as the VERSION environment variable is due to Lite not supporting upgrades. Doing it this way ensures we always get the current version. Of course, readers from the future will need to find their URL on the History of changes webpage. Changing the PASSWORD environment variable is encouraged.
In order for licensing to play nicely, we need the --mac-address parameter to be set to a fixed value. The easiest way forward is just generating one randomly. And no, this is not MAC address connected to my license. :)
For restarts, I found on-failure setting works best for me as it will start the container when the system goes up, in addition to restarting it in the case of errors.
And lastly, the Docker image coppit/xeoma is given as a blueprint for our setup.
And this Docker solution works nicely for me. Your mileage (and needs) may vary.