Error While Powering on VMware Player on Windows 10
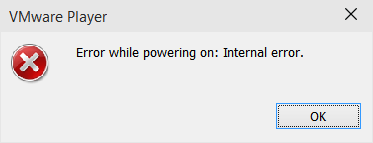
As I went through one of the many Windows 10 beta updates, my VMware Player started throwing “Error while powering on: Internal error.” After reboot everything started working again so I just assumed it was simply some fluke in the upgrade process. And then it happened again a bit later. This time a single restart didn’t help but it did start working after a few of them. Every restart was like a coin toss. It smelled like a race condition.
One of things I checked was status of VMware’s services. There I noticed that, although startup type was set to Automatic, VMware Authorization Service was not running at times. And I could match the times when it was not running with the error. Even better, error would disappear as soon as I would manually start that service. My best guess, based on observed behavior, was that VMware Authorization Service needed some other service to start beforehand. However, dependencies for that service were missing. All VMware’s service needed was a bit more time.
Fortunately, Windows has one great feature enabling just that ever since Windows Vista. All needed is to change startup type to Automatic (Delayed Start) and your service will wait a bit extra time before starting. Original idea of this feature was to alleviate system load at startup by postponing some tasks for just a bit later when CPU had a chance to breathe. But, as a side effect, we can be sure that pretty much all important system services are already up by the time delayed start kicks in.
Might not be an ideal solution but I had no issues with it.
PS: Proper solution would be to find the missing dependency and add it to service. But setting up dependencies is not an easy task and pretty much becomes just trial-and-error adventure unless you know the product on the source code level. Not worth it.