Installing Windows 10 via Windows Update works surprisingly well. However, such upgrade leaves you stuck with partition layout you might not like. Sometime best course is installing from scratch.
First step to prepare installation is getting .iso file and Microsoft always provides a way to do it. With Windows 10 it is Microsoft Media Creation Tool.
Second step is to prepare bootable USB drive. This step can be done by tools but, if you want UEFI boot, you want to do it manually. Most of tools currently available format disk as NTFS and that file system is not supported by UEFI boot process. Yes, most BIOSes still have support for legacy mode but you do lose some boot speed improvements and there are security implications.
In regards to UEFI do notice that it isn’t really important if your processor supports 64-bit OS or not - if your UEFI system is 32-bit you better install 32-bit Windows too. This weird situation of having 32-bit UEFI only with 64-bit capable processor often happens with Atom tablets. Just treat them as 32-bit system and you’ll be fine. On more capable laptops and desktops UEFI usually has support for both or rarely for 64-bit only. Rule of the thumb is to get 32-bit .iso if you are dealing with tablet and 64-bit otherwise.
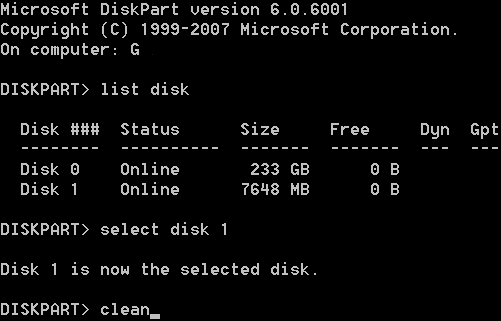
Procedure is actually simple. Just write DISKPART on start screen and you will be greeted with security prompt after which you will have old-fashioned textual interface. In my case USB was disk 3 (you can deduce it based on size) but your case will probably differ. Double check which disk you are selecting because DISKPART does destroy data:
DISKPART> LIST DISK
  Disk ###  Status         Size     Free     Dyn  Gpt
  --------  -------------  -------  -------  ---  ---
  Disk 0    Online          476 GB      0 B        *
  Disk 1    Online          931 GB      0 B
  Disk 2    Online         7168 MB      0 B
  Disk ^^3^^    Online         7648 MB      0 B

DISKPART> SELECT DISK ^^3^^
Disk 3 is now the selected disk.

DISKPART> CLEAN
DiskPart succeeded in cleaning the disk.

DISKPART> CREATE PARTITION PRIMARY
DiskPart succeeded in creating the specified partition.

DISKPART> FORMAT FS=FAT32 QUICK
  100 percent completed

DiskPart successfully formatted the volume.

DISKPART> ACTIVE
DiskPart marked the current partition as active.

DISKPART> EXIT
Assuming that your, newly created and empty, USB drive is under letter U: and your Windows installation disk is at W:, you can use XCOPY to transfer files. Press + to get a prompt where you can enter following command:
XCOPY W:*.* /e /f U:\
Last step is to boot machine while pressing <F2> (or some other key; <Del> used to be popular) to enter BIOS. Since boot is extremely fast, I always need a few attempts to get inside. :)
Depending on the BIOS, option might have a slightly different name but most of them have “Boot override” section somewhere. Your new UEFI USB drive should appear there. Just select it and boot should ensue.
Enjoy your clean installation.
PS: Same procedure actually works for any UEFI system - from Windows Vista onward.