In order to prove my marriage to US government I had to obtain a marriage certificate from my home country - Croatia. Instead of getting standard certificate and translating it myself, I decided to get a fancy international one.
As it was agreed way back in 1976, its format leaves a lot to be desired. The front side is written in Croatian (official Croatian language) with French right below it. What makes it international is fact there are a few more languages, including English, on the other side included as the legend. On the front side you have numbered fields and in legend on the back you see what that field corresponds to in multiple languages.
While I would personally expect any computerized office to simply print the marriage certificate in any language directly on the front page, I guess legend on the back is not the worst solution out there. And I’m sure there is some obscure legal reason behind why the French language that almost nobody in Croatia speaks gets the front page treatment instead of German or English. But that’s not what pisses me off about this form.
The most annoying thing there is number of errors visible on the first glance.
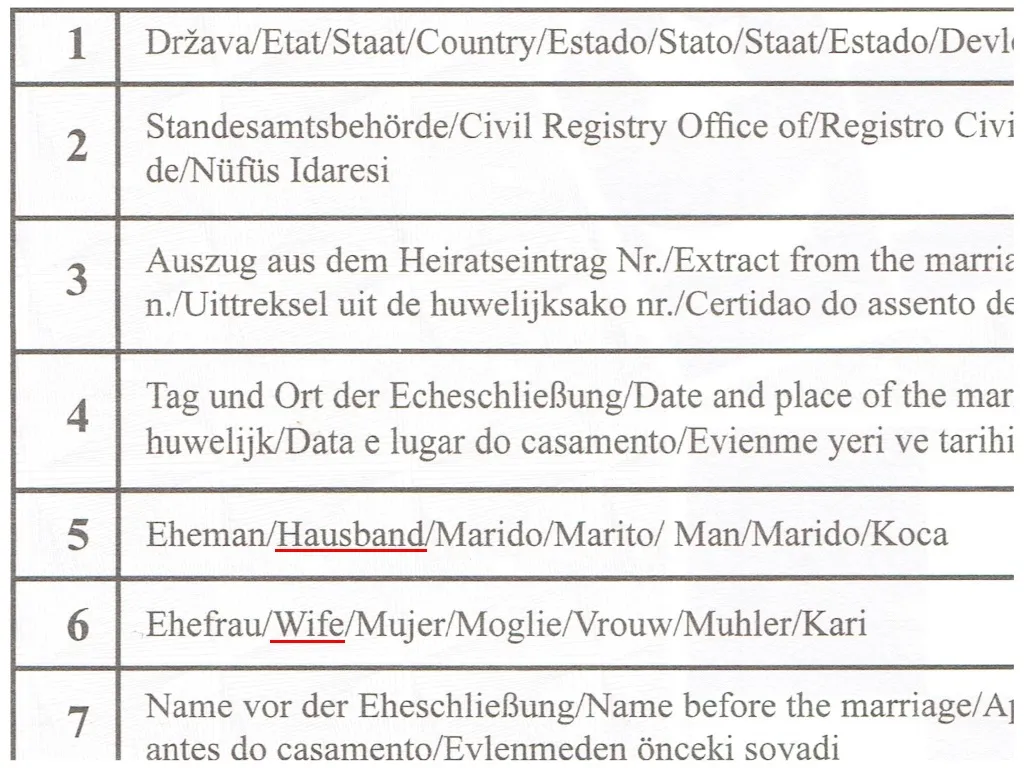
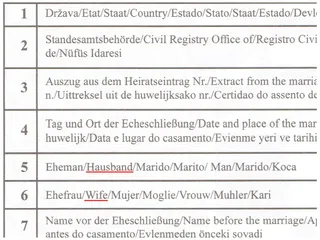
Let’s start with the first field. This one has name of the country written in Croatian, French, German, English, Spanish, etc. All fields following it have their corresponding meaning printed in German, English, Spanish, etc. Notice what’s missing? Yes - other fields have no Croatian or French description as those are already written on the front page. But the first field gets to be inconsistent.
And no, this minor issue is not where the fun stops.
Second fields has English translation of “Extract from the marriage registratica n°.” This field is generous enough to give us two mistakes, the first one being decidedly non-English (or probably any language) word registratica. Second error is n° abbreviation. In English it can be written as №, Nº, N° (for non-Unicode folks), No., no., and probably many more forms. But it’s almost never written in the French “n°” style. Yep, English translation of this field offers an unique mix between non-existent word and abbreviation in the wrong language.
And I will finish with my favorite error.
Field 5 has its English translation listed as “Hausband”. Since field following it has translation “Wife”, I can only assume it was meant to say “Husband” rather than something that could be interpreted as German house band. How the heck you can have word husband misspelled in the country where 97% kids in 2014 were supposedly taught English? While I don’t have stats for my generation, I doubt it was lower than 75% even in 2K days.
And don’t tell me that was just an accident - the same darn mistake is also on the front page as part of a smaller legend translated as “Death of the hausband” - which does sound like a good band name when I think about it.
Croatia has been an independent country for 28 years now. I am not sure when exactly international marriage certificate was introduced but it has been present for at least 10 years now, if not since the very beginning. I can imagine semi-valid excuses for the first person doing the translation - maybe it was simply some clerk who wasn’t aware how bad his English was.
However, persisting these errors through god-knows how many reprints is something that cannot be excused.
PS: And no, I didn’t check all fields nor I bothered with other languages. However, since English translation is this butchered, I can only imagine all the levels of wrongness for other languages.
PPS: If you want to see both front and back page for yourself you can download example form from Croatian government website.
PPPS: If you want to see better translated marriage certificate there is one from the Macedonian government.