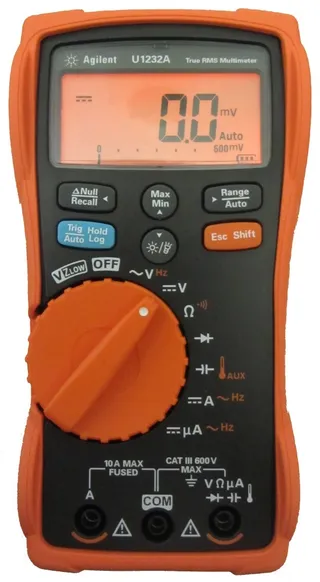
Newest in line of my multimeters is a 6000-count Agilent U1232A.
This device falls into a category of electrician’s multimeters which is most noticeable on current range which only starts at 1 mA. Other specs for this multimeter are also nothing special; you cannot even use K-type probe directly with it. Considering cost in excess of $100, why would anyone buy it?
Because trust is important. While every multimeter states at least CAT III 600V rating, just few of them really do. In reality they will fry if you do something stupid (e.g. measuring current on ohm range). And it is not question whether you will do something stupid, it is just question of time. This multimeter can handle stupid.
DC voltage measurement is 0.5% + 2 counts from 0.1 mV to 600 V which is more than decent. AC voltage is slightly worse with 1% + 3 counts but no real surprise there. Nice addition is low input impedance mode as a separate switch selection. Not only that it will deal with “phantom” voltages but it will automatically detect whether voltage is AC or DC.
Simple hand-wave above its screen can produce quite a big voltage spikes (up to few hundred mV) in this multimeter. It is not necessarily an real-life issue with measurements since I don’t ever hold my multimeter in hands but it is something to be aware of. It seems that someone at Agilent decided to go a bit cheap on shielding.
Resistance is 0.9% + 3 on all ranges except 60 MΩ. Resolution better than 100 mΩ would be good but it is definitely not something I need every day. Still, it would be nice if it went at least one decade lower. Continuity tester is speedy and it will even flash screen at you. I love this for late night sessions because sound can be turned off.
Diode measurement is basic and, of course, cannot light up white LED. I find that slightly disappointing but I know of even more expensive multimeters without this functionality.
Capacitance range goes from 1 nF to 10 mF. If you need to measure smaller capacitance, you will need to have additional LCR meter. This multimeter is good for troubleshooting bad power supply caps but not that good if you want to check oscillator cap values.
There is one mode that sort-of measures temperature but only with additional accessory. If you don’t have such accessory you can use it as fixed 600 mV range but I don’t see the point. If you are not going to include direct K-type measurement, there is no need to include temperature setting especially when multimeter offers nice scaling function.
Current range starts at 1 mA and goes to 10 A of continuous current. If you just need quick measurement you can go up to 20 A for 30 seconds. While this is something that most multimeters can handle, not all of them are ready for new measurement within a minute after overload. Multimeter also has µA range that is not suitable for any real measurement because it has more holes than a Swiss cheese. It is only suitable for measuring some (e.g. flame) sensors and not for general-purpose measurement. Unless you use something like µCurrent you can forfeit low-current work.
Menu system is logical and it is usable even without manual. You can set surprisingly big number of options ranging from beep frequency and backlight all the way to smoothing. There is a possibility of basic data logging on multimeter itself but it is very restricted. Fortunately there is an optional IR to USB cable (that does not work with Windows 8, but more on that later).
Looking directly at display numbers look clear and big. However, it gets really washed out when watched from above. It is only slightly better looking from side and generally I find it rather disappointing. How come that Uni-T can provide superior LCD screens even with its cheapest multimeters and Agilent cannot get it right with one that is at $130. Selection switch is really spongy and unlike any other I have tried. It was necessary to make it a bit softer in order to allow for one-hand operation but Agilent went a bit too far in my opinion.
Build-wise this is really nice meter. Sockets are full metal and they give nice feel when you plug cable into them - not too soft, not too firm. Rubber foot fits nicely around multimeter offering protection and good feel. Some reported on it getting easily dirty but I cannot testify to that. Either I keep it too clean or (as wife can testify) I have blind spot when it comes to dirt. AAA batteries hide under single threaded (semi-captive) screw alongside a single 11 A HRC fuse.
Two more self-tapping screws hold a case together. PCB inside is nice and clean without many surprises. Protection comes in form of two power resistors, few PTCs, and a glass encased varistors. There are a few isolation slots at a strategic places so high voltage should not be an issue. Sockets are connected via hex head and no amount of vibration will set those free. This multimeter has potential to last a long time even with all expected abuse.
Carrying case is an optional accessory and comes at price of $20. For that price I have an issue with velcro strap. Even Uni-T gives elastic strap in its free case and it is infinitely more practical.
USB to IR cable has much bigger issue. In their wisdom Agilent decided to use obsolete chip (PL-2303HXA) and thus there is no Windows 8 driver support. Not now, not ever. I did manage to make it run on Windows 8 by making a completely new board.
Agilent’s Data Logger GUI was probably build by prisoners around 200 BC judging by its quality. I haven’t seen program that requires administrator rights on computer in a while. Yes, corporate users without administrative privileges on a computer can forget about it.
All things considered, I am still happy with this multimeter. Agilent did a really lousy job on accessories side but main device is good enough that you can forget few shortcomings.
P.S.: If you are interested how it looks inside, I have a close-up PCB images for you.
P.P.S.: There is quite long review video for this multimeter on YouTube.
P.P.P.S.: If you need IR to USB cable under Windows 8, check alternative communication board (you will still need Agilent’s cable).