Windows 10 Pro USB Install on Dell's XPS 15
When I got my new Dell XPS 15 with Windows 10 Home; the first thing I wanted to install my own fresh copy of Windows 10 Pro.
Guess what? Dell, as many other PC manufacturers, stores key in BIOS (Home edition in my case) and it will never ask you for it. Try as you may but Windows installation will never even ask your for alternate key. That is, if you don’t adjust it a bit.
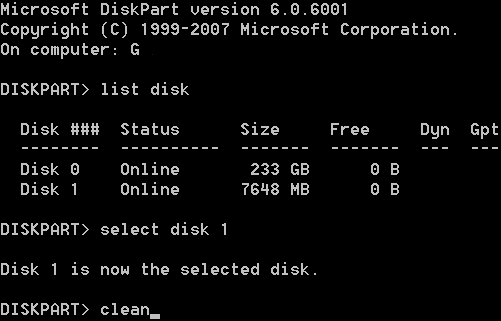
First part is preparing installation USB and these same steps are needed even if you don’t need to change install key. Press <Win>+<R> and write diskpart, followed by OK. This will execute partition editor tool. Be very, very careful to select disk you want to clean and make new installation USB:
LIST DISK
 Disk ###  Status         Size     Free     Dyn  Gpt
 --------  -------------  -------  -------  ---  ---
 Disk 0    Online          476 GB      0 B        *
 Disk 1    Online          931 GB      0 B
 Disk 2    Online         7168 MB      0 B
 Disk ^^3^^    Online         7648 MB      0 B

SELECT DISK ^^3^^
 Disk 3 is now the selected disk.

CLEAN
 DiskPart succeeded in cleaning the disk.``

CREATE PARTITION PRIMARY
 DiskPart succeeded in creating the specified partition.``

FORMAT FS=FAT32 QUICK
 100 percent completed``
 DiskPart successfully formatted the volume.``

EXIT
Assuming that your, newly created and empty, USB drive is under letter U: and your Windows installation disk is at W:, you can use XCOPY to transfer files. Again, press <Win>+<R> to get a prompt where you can enter following command:
XCOPY ^^W:^^*.* /e /f ^^U:^^\For getting our key into installation we need to create PID.txt with following content (use your key instead of XXXXX-XXXXX-XXXXX-XXXXX-XXXXX):
[PID]
Value=^^XXXXX-XXXXX-XXXXX-XXXXX-XXXXX^^
This file you then copy onto USB to U:\sources or U:\x64\sources folder, depending which one is present.
Now you can plug USB into XPS 15, boot to USB using F12 key and proceed with Windows installation as you usually would. The only difference is that Windows will now use key from USB instead of BIOS and give you the correct edition.
PS: If you want to use USB drive bigger than 64 GB, use CREATE PARTITION PRIMARY SIZE=8000 to make disk appear a bit smaller. Otherwise FAT32 formatting won’t work and that is important for UEFI.
PPS: To avoid entering legacy mode, I like to add custom EFI boot option pointing to \efi\boot\bootx64.efi on USB.