Testing Native ZFS Encryption Speed
[2020-11-02: There is a newer version of this post]
As I wrote about installing ZFS with the native encryption on the Ubuntu 20.04, it got me thinking… Should I abandon my LUKS-setup and switch? Well, I guess some performance testing was in order.
For this purpose I decided to go with the Ubuntu Server (to minimize impact desktop environment might have) inside of the 2 CPU Virtual Machine with 24 GB of RAM. Two CPUs should be enough to show any multithreading performance difference while 24 GB of RAM is there to give home to our ZFS disks. I didn’t want to depend on disk speed and variation it gives. For the testing purpose I only care about the relative speed difference and using the RAM instead of the real disks would give more repeatable results.
For OS I used Ubuntu Server with ZFS packages, carved a chunk of memory for RAM disks, and limited ZFS ARC to 1G.
sudo -i << EOF
    apt update
    apt dist-upgrade -y
    apt install -y zfsutils-linux
    grep "/ramdisk" /etc/fstab || echo "tmpfs  /ramdisk  tmpfs  rw,size=20G  0  0" \
        | sudo tee -a /etc/fstab
    grep "zfs_arc_max" /etc/modprobe.d/zfs.conf || echo "options zfs zfs_arc_max=1073741824" \
        | sudo tee /etc/modprobe.d/zfs.conf
    reboot
EOF
With the system in pristine state, I created data used for testing (random 2 GiB).
dd if=/dev/urandom of=/ramdisk/data.bin bs=1M count=2048Data disks are just bunch of zeros (3 GB each) and the (RAID-Z2) ZFS pool has the usual stuff but with compression turned off and sync set to always in order to minimize their impact on the results.
for I in {1..6}; do dd if=/dev/zero of=/ramdisk/disk$I.bin bs=1MB count=3000; done
echo "12345678" | zpool create -o ashift=12 -O normalization=formD \
    -O acltype=posixacl -O xattr=sa -O dnodesize=auto -O atime=off \
    -O encryption=^^aes-256-gcm^^ -O keylocation=prompt -O keyformat=passphrase \
    -O compression=off -O sync=always -O mountpoint=/zfs TestPool raidz2 \
    /ramdisk/disk1.bin /ramdisk/disk2.bin /ramdisk/disk3.bin \
    /ramdisk/disk4.bin /ramdisk/disk5.bin /ramdisk/disk6.bin
To get write speed, I simply copied the data file multiple times and took the time reported by dd. To get a single figure, I removed the highest and the lowest value averaging the rest.
sudo -i << EOF
    sudo dd if=/ramdisk/data.bin of=/zfs/data1.bin bs=1M
    sudo dd if=/ramdisk/data.bin of=/zfs/data2.bin bs=1M
    sudo dd if=/ramdisk/data.bin of=/zfs/data3.bin bs=1M
    sudo dd if=/ramdisk/data.bin of=/zfs/data4.bin bs=1M
    sudo dd if=/ramdisk/data.bin of=/zfs/data5.bin bs=1M
EOF
For reads I took the file that was written and dumped it to /dev/null. Averaging procedure was the same as for writes.
sudo -i << EOF
    sudo dd if=/zfs/data1.bin of=/dev/null bs=1M
    sudo dd if=/zfs/data2.bin of=/dev/null bs=1M
    sudo dd if=/zfs/data3.bin of=/dev/null bs=1M
    sudo dd if=/zfs/data4.bin of=/dev/null bs=1M
    sudo dd if=/zfs/data5.bin of=/dev/null bs=1M
EOF
With all that completed, I had my results.
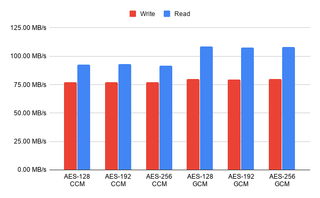
I was quite surprised how close a different bit sizes were in the performance. If your processor supports AES instruction set, there is no reason not to go with 256 bits. Only when you have an older processor without the encryption support does the 128-bit crypto make sense. There was a 15% difference when it comes to the read speeds in the favor of the GCM mode so I would probably go with that as my cipher of choice.
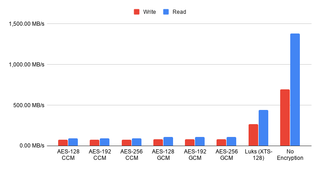
However, once I added measurements without the encryption and for the LUKS-based crypto I was shocked. I expected thing to go faster without the encryption but I didn’t expect such a huge difference. Also surprising was seeing the LUKS encryption to have triple the performance of the native one.
Now, this test is not completely fair. In the real life, with a more powerful machine, and on the proper disks you won’t see such a huge difference. The sync=always setting is a performance killer and results in more encryption calls than you would normally see. However, you will still see some difference and good old LUKS seems like the winner here. It’s faster out of box, it will use less CPU, and it will encrypt all the data (not leaving metadata in the plain as ZFS does).
I will also admit that comparison leans toward apples-to-oranges kind. Reason to use ZFS’ native encryption is not due to its performance but due to the extra benefits it brings. Part of those extra cycles go into the authentication of each written block using a strong MAC. Leaving metadata unencrypted does leak a bit of (meta)data but it also enables send/receive without either side even being decrypted - just ideal for a backup box in the untrusted environment. You can backup the data without ever needing to enter password on the remote side. Lastly let’s not forget allowing ZFS direct access to the physical drives allows it to shine when it comes to the fault detection and handling of the same. You will not get anything similar if you are interfacing over the virtual device.
Personally, I will continue using the LUKS-based full disk encryption for my desktop machines. It’s just much faster. And I probably won’t touch my servers for now either. But I have a feeling that really soon I might give native ZFS encryption a spin.
[2020-11-01: Newer updates of 0.8.3 (0.8.3-1ubuntu12.4) have greatly improved GCM speed. With those optimizations GCM mode is now faster than Luks. For more details check 20.10 post.]
PS: You can take a peek at the raw data if you’re so inclined.

