Mikrotik routers give you a lot of control over traffic. If you stick with IPv4, it’s possible to nicely subdivide your network and use queues to traffic-shape any user’s bandwidth based on IP address. But things are not as easy when you allow IPv6. Suddenly your simple queues are essentially broken and tracking users becomes quite a lot more difficult.
For exactly that purpose, you have firewall mangle rules. In its simplest form, you just use MAC address as a condition to mark your connection and then you use that connection mark to mark each packet. In Mikrotik’s lingo, that would be something like this:
/ip firewall mangle add
    chain=forward
    src-mac-address=^^12:34:56:78:90:12^^
    connection-state=new
    action=mark-connection
    new-connection-mark=^^some-mark^^

/ip firewall mangle add
    chain=forward
    connection-mark=^^some-mark^^
    action=mark-packet
    new-packet-mark=^^some-mark^^
    passthrough=no
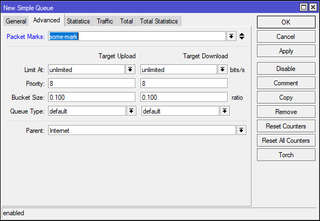
Now you can use this packet mark in a simple queue as a condition instead of the subnet or IP. If you go further and create these mange rules in /ipv6 section as you did for /ip, you have yourself an easy way to track traffic even on per-MAC resolution.
The real challenge then becomes entering all these rules into the router. In order to fill this, it’s best to have a script as executing all these commands manually is really error prone. I like to keep this in a file looking something like this:
12:34:56:78:90:ab user1-mark
23:45:67:89:0a:bc user1-mark
34:56:78:90:ab:cd user2-mark
Using this I don’t necessarily track or limit traffic per device but per user. As long as all user’s MAC addresses result in the same mark, queue doesn’t really care.
I mark all automatic entries with !AUTO! in the comment field. Any time I want to update firewall rules, I make sure to delete the old ones first:
OLD_V4_ENTRIES=`ssh router.home "/ip firewall mangle print without-paging" | grep ";;; !AUTO!" | awk '{print $1}' | xargs | tr ' ' ','`
if [[ "$OLD_V4_ENTRIES" != "" ]]; then
    ssh router.home "/ip firewall mangle remove numbers=$OLD_V4_ENTRIES"
fi

OLD_V6_ENTRIES=`ssh router.home "/ipv6 firewall mangle print without-paging" | grep ";;; !AUTO!" | awk '{print $1}' | xargs | tr ' ' ','`
if [[ "$OLD_V6_ENTRIES" != "" ]]; then
    ssh router.home "/ipv6 firewall mangle remove numbers=$OLD_V6_ENTRIES"
fi
With old entries gone, we can add new entries using something like this:
cat ^^~/MAC.dat^^ | grep -v '^#' | while read ENTRY; do
    MAC=`echo "$ENTRY" | xargs | cut -sd' ' -f1`
    MARK=`echo "$ENTRY" | xargs | cut -sd' ' -f2`
    if [[ "$MAC" != "" ]] && [[ "$MARK" != "" ]]; then
        echo "$MAC $MARK"
        ssh -n router.home "/ip firewall mangle add chain=forward src-mac-address=$MAC connection-state=new action=mark-connection new-connection-mark=$MARK comment=\"!AUTO!\""
        ssh -n router.home "/ip firewall mangle add chain=forward connection-mark=$MARK action=mark-packet new-packet-mark=$MARK passthrough=no comment=\"!AUTO!\""
        ssh -n router.home "/ipv6 firewall mangle add chain=forward src-mac-address=$MAC connection-state=new action=mark-connection new-connection-mark=$MARK comment=\"!AUTO!\""
        ssh -n router.home "/ipv6 firewall mangle add chain=forward connection-mark=$MARK action=mark-packet new-packet-mark=$MARK passthrough=no comment=\"!AUTO!\""
    fi
done
Script above will go over the whole file, skipping all the comments, and assuming the first field in line is MAC address and the second is the mark you want to assign it. Then it will just add mangle pair to both IPv4 and the IPv6 firewall rules.
The last step is to force firewall to clear the existing connections so it can mark them with the new marks.
ssh -n router.home "/ip firewall connections remove [find]"
ssh -n router.home "/ipv6 firewall connections remove [find]"
Only thing now is to create simple queue based on each mark. And yes, that can be automated too. :)