With the new LTS Ubuntu just round the corner, it came time to refresh my Surface Go operating system. For this guide I will assume you have the Windows currently running so you can write Ubuntu 22.04 image using Rufus utility. Make sure to use GPT partition scheme targeting UEFI systems.
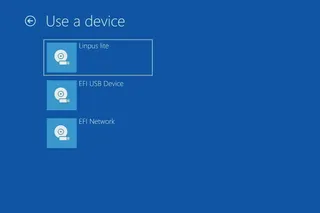
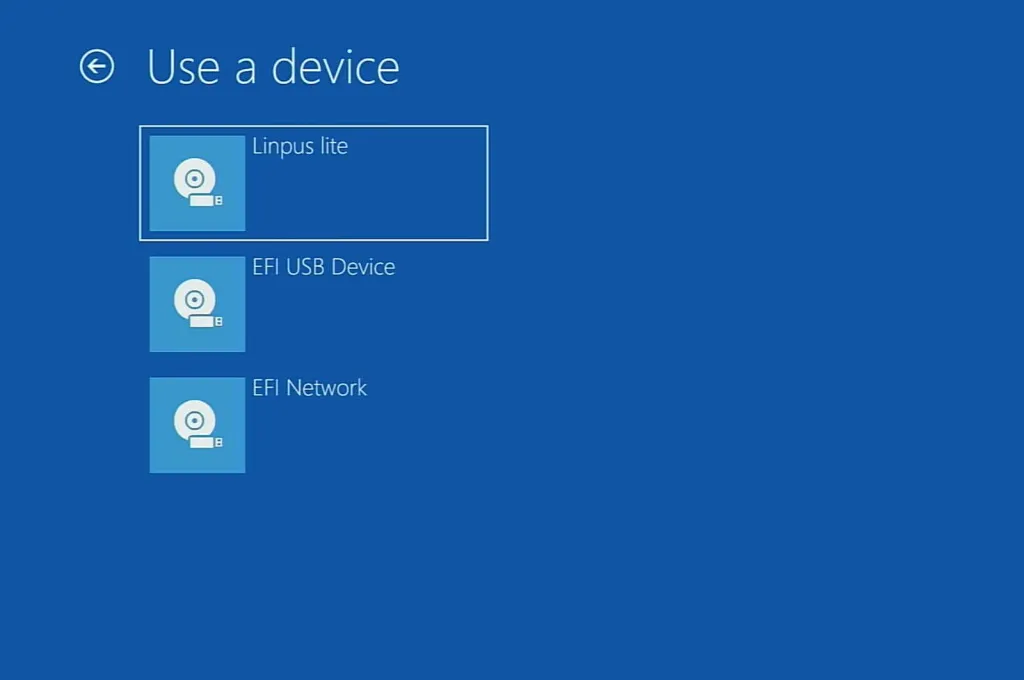
First we need to partition disk and install Linux for which we have to boot from Ubuntu USB drive. To do this go to Recovery Options and select Restart now. From the boot menu then select Use a device and finally use Linpus lite. If you are using Ubuntu, there is no need to disable secure boot or meddle with USB boot order as 22.04 fully supports secure boot.
While you could proceed from here with normal Ubuntu install, I like a bit more involved process that includes a bit of command line. Since we need root prompt, we should open Terminal and get those root credentials going.
sudo -i
The very next step should be setting up a few variables - host, user name, and disk(s). This way we can use them going forward and avoid accidental mistakes.
HOST=^^desktop^^
USER=^^user^^
DISK=/dev/mmcblk0
Disk setup is really minimal. Notice that both boot and EFI partition will need to be on internal disk as BIOS doesn’t know how to boot from micro-SD card.
blkdiscard -f $DISK
sgdisk --zap-all                       $DISK
sgdisk -n1:1M:+63M -t1:EF00 -c1:EFI    $DISK
sgdisk -n2:0:+640M -t2:8300 -c2:Boot   $DISK
sgdisk -n3:0:0     -t3:8309 -c3:Ubuntu $DISK
sgdisk --print                         $DISK
I usually encrypt just the root partition as having boot partition unencrypted does offer advantages and having standard kernels exposed is not much of a security issue.
cryptsetup luksFormat -q --cipher aes-xts-plain64 --key-size 256 \
    --pbkdf pbkdf2 --hash sha256 ${DISK}p3
Since crypt device name is displayed on every startup, for Surface Go I like to use host name here.
cryptsetup luksOpen ${DISK}p3 ${HOST^}
At last we can prepare all needed partitions.
yes | mkfs.ext4 /dev/mapper/${HOST^}
mkdir /mnt/install
mount /dev/mapper/${HOST^} /mnt/install/

yes | mkfs.ext4 ${DISK}p2
mkdir /mnt/install/boot
mount ${DISK}p2 /mnt/install/boot/

mkfs.msdos -F 32 -n EFI -i 4d65646f ${DISK}p1
mkdir /mnt/install/boot/efi
mount ${DISK}p1 /mnt/install/boot/efi
To start the fun we need debootstrap package. Do make sure you have Wireless network connected at this time as otherwise operation will not succeed.
apt update ; apt install --yes debootstrap
And then we can get basic OS on the disk. This will take a while.
debootstrap $(basename `ls -d /cdrom/dists/*/ | head -1`) /mnt/install/
Our newly copied system is lacking a few files and we should make sure they exist before proceeding.
echo $HOST > /mnt/install/etc/hostname
sed "s/ubuntu/$HOST/" /etc/hosts > /mnt/install/etc/hosts
sed '/cdrom/d' /etc/apt/sources.list > /mnt/install/etc/apt/sources.list
cp /etc/netplan/*.yaml /mnt/install/etc/netplan/
If you are installing via WiFi, you might as well copy your wireless credentials:
mkdir -p /mnt/install/etc/NetworkManager/system-connections/
cp /etc/NetworkManager/system-connections/* /mnt/install/etc/NetworkManager/system-connections/
``

Finally we're ready to "chroot" into our new system.

```sh
mount --rbind /dev  /mnt/install/dev
mount --rbind /proc /mnt/install/proc
mount --rbind /sys  /mnt/install/sys
chroot /mnt/install \
    /usr/bin/env HOST=$HOST USER=$USER DISK=$DISK \
    bash --login
For new system we need to setup the locale and the time zone.
locale-gen --purge "en_US.UTF-8"
update-locale LANG=en_US.UTF-8 LANGUAGE=en_US
dpkg-reconfigure --frontend noninteractive locales

dpkg-reconfigure tzdata
Now we’re ready to onboard the latest Linux image.
apt update
apt install --yes --no-install-recommends linux-image-generic linux-headers-generic
Followed by boot environment packages.
apt install --yes initramfs-tools cryptsetup keyutils grub-efi-amd64-signed shim-signed
Since we’re dealing with encrypted data, we should auto mount it via crypttab. If there are multiple encrypted drives or partitions, keyscript really comes in handy to open them all with the same password. As it doesn’t have negative consequences, I just add it even for a single disk setup.
echo "${HOST^} UUID=$(blkid -s UUID -o value ${DISK}p3)  none \
    luks,discard,initramfs,keyscript=decrypt_keyctl" >> /etc/crypttab
cat /etc/crypttab
To mount boot and EFI partition, we need to do some fstab setup too:
echo "UUID=$(blkid -s UUID -o value /dev/mapper/${HOST^}) \
    / ext4 noatime,nofail,x-systemd.device-timeout=5s 0 1" >> /etc/fstab
echo "PARTUUID=$(blkid -s PARTUUID -o value ${DISK}p2) \
    /boot ext4 noatime,nofail,x-systemd.device-timeout=5s 0 1" >> /etc/fstab
echo "PARTUUID=$(blkid -s PARTUUID -o value ${DISK}p1) \
    /boot/efi vfat noatime,nofail,x-systemd.device-timeout=5s 0 1" >> /etc/fstab
cat /etc/fstab
Now we update our boot environment.
KERNEL=`ls /usr/lib/modules/ | cut -d/ -f1 | sed 's/linux-image-//'`
update-initramfs -u -k $KERNEL
Grub update is what makes EFI tick.
sed -i "s/^GRUB_CMDLINE_LINUX_DEFAULT.*/GRUB_CMDLINE_LINUX_DEFAULT=\"quiet splash \
    mem_sleep_default=deep\"/" /etc/default/grub
update-grub
grub-install --target=x86_64-efi --efi-directory=/boot/efi --bootloader-id=Ubuntu \
    --recheck --no-floppy
Finally we install out GUI environment. I personally like ubuntu-desktop-minimal but you can opt for ubuntu-desktop. In any case, it’ll take a considerable amount of time.
apt install --yes ubuntu-desktop-minimal firefox
Short package upgrade will not hurt.
add-apt-repository universe
apt update ; apt dist-upgrade --yes
The only remaining task before restart is to create the user, assign a few extra groups to it, and make sure its home has correct owner.
adduser --disabled-password --gecos '' $USER
usermod -a -G adm,cdrom,dip,lpadmin,plugdev,sudo $USER
echo "$USER ALL=NOPASSWD:ALL" > /etc/sudoers.d/$USER
passwd $USER
As install is ready, we can exit our chroot environment.
exit
And unmount our disk:
umount /mnt/install/boot/efi
umount /mnt/install/boot
mount | tac | awk '/\/mnt/ {print $3}' | xargs -i{} umount -lf {}
After the reboot you should be able to enjoy your Ubuntu installation.
reboot
If all went fine, congratulations, you have your Ubuntu up and running.