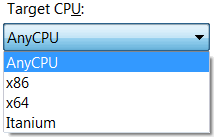
Hyper-V Server 2008

Illustration

Virtualization is nice idea. You have one powerful PC and put multiple servers on it. One for file sharing (e.g. FreeNAS), one for your domain, one for testing - list just goes on. It is even suitable for home use.

However, there is one hidden cost there. You already need operating system to host your other virtual machines. If you are playing with VMware or VirtualBox, you can use linux as host. Although there is no cost associated here, you must know that now you have one more system to manage, patch… It is very hard to minimize surface area for attacks.

You could go on hypervisor path with VMware’s ESX server but there is question of drivers here if you have lot of components that are not of premium quality. If you want to play with Microsoft’s own Hyper-V, you will not have that problem since any imaginable piece of hardware has drivers for Windows. Cost is issue. For this one, you need Windows Server 2008 - that is not free OS.

Illustration

However, now there is Hyper-V Server 2008 to cover free virtualization market. It is based on Windows, but its not windows as we know it - there is only command line interface available. There is no possibility of any configuration on the machine it self. You need another machine with Windows Vista or Windows 2008 in order to manage it. I do not find this a big issue since if you need virtualization, there is great chance that you have more than one computer anyway.

There is option of managing everything with script files but that is not so nice solution as having MMC on another computer. Even if you choose graphical path there are some manual steps required for everything to work, or you can run a script that will enable all for you.

As you can see, there are some configuration issues to deal with but once you get it running, this one is great. If you have lot of Virtual Server / Virtual PC images, just make new machine and add existing disk (or use a import tool). Do not forget to uninstall old Virtual Server Additions and to install new Integrated Services in order to get best performances.

If you used other virtualization tools (VMware, VirtualBox…) there is no real need to switch. But if you used Microsoft’s virtualization before, give this one a try. It is free.

Google Sync

Illustration

If you want to use Google Sync to synchronize your mobile phone with Google’s address book and calendar, you will probably have problem with fact that upon synchronization, your mobile phone’s content will be deleted (both contacts and calendar items).

I personally use my mobile phone (HP iPAQ 514) as most up-to-date storage of contacts so I had a big problem with that. However, I decided to give Google Sync a try. In whole process it cheated a little in order to preserve all contacts (and calendar items).

Please notice that while this whole procedure worked fine for me, you may not be that lucky. Perform backup!

Step 1

First we need to copy pim.vol file from root directory of your mobile phone. This is place where most of your PIM data is stored. Before coping that file, you may want to turn off and on your mobile phone in order to flush all data in cache. This file is write-cached to enhance performance and to avoid wear-and-tear of underlying flash. Save that file to SD card - we will need it again later.

Step 2

Synchronize with Google Sync. Instructions are at Google’s site and I will not repeat it here.

Step 3

Once synchronization is done, you will notice that your contacts are gone and replaced with those defined at Google’s side. Now it is good time to turn off your phone, turn it on again, and copy pim.vol (one your stored in step 1) over pim.vol in root directory. If you get a message that file is in use, wait a little and try again. Once file is copied, turn off your phone and turn it on again. At this point, you should have all your contacts back.

If you synchronize now, all your contacts will get recognized as new and transferred to Google. From this point on, your phone is synchronized.

Quick VHD Install

Illustration

I already wrote about installing Windows 7 (and their Windows 2008 R2 cousin) into VHD (Virtual Disk) file, but there is a quicker way of doing it. You don’t even need to go through installation process.

On MSDN, script appeared that does conversion from .wim files to VHD. As you may know, .wim is extension of Windows Imaging Format that serves as installation image from Vista onward. This script just reads this file and using native Windows 7 VHD mounting (yes, you need to have Windows 7 for this) creates new virtual disk with Windows installed inside of it (only Windows 7 and above). This speeds things considerably since there is no booting inside installation, loading it’s drivers or even answering any questions (for that you need to use unattended answer file).

This tool has much more possibilities that described here (e.g. applying of patches) but I will go only into installing base system.

Creating virtual disk

In order to create bootable windows you can call script (in elevated prompt - administrator rights are required):

cscript.exe WIM2VHD.wsf /wim:X:\sources\install.wim /sku:ULTIMATE /vhd:"D:\Virtual Machines\Native\Windows7.vhd" /size:20480 /disktype:Fixed
...
INFO: Inspecting the WIM...
INFO: Creating a Fixed VHD. This can be a time consuming process...
INFO: Configuring and formatting the VHD...
INFO: Applying the WIM... [ 100% ] Applying progress
INFO: Making the VHD bootable with BCDBoot...
INFO: Unmounting the VHD...
Summary: Errors: 0, Warnings: 0, Successes: 1 INFO: Done.

Notice that here X: is Windows 7 installation disc (or Windows 2008 R2, works the same).

Only required parameters are /wim and /sku, but I wanted to include /vhd, /size and /disktype in order to make same .vhd file like in original post. Do be carefull since it overwrites without any questions.

If you are wondering how to find which /sku value you should use, you can check which ones are available with:

cscript.exe WIM2VHD.wsf /wim:X:\sources\install.wim
...
************************************************************
Error: 0: The supplied WIM does not contain a(n) "UNSPECIFIED" image.
Possible images are:
HOMEBASIC
HOMEPREMIUM
BUSINESS
ULTIMATE
************************************************************
...

Booting

In order to boot from this disk image, you need to work a little with bcdedit. I will not describe it here since it is same procedure as booting from any other VHD file. For booting inside of Hyper-V or Virtual PC, there is no need for any action other that attaching VHD to virtual machine.

Something else

Don’t forget to install Windows Automated Installation Kit. If you do forget, you will get rather unhelpful message (Error: 0: No filePath was specified. This file was marked as critical.) and script will refuse to do any work. This same message will appear if imagex.exe cannot be found (usually at C:\Program Files\Windows AIK\Tools\amd64 or C:\Program Files\Windows AIK\Tools\x86). Just put it in PATH environment variable and you will be fine.

Is it any good?

Whole process took around ten minutes. Installation step took only four minutes (rest was creation of fixed VHD) which is much faster than DVD based installation. It does leave you at Out of Box Experience (some five minutes more), but if you really need speed, you can prepare answer file and that step is gone.

If you need to install Windows 7 into VHD (not only on your native system but also for use with Hyper-V or Virtual PC) this is a way to go.

[2009-05-13: Updated with Windows 7 RC links]

Fixing Bootable VHD

Illustration

I have installed Windows 7 to VHD (Virtual Disk) file a while back now. I did like it, so I killed Vista and decided to install Windows 7 on my primary partition also. During installation of it, I formatted boot partition. Unfortunately, that also killed any possibility to boot into Windows 7 system within virtual disk file.

In order to boot from this disk image, some play with bcdedit is needed (in elevated prompt). First we need to discover identifier of our original installation (marked red in following text). Once we have it, we can make a copy and perform all further editing on newly created entry (marked blue). Then we set device and osdevice settings. With that step, we are ready for booting. Here are exact commands that worked for me:

C:\bcdedit /v
...
Windows Boot Loader
-------------------
identifier       {2fae45a6-f1ca-11dd-bde6-c5438ada3082}
device           partition=C:
path             \Windows\system32\winload.exe
description      Windows 7
locale           en-US
inherit          {6efb52bf-1766-41db-a6b3-0ee5eff72bd7}
recoverysequence {2fae45a7-f1ca-11dd-bde6-c5438ada3082}
recoveryenabled  Yes
osdevice         partition=C:
systemroot       \Windows
resumeobject     {2fae45a5-f1ca-11dd-bde6-c5438ada3082}
nx               OptIn


C:\bcdedit /copy "{original_id}" /d "Windows 7 VHD"
The entry was successfully copied to {2fae45a9-f1ca-11dd-bde6-c5438ada3082}.

C:\bcdedit /set "{new_id}" device "vhd=[D:]\Virtual Machines\Native\Windows7.vhd"
The operation completed successfully.

C:\bcdedit /set "{new_id}" osdevice "vhd=[D:]\Virtual Machines\Native\Windows7.vhd"
The operation completed successfully.

C:\bcdedit /v
...
Windows Boot Loader
-------------------
identifier       {2fae45a9-f1ca-11dd-bde6-c5438ada3082}
device           vhd=[D:]\Virtual Machines\Native\Windows7.vhd,locate=custom:12000002
path             \Windows\system32\winload.exe
description      Windows 7 VHD
locale           en-US
inherit          {6efb52bf-1766-41db-a6b3-0ee5eff72bd7}
recoverysequence {2fae45a7-f1ca-11dd-bde6-c5438ada3082}
recoveryenabled  Yes
osdevice         vhd=[D:]\Virtual Machines\Native\Windows7.vhd,locate=custom:22000002
systemroot       \Windows
resumeobject     {2fae45a5-f1ca-11dd-bde6-c5438ada3082}
nx               OptIn

If you moved image from another system and you with to boot from it, you may also need to turn on HAL detection:

C:\bcdedit /set "{new_id}" detecthal on
The operation completed successfully.

At this point, there is nothing more to do. You may restart and boot into your favorite VHD.

[2009-05-17: Adjusted bcdedit commands so they work both in cmd.exe and in PowerShell]