Rule Number One
I got into discussion with friend about best practices when it comes to designing things around PIC micro-controllers. One that we agreed on was to never, absolutely never use ICSP (in-circuit serial programming) pins for anything other than connecting to PIC programmer.
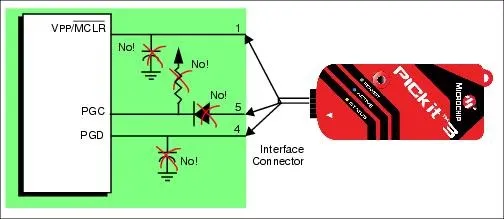
Yes, I know that there are things that you can connect safely to those pins while having them functional as far as programming goes. Yes, I am aware that I am talking about two-and-half perfectly good I/O pins (PGC, PGD and MCLR). Yes, I am probably overreacting. Taking all into account, I still stand by my recommendation.
I know how it goes, first PGC and PGD are left alone. As design develops, we seem to be one pin short. No biggie, we just use PGC for a button. Simple button cannot hurt. Then we need status LED, PGD can do that!
As design develops we move pins back and forth and, sooner or later, we end-up with something like pull-up or diode on ICSP. And that spells trouble. I will not even go into how exactly are we to use ICSP for in-circuit debugging if we have to use it for e.g. input button that triggers action we are trying to debug.
I am not saying it is impossible to use ICSP in your circuit. Those pins can serve as excellent last resort. But most of time it is better to go for a bigger gun PIC.
P.S. Yes, I broke ICSP rule fair number of times.
