VHD Install
With Windows 7 (and Windows 8 also) there is one great possibility that was not there before - booting from VHD files (a.k.a. virtual disks). Great thing about that is possibility to install new operating system (works for Windows 7 and Windows 2008 R2) without killing of your original installation (Vista in my case). Unlike installing it in Virtual PC/Server or Hyper-V, here that OS is working on bare metal. All drivers are accessible. It is just like dual boot but without hassle of repartitioning your drive. For more details on how it exactly works, you can take a look at Mark Russinovich’s TechEd lecture about that feature.
As with much of beta features, there is little bit more command line work required for this to work. I found a lot of guides on Internet, but none of them worked for me and most of them included playing with bcdedit which is no longer needed (as of beta 1). It does seem that quite a lot of them was written before Windows 7 public beta and nobody updated them. I will share with you what worked for me as quickest way to do installation without unnecessary steps.
Booting installation
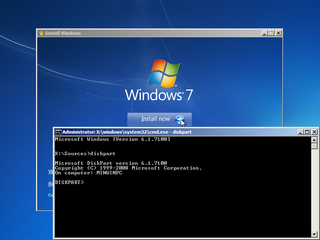
First step is to boot into Windows 7 (or Windows 2008 R2) installation. On installation screen press Shift+F10 and you will be presented with Command prompt. That is our destination for now.
Creating virtual disk file
In this example I will create 20 GB VHD file but you can select whichever size you want.
We need to use DISKPART in order to get anywhere.
DISKPARTCREATE VDISK FILE="D:\Virtual Machines\Native\Windows7.vhd" MAXIMUM=20480 TYPE=FIXED
SELECT VDISK FILE="D:\Virtual Machines\Native\Windows7.vhd"
ATTACH VDISK
EXITBecause of some weird reason (or bug), creating virtual disk file (CREATE VDISK) with path longer than 14 characters kept failing with “The pathname for a virtual disk must be fully qualified.” error. Workaround was to create VHD file at root (and choose short file name) and move it to desired place afterwards. Other commands (SELECT VDISK and ATTACH VDISK) do not mind long file names, so rest of procedure is just fine. [2009-01-22: As I was informed, problem is in using “Windows” as part of name. If you select name without that word, everything goes fine]
Although CREATE VDISK creates dynamic disk (extends as needed) by default, I use fixed since performances are slightly better and Windows 7 tends to extend dynamic disk anyhow to its maximum size during installation. Please notice that CREATE VDISK step will take quite a while if you create fixed disk so be patient (or go with dynamic one).
You could use already existing virtual disk file but there are some reports that it has problems with Virtual PC/Server generated files. Cannot confirm that since I haven’t tried that my self. I did tried one already existing fixed Hyper-V virtual disk file and it worked without problems.
Installing
After attaching virtual disk file we can continue with installation. I saw some guides going through BCDEDIT in order to set some parameters but there is no real need (at least with Windows 7 beta 1) for it.
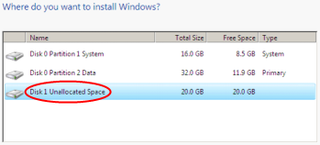
As install type select Custom and you will get drive selection among which virtual disk file is also visible.
There will be small warning at the bottom that says “Windows cannot be installed to Disk X Partition Y”. This may seem troubling but as you take a look to details, there is slightly different wording of message. It says that it “may not support booting to this disk” through BIOS. Since we are not going through BIOS booting process (remember, this is just file on disk), we can just safely ignore this message and click on “Next”.
Installation will then go as usual and after some time and few restarts, your system will be ready for usage.
[2009-05-05: Clearing up some issues]

