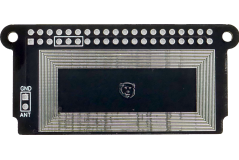
Longwave Fun (part 1; aka HAT)
This is a part 1 in my WWVB time signal series (part 2).
I have been aware of “atomic” clocks and watches for a while now. Those devices rely on WWVB signal (at least in USA) for occasional time synchronization. Between two synchronizations they depend upon a standard quartz crystal to keep time. This allows for decent accuracy almost assuring time is always within a second of precision.
So, this year I decided to jump on that particular band wagon with a Casio Lineage watch. And I was immediately hit by a disappointment. While watch itself was exactly what I wanted, I simply couldn’t get it to receive and decode WWVB signal during the day. Night was slightly better and I could get it synced in the wee hours. And yes, night-time synching is what watch does anyhow and for any normal person that would suffice. But me? I wanted to play with it.
So I went searching for a WWVB transmitter. And it took no time to find Radio time station transmitter by HennerZeller. It worked wonderfully using nothing more than three resistors and a loop of wire. Instead of leaving the perfection alone, I decided to mess a bit with it.
First of all, I decided to put all components of HennerZeller’s design onto a PCB. Already with this change things got even simpler as the only external element was the antenna wire. So I attempted to remove even that using PCB trace. And here comes the first issue - if you want to make a proper antenna for WWVB at 60 kHz, you need quite a long trace. About 1.25 km for the quarter length. A bit too much for a PCB.
However, same principle as in the original design applies. If you’re ok with making a really bad antenna, any loop will do. And bad antenna has unexpected benefit - it will limit range of transmitter. Since we want to keep emissions under 40 μV/m as measured at 300 meters in order to keep FCC happy, having an imperfect antenna is really a good thing. Moreover, since watches were designed to work with weak signal, better antenna might cause issues at close range.
It did take me a few tries to figure out the exact geometry to make it work. I found that 13 loops in rectangular area allows for up to 10-20 cm (4-8 inches) of working distance. If more distance is required, PCB also includes a connector for external antenna. While transmitting longwave is troublesome, one could look into a loop stick or even a spiderweb antenna.
When it comes to PCB, one thing that immediately grabs attention is its wonky shape. Overall dimensions were clear to start with as I wanted to match Raspberry Pi zero footprint. And as long as one makes 65x30 mm rounded rectangle PCB, you have it. Since full size Raspberry Pi can take smaller boards, one would think that there’s no need for messing with it further. Until you try to put it into the official Raspberry Pi case.
Due to how the official Raspberry Pi case connects together, rectangular PCB hits side pillars and prevents it from closing. Further more, there is a camera connector underneath it so notch is needed to allow easy routing. Due to both these issues, the actual PCB got a few curves and a slim down on sides where it would interfere thus giving it the final shape.
The end result is a WWVB transmitter fully compatible with HennerZeller’s design and software fitting nicely into an official Raspberry Pi case.
PS: While this device complies with FCC rules for low power transmitters, that doesn’t make it legal in every other country. Do your research before using it._
PPS: If you’re interested in building your own, you can grab source files from GitHub or purchase kit here.
